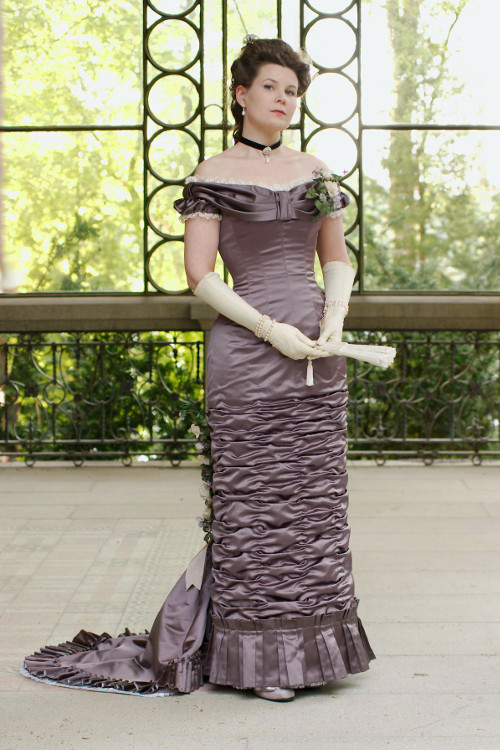
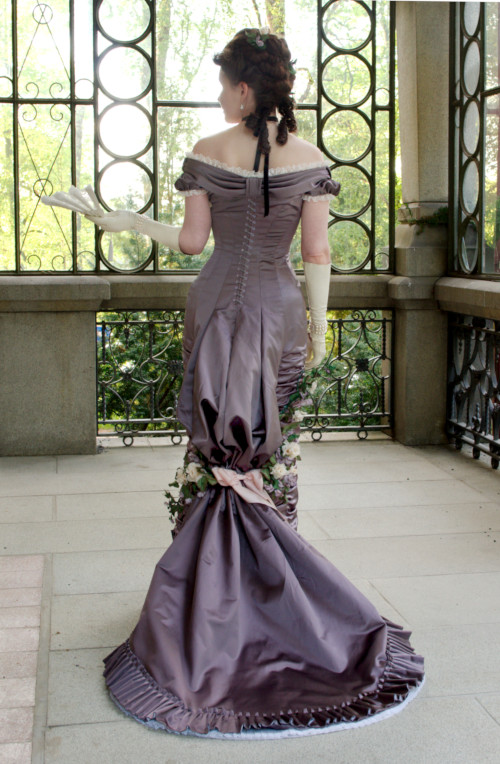
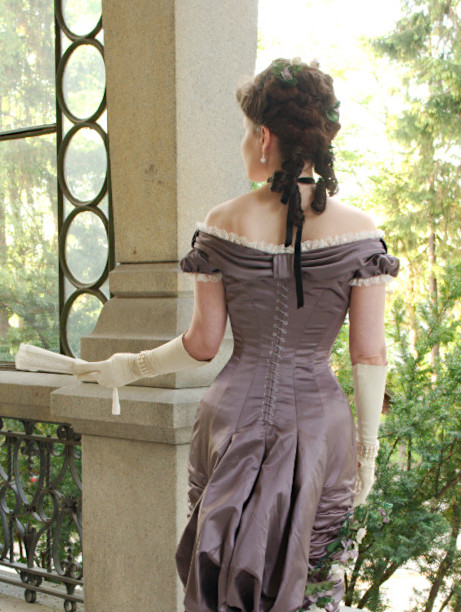
Ballgown, 2017-2018
1870s with the elegant silhouette and sweeping trains bedecked with feminine ruffles has always been among my favorite fashion eras, or at least ever since I saw Martin Scorsese’s film “The Age of Innocence” at a tender age. When I began making historical costumes years ago I started with another all time favorite of mine, the 18th century, and then friends introduced me to SCA and the chivalrous lure of late medieval, both of which together kept me fully occupied for some years. I still have many plans and dreams for both these eras, but at some point I noticed that my restless mind kept wandering towards Victorian aesthetics and suddenly I had Pinterest boards filled with 1870s fashion plates. I had vague plans of beginning, at some point, with some simple day dress, but kept moving the plan forward because all other stuff I was working on.
The final push over the edge came with Prior Attire’s Victorian Ball. Several of my friends were going, and Bath itself is a place an anglophile 18th century enthusiast must see at least once. So, we purchased tickets for the Ball, and then I was faced with creating a ballgown with all the underwear and accessories required. The one thing I did have were gloves (which is actually not a bad thing to start with as most antique gloves tend to be too small for me). Farewell to the simple day dress, let us jump straight into the deep waters with an elegant ballgown!
When I began with 18th century years ago I did not really know that much about it, but that did not bother me so much and I set on with an optimistic attitude of making something pretty that would look more of less right on the outside. Now, beginning a new era I was painfully aware of how little I knew, especially as with a later era there is so much more original garments, sewing manuals and other sources remaining. Besides, victorian garments tend to be amazingly finely finished. This combination did not make beginning easier. Finally I managed to half convince myself that I would just have to begin somewhere, one generally learns while working and there will always appear problems that you did not anticipate. Also, learning and problem solving are a satisfactory parts of the hobby even if it sometimes means the outcome will not be perfect this time.
I had for some time collected images of fashion plates, and while at first I had considered the puffy bustles of early 1870s my preference had shifted to the later Natural Form-style. Choosing it would also save me the trouble of making a bustle. I also wanted my first dress to be relatively simple, as I was only beginning with the patterns and look of the new period, and did not want to hem 30 meters of silk organza just to find out that the finished dress fit terribly or did not look even faintly period other ways.

The Material
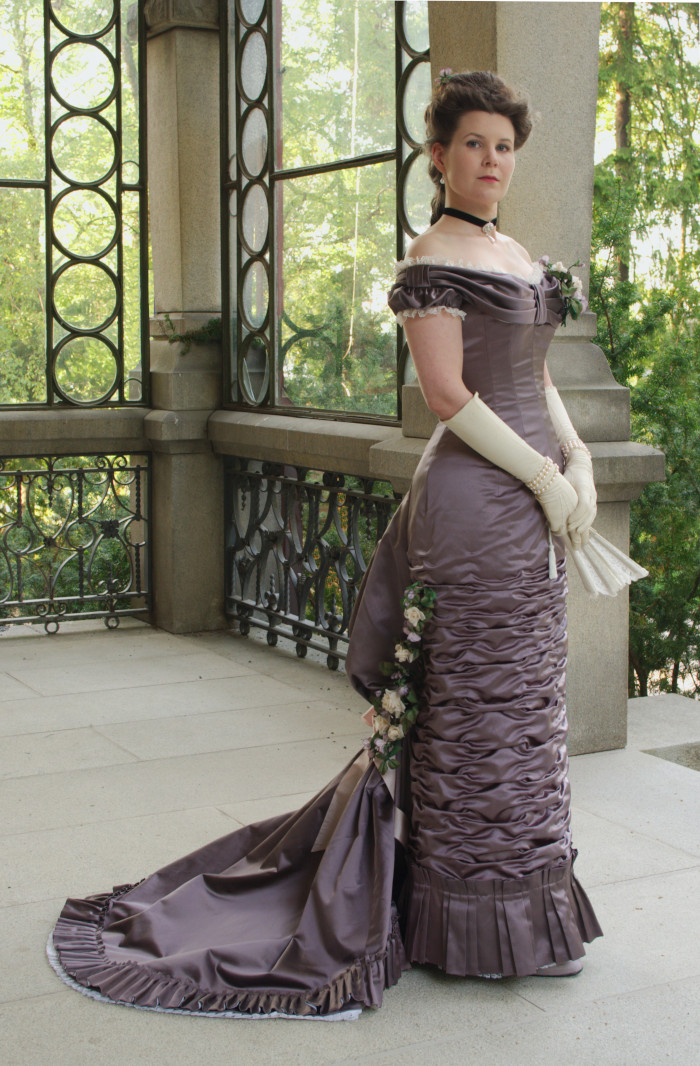
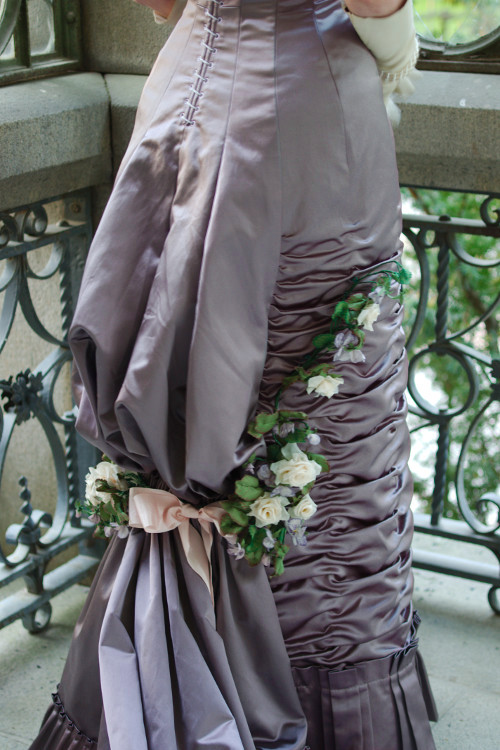
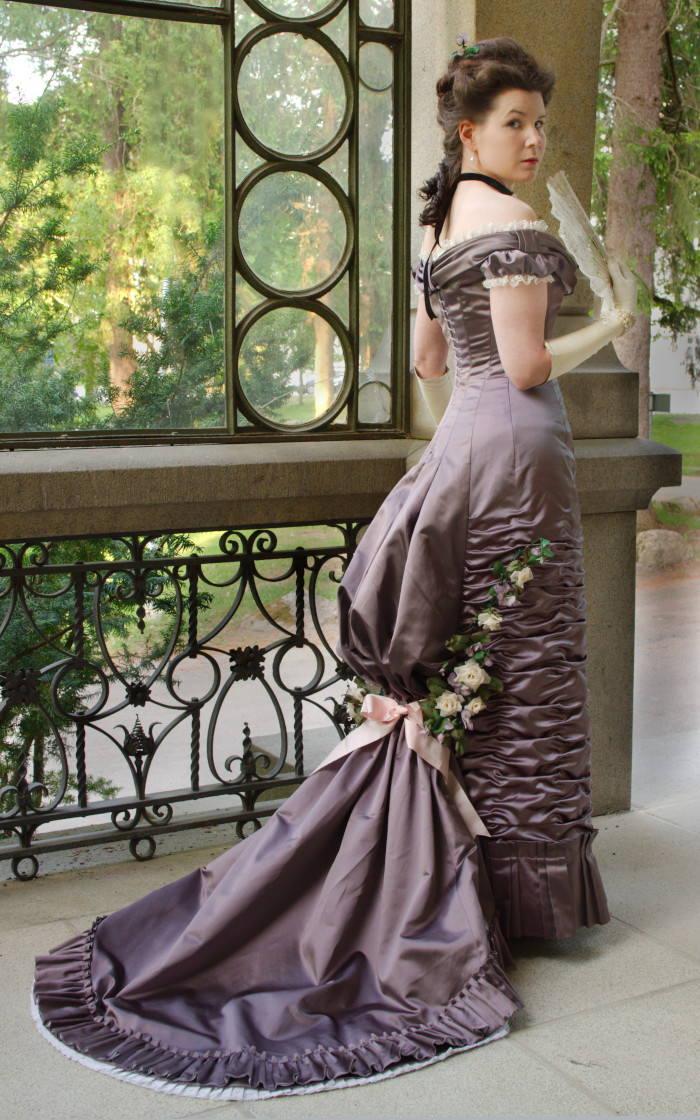
For the same reason I went with a modest budget. I found from my stash a cotton-poly blend satin I had originally vaguely pictured for late 18th century, but never got to that particular project. It was a dusty lilac that looks almost grey in some light, and I fancied that it would go for a refined victorian look, though a ball gown might not be quite the best use for it. (Ladies magazines of the period list shades of violet among those that don’t look good on gaslight, therefore not the best choice for evening wear, and the same can be said about modern warm toned electric lights). But then again, a subdued violet is a very suitable color for a middle aged married lady, under which category I fall within the standards of time. Anyway, I liked the color and wanted to do something with it.
The satin was in three pieces, the smallest of which I had found later in a sale bin. There largest one had a bad stain that I didn’t manage to get rid of. Even so, I thought that if I cut carefully I might just be able to get a simple trained evening dress out of it.
Choosing
the style
The material played a large part in choosing the style, as the rather heavy satin would not work in frilly designs but rather needed something simple and more sculptured. I could, of course, have combined it with some lighter material, and I did consider this for a while, but then I decided that a relatively simple satin dress that could be further decorated with flowers would be a safe choice. After some thought I picked three different fashion plates which I liked best.
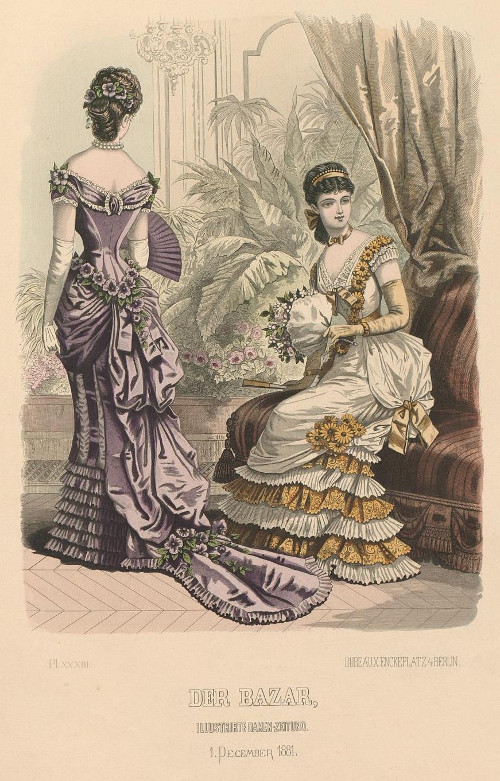
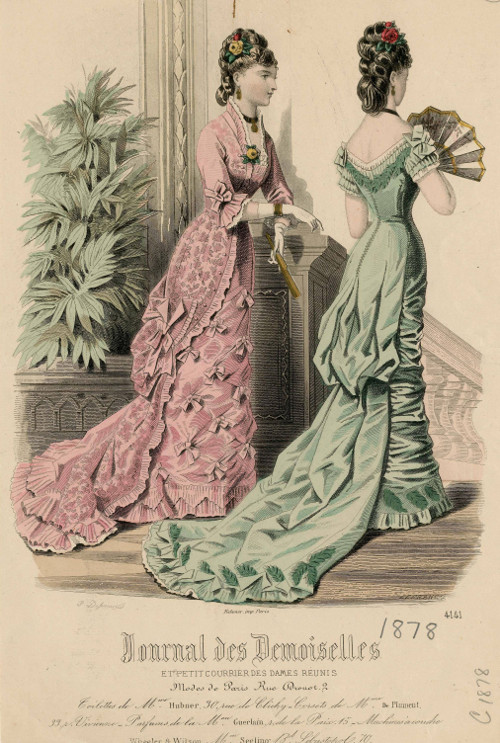
On the first plate’s lilac dress (Der Bazaar 1881) I loved the color, bodice cut and the flowers, on the light green one one another (Journal des Demoiselles 1878) the fabulous skirt shape. I also thought that the ruching on the front skirt of the latter would look nice on the heavy, shiny satin.
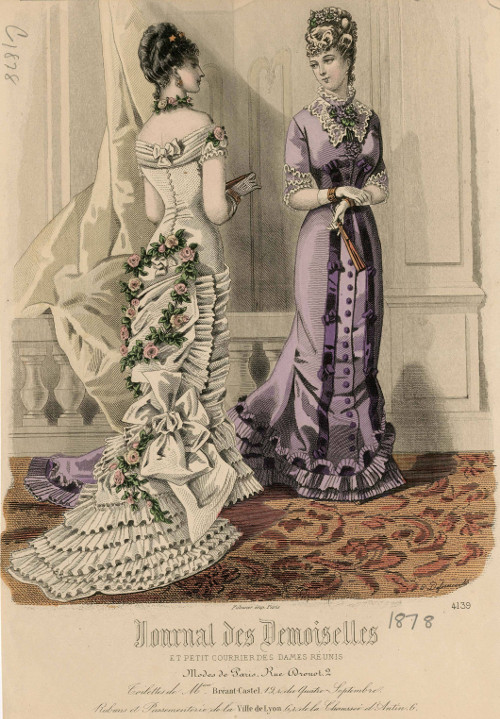
The styles are a few years apart, but then there was the white dress (Journal des Demoiselles 1878) that has the off-shoulder bodice a bit similar to the lilac dress and a skirt not far from the green dress, decked with ruffles. It also has the flower wreath.
The
Pattern
After making the corset I began to draft the dress pattern. I decided to draft a basic bodice pattern first and then make a low-necked version. I had just gotten my copy of “Fashions of the Gilded Age” (Frances Grimble), which contained instructions for a period bodice pattern drafting method (The Complete Guide to Ladies' Garment Cutting, Henrich Klemm 1883), so of course I had to try it.
Well, I noticed quite soon that while the Klemm method was interesting to learn, but it simply did not work on my body. It was made for a considerably shorter person (which is very logical), and the front width was really wide. I abandoned the pattern midway and went back to my original plan, which had been to alter my modern basic pattern to a period shape and match my corseted measurements.
This actually worked out quite well. The main difficulty was getting rid of the bust dart, but the curved front seam and a mock up helped. The Klemm bodice pattern also ended at the waistline, while my modern pattern was drafted to hip level, which has to fit well on a Princess-cut dress.
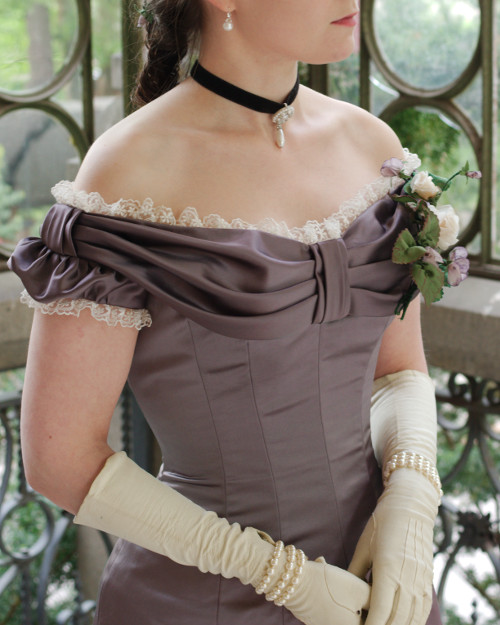
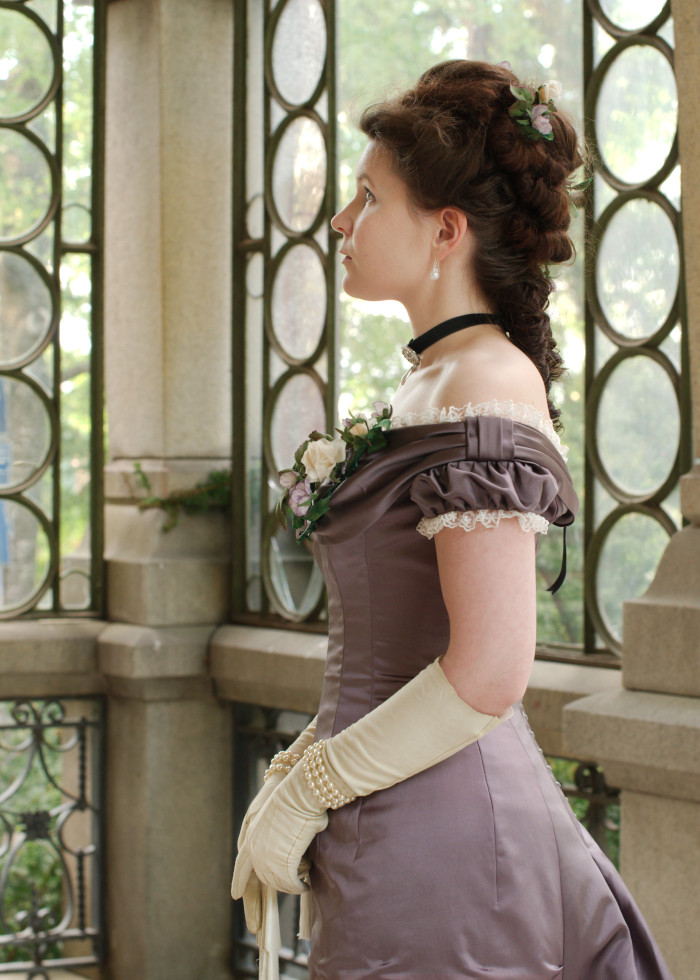
The off shoulder ballgown bodice needed a bit more work and mock up fittings. Of course for a beginner it would have been a safer choice to pick a turn of the 1880s style with shoulder straps, but the earlier off shoulder neckline was one of the things I absolutely wanted for my ballgown. I have always loved the look, it helps a lot to create the hourglass shape and would hopefully balance my shapely hips.
The tiny puffed sleeve’s pattern more or less followed GOTGAs (Fashions of the Gilded Age) ballgown sleeve patterns. The satin top layer is supported by a shorter and narrower lining which keeps the sleeve in shape. I made a few mock ups until I was fairly happy with the shape. I also made a bias cut mock up of the Bertha draping to see roughly how much material I would have to use.
The dress skirt pattern was drafted laboriously by trial and error, and during this stage I seriously longed for the simple pleated lengths of 19th century skirts. I maniacally scanned my pattern books (FOTGA, Arnold) for Princess and Polonaise patterns and made several mock ups.
I thought the “Fan skirt”-pattern (FOTGA, page 155) would be a good base for the skirt: narrow front and a wide back piece gathered at about knee level. The extra back width pleated to the waistband in the pattern would go into large pleats at the bottom end of bodice back seams, and would be puffed with an arrangement of vertical and horizontal tape ties. I added some extra length at the puffed part to be pleated on the side seam on the mock up.
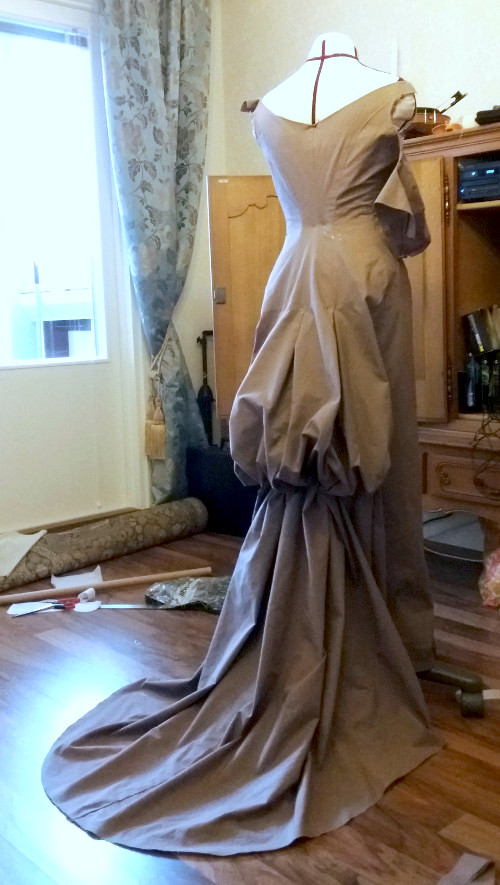
The first mock up revealed that I had been over-generous with the material, not only the puff was too wide but also the train didn’t really need any extra width. I thought that with the rather heavy material the puff could well be a bit smaller than on the light green fashion plate dress, especially as I was short on material. At the pattern making stage I was still mentally prepared to find a new fabric if the patterns would not just fit.
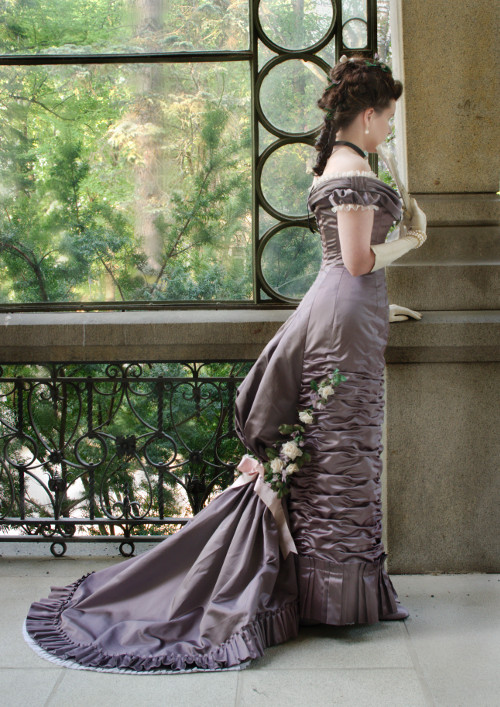
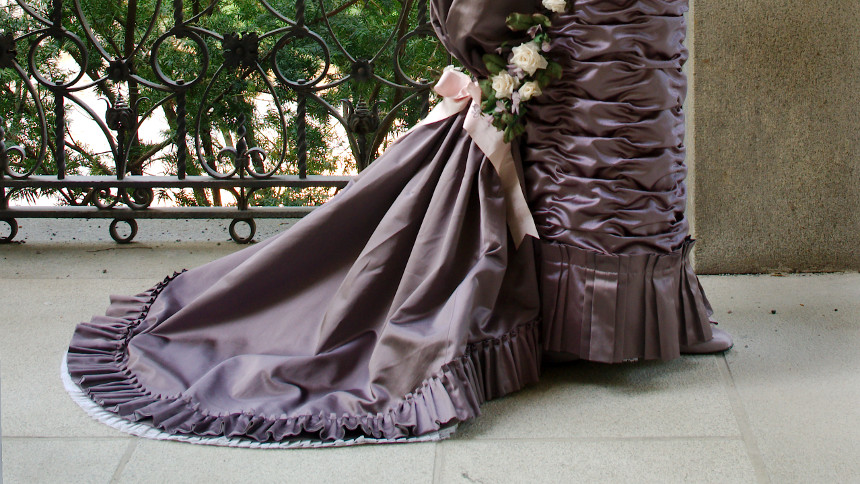
The green dress has a long, straight, almost squarely cut train. I liked the fan shape more, however, so when I was happy with the train width I shaped the edge rounded.
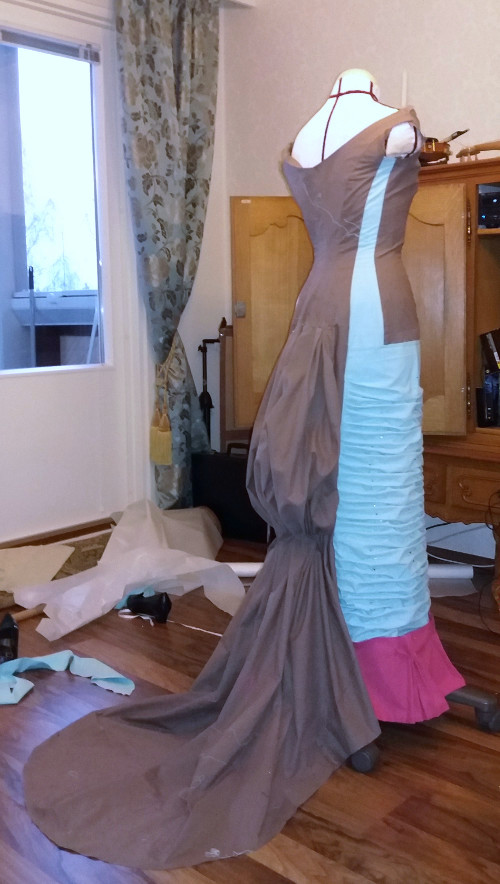
The front skirt ended up almost surprisingly straight and narrow. The front was easy to get right, but at the side back the back puff and ties pulled the side skirts to unseemly wrinkles although I tried to loosen the ties. At last I realized that I should instead move the puffed part further back. I added an extra seam on the back, widened the front skirt to reach further back and turned my former side seam to a long underarm dart. In the picture this alteration is easy to see as I had to add an extra piece of differently colored material.
This alteration fixed many things: The back puff looked somehow nicer, the hip area looked lighter in general and the narrower gathering line kept the train in place better. The Natural Form shape of pencil-narrow front and sweeping back began to emerge from the mass of old sheets.
I also tried out the front skirt ruching with pins. My guess on how the ruchings and pleatings on fashion plates were made was to baste the top fabric on a foundation layer at regular intervals. After laying my patterns on the material I had calculated that I would have exactly 35cm extra length for the ruching, so I pinned the mock up with this amount. Happily it looked more or less alright.
The front skirts would also need some decoration at the hem. I tried a few different pleating styles but couldn't decide yet which I liked best, so I just decided to leave two pattern widths of about 20cm for it and figure out later what would look best.

Making the
dress
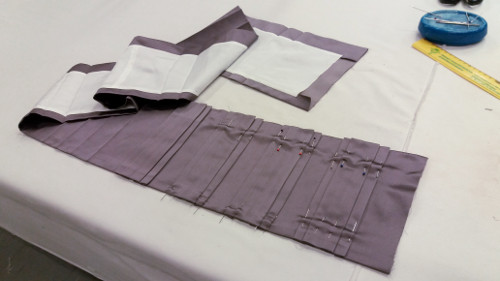
Cutting the dress, finally, was quite an ordeal. I tried several different way of placing the pattern to cut as economically as possible, and if possible to leave enough material for a pleating on the train edge. The train could, of course, be left plain in emergency, but then again some pleating would look nice and help to keep the train in shape by stiffening the edge.
In the end I cut the skirt back pieces just a bit narrower still, cut a joining seam at the back side pieces where that gathering would go (which hardly shows on the finished dress) and finally another joining seam at the center back waist. The latter was not a very good place for a join, even though the back lacing distracts the eye from it somewhat, but then again it made my cutting plan so much more economical.
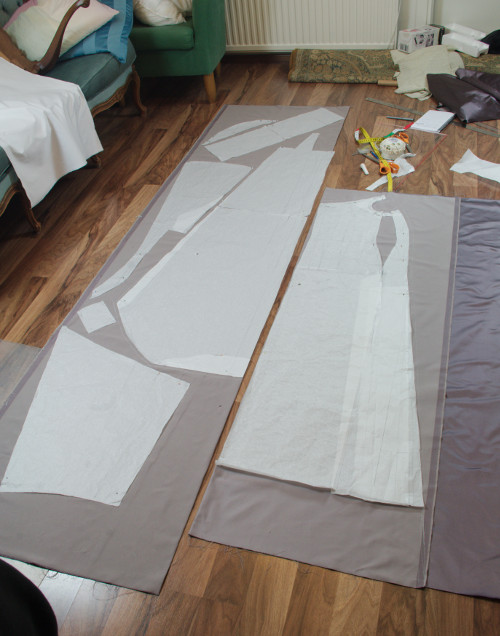
The back tip of the train is also pieced from strips cut on different direction, but that would get covered by the pleating. The hem of the front skirt, also to be covered by a pleating is made of cotton sheet of a neutral shade.
After cutting the main pieces (I left the Bertha draping and pleating strips to be cut later after having calculated I could still get them out of the remaining material) I basted a lot of markings.
The dress construction is a combination of period techniques, modern shortcuts and things that I improvised along the way. This is already a sewing machine era, but while the main seams are machine sewed there is still a lot of hand finishing. Still the use of sewing machine brings the construction logic much closer to modern techniques compared to for example the 18th century Robe a la Francaise, largely fitted on the body and formed by pleats sewn from the outside. The late 19th century of doing things felt very logical to me in comparison, and I realized that when beginning 18th century I had actually tried to do it which much later techniques.
I lined the bodice with cotton twill. Following the instructions of FOTGA I left 1cm extra length at the waist level, which was supposed to prevent horizontal wrinkles. If the waist curve is a very sharp one leaving the lining a bit longer certainly makes sense. My bright idea of sewing the extra length into a pleat so that it would stay even when basting did not prove that great, though. The pleat stuck on after removing the line of stitches and no ironing would smooth it down completely. It very much does show through thee finished bodice. I also think that a bit less extra length would have been quite enough, but there it is.
The bodice lining reaches hip level so that the edge is covered by the hem ruching and the twill reinforces the back puff pleats. On the front piece it’s joined with the skirt foundation layer, a cotton bedsheet material leftover found on the stash. Then I basted the front piece on the lining. I wanted to be rather over-meticulous than other ways, so I basted pretty much everything, the pattern edges, darts and center lines of darts, the vertical lines between them, and horizontal lines on bust and hip level. While basting I smoothed the extra length in the lining to about 15cm space at the waist, but as stated before, there still formed a pleat in at the waistline.
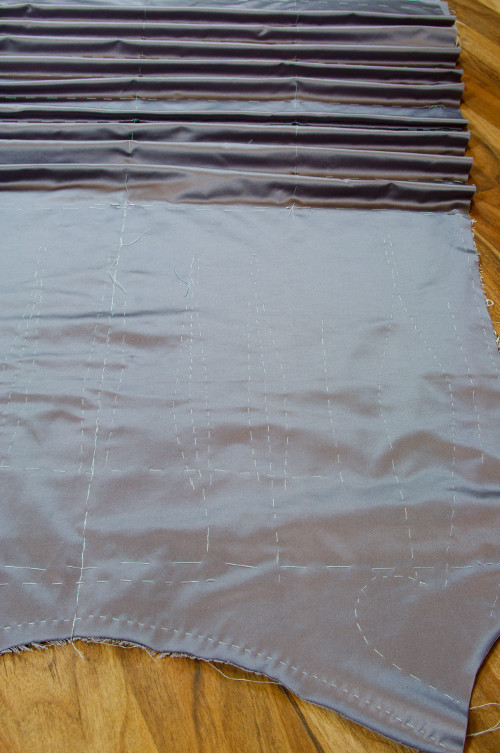
After basting the bodice it was the time for the front skirt. I had basted horizontal guidelines in the satin at 10cm distances, and vertical lines for the mounting lines. There was to be three mounting lines, the center front, side fronts and then of course the sides would be pleated into the side seam. On the foundation layer I marked the center front line and corresponding horizontal lines with a pencil.
I first pinned the satin on the foundation on the basted horizontal lines, careful not to pull the foundation. Then I pinned between the lines and then again between the pinned lines. Then I mounted the satin on the foundation at the basted vertical lines, securing every pleat with a few tiny stitches. For further neatness and security I decided to add yet another set of stitching lines between the original ones. On the side seams I turned the pinned pleats upwards and sewed a row of machine stitch to secure them. I did not want to iron the pleats but rather left them to shape freely between the stitched lines.
As I had hoped, the ruching looked very nice in the thick satin. While I’m not yet sure whether it’s quite right for a period look at least it creates a very nice effect to a modern eye.
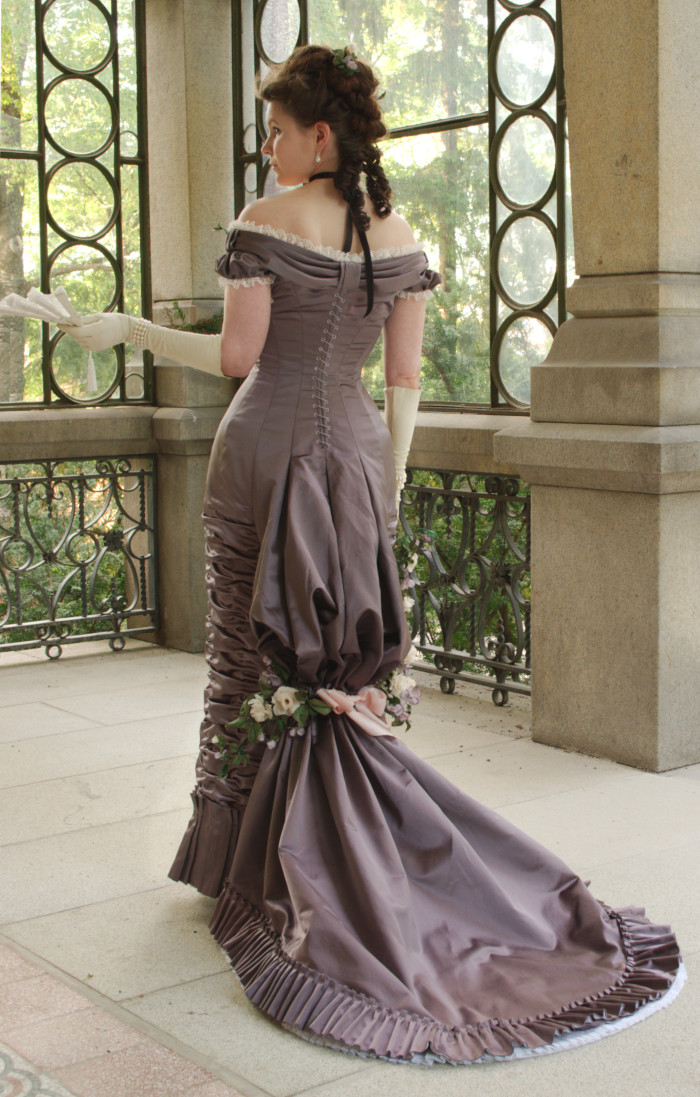
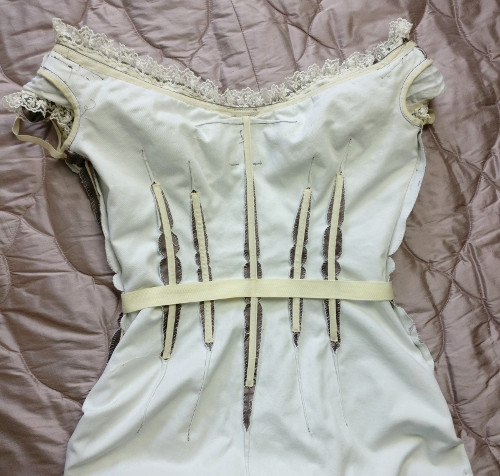
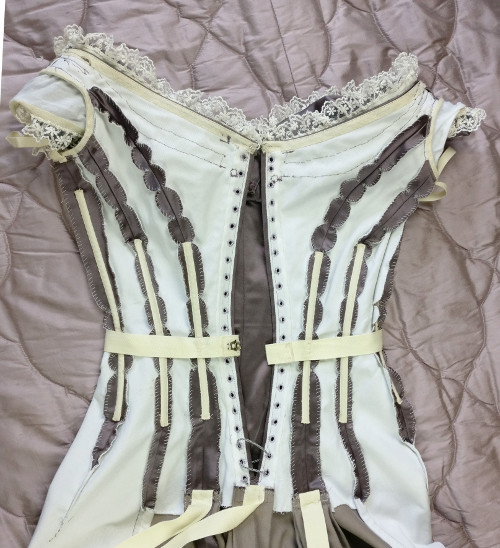
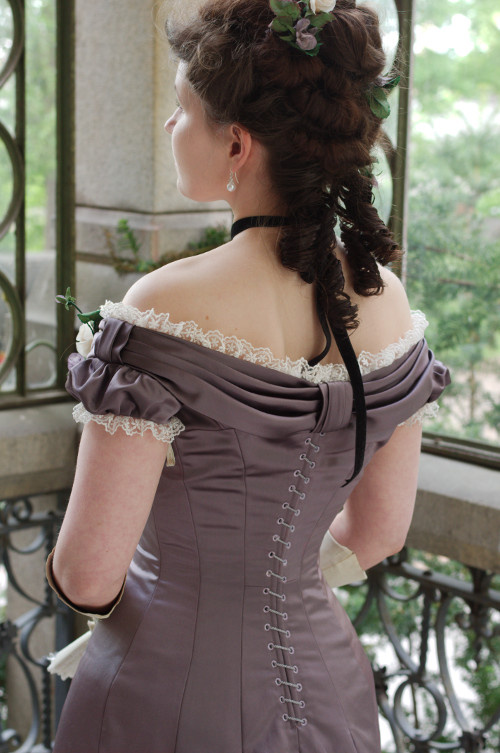
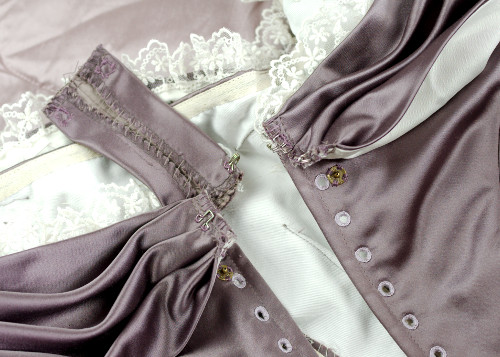
The narrow back pieces were basted quickly on the lining. I began the assembling at the center back seam, the tiny bit of it that there was between the end of the back opening and the opening of the back hem pleats. I turned the back opening edges on the wrong side with a cotton tape, sewed narrow boning channels on the edges and then began to work on the lacing eyelets. I made them already at this point as the final mock up had convinced me that the shape of the back seam was basically ok and the eyelets would be so much easier to make on only the separate back pieces rather than on the finished dress.
The eyelets, 40 in total are spaced 2cm apart. As they would show in the finished dress I tried to get them very neat and even, which was easier said than done as the satin would not give in. As one can easily guess, the finished eyelets pull on the satin. Actually I could have well made them smaller, as my lace was rather thin, which would have lessened the pressure on the material.
After preparing the pieces, sort of, I could start with really putting it together. On the back pieces I sewed first the long skirts seams and then the bodice seams. For the fitting I pinned the back pleats. On the front piece I sewed the darts.
As the final fit of the bodice would be revealed only after shaping the wide seam allowances and preferably even adding the boning I had decided to trust my final mock up with the shaping of the seams, and only leave some room for altering the bodice tightness at the side-back seam and the long underarm darts. So I cut the openings on the seam allowances, cut then rounded and whip stitched them at once after closing the seams before they got a chance to fray. For the last thing I closed the side seam.
At the fitting the dress did look rather promising. As I had anticipated, the bodice was still just a bit too large, but I decided to add the boning and then try it on again to see if it would still require adjusting. I was a bit surprised, though, to see how much extra width there suddenly seemed to be at the back hip line. Perhaps this was more obvious on the heavier material than it had been on the mock up. It was too late to do much about the center back seam, but I took in quite a bit at the side-back seams and managed to get a bit closer fit.
I used spiral steel boning for the bodice. It was known in the period, though perhaps more used in lighter “sports” and riding corsets. It’s thin and flexible and follows curved seams beautifully, so I decided it would be the best choice for my dress.
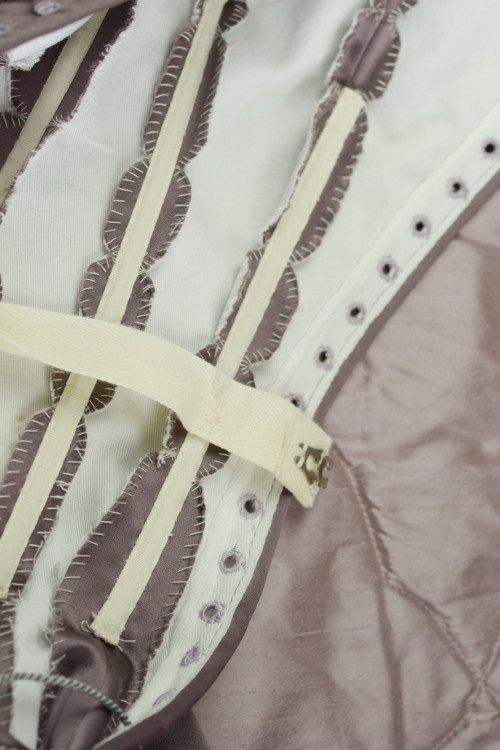
I made boning channels from a folded cotton tape and inserted the bones in them. Then I sewed them on the seam allowances by hand, trying to bend the seam to to shape it would be when the dress was on while sewing. I sewed the ends loosely so they would not pull on the dress material.
At the next fitting I noticed both that the bodice was still slightly too large and that some of the boning (mainly at the front darts) were too long and their ends showed through very unseemingly. There was nothing else to do but to take out the carefully sewn boning channels, shorted the bones and sew then back again. But happily this worked, now the bones were safely covered by the opened seam allowances of the darts and don’t show much on the front side anymore.
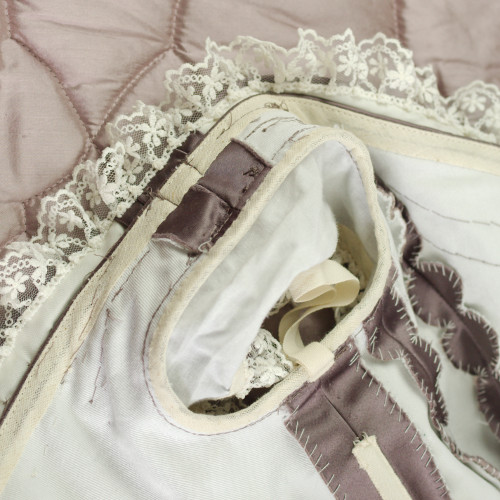
After fixing the boning issue, taking in a few millimeters at the underarm darts and finishing the seam allowances neatly I could finally put on the waistband. Following the example of museum pieces I sewed it on the center front boning channel and at the back to the side back seam boning channels right next to the lacing. This way it’s easy to close with the heavy hook and clasp before doing the lacing. The waistband together with the boning keep the bodice very securely figure-hugging, which is essential in an off-shoulder gown with heavy skirts.
As the bodice began thus take its final shape I closed the so far only basted shoulder seams, and began to assemble the sleeves.
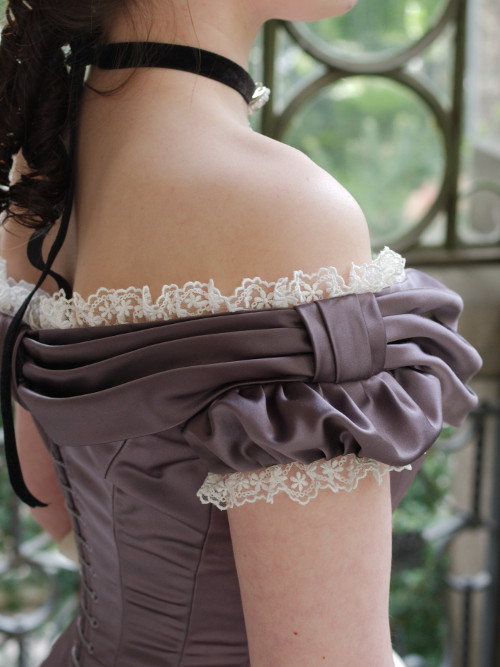
The top satin layer of the sleeve is cut on the bias and mounted into a lining layer, pleated on the top and gathered very slightly on the underarm. From FOTGA I learned to turn the pleats on different directions at the top and bottom edge of the sleeve, which created a very nice effect. I used cotton batiste for the lining, and belatedly noticed that I might have considered something heavier instead, as the sleeve tends to collapse. Of course the fault may also lie on the pattern. However, I finished the sleeve end with a bias tape turned and sewed down on the wrong side. The armhole seam is also finished with bias binding.
To tell the truth I was at this point a bit stressed out and did not have overly much patience with the sleeves. The sleeves themselves are okay enough, but at the fitting I noticed that they seem to pull the shoulder piece downwards so that a large wrinkle appeared at the back armhole. The fact that the lacing was pulling the center back piece shorter did not help at all.
As I said earlier, I had already pretty much finished the bodice in the good faith that it would fit, so the idea of tearing everything open now was not a very pleasant one. I also had an uneasy feeling that trying to fix the problem at this point might change the shape of the pieces beyond what I could take from the seam allowances, and besides, needle marks tend to show in the satin. So, I decided to just try to ignore the giant wrinkle and hope that the bertha would partly cover it. Of course in the end it didn't.
Anyway, now that I had the sleeves on I marked the final shape of the neckline. Since the lacing pulled the fabric at center back I had to raise the top edge a bit higher to cover the corset edge and also add an extra set of lacing holes.
On the front I gathered the neckline quite a bit to follow the bust shape. Then I sewed a bias tape around the neckline and sewed it down on the underside by hand. One of my favorite things about 19th century is that I can use bias tape everywhere, I do use it on 18th century too but I always know it's wrong.
I was still not quite ready to tackle the bertha, so instead I turned my attention to finishing the hem.
I had covered the lower edge of the front skirt with a neutral-toned piece of cotton to save fabric, this would get covered with the pleating. After checking the skirt length I turned the edge under with a 2cm wide cotton tape.
On most fashion plates the ballgown skirts seem to reach ground even at front, but as that would make the dancing more tricky and possibly hazardous I left a few centimeters off the ground. I have also seen this length in photographs, which are often a more reliable source of how people really wore their clothes.
I had decided to line the train with cotton batiste up to the gathered line. It would be a convenient way to finish the hem, look very neat and perhaps even protect the satin a bit from dirt, wear and tear. I cut the lining with the dress pattern only to realize belatedly that I had cut the back parts a bit narrower still to save the fabric and forgotten to fix the pattern, so no wonder that my lining did not quite fit at the first try. Anyway, after fixing it to the right shape I bag lined the train hem and finished the top part of the side seams with bias tape to get them nice and neat.
In the side back pieces I turned the lining over the horizontal joining seam to cover the seam allowances and whip stitched it on. In the center back piece I just turned the lining edge under and basted it on for now, the gathering loops would secure it later.

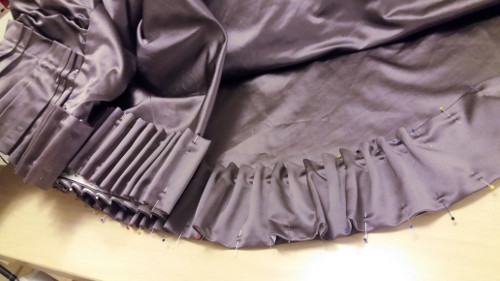
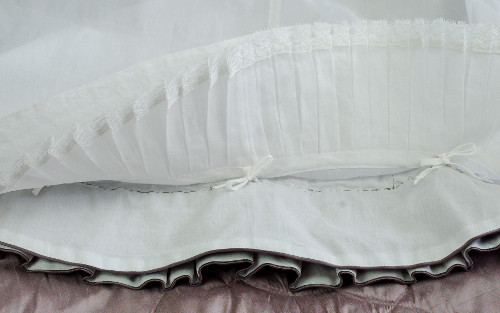
After some thought and experimenting with safety pins I had decided to gather the back skirt with a tape threaded trough a series of thread bars. It would gather the heavy fabric much more elegantly than a drawstring, and would also be easy to open for ironing, folding and packing.
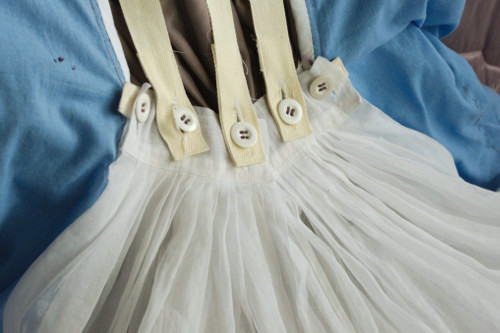
My initial idea of a gathering tape evolved into a sturdy band with buttonholes. I would sew buttons at the side seams, side back seams and center back and secure the gathering, the vertical tapes of the puff and finally the detachable balayeuse with them.

I had tested the right length for the tapes and the distance between the thread bars with a mass of tapes and safety pins. I ended up making the gathering band in two pieces, so I could ease it easily from the middle if I needed to for getting in or out of the dress.
I sewed thread bars about 5cm apart from each other, making sure they were long enough to pass the band through them easily. I sewed the buttons with a very long and sturdy stem to reach through all the fabric layers. When the gathering system was finished I tried the dress on once again and checked the final length of the vertical tapes keeping the puff in shape just to be sure, and then finished their ends and added buttonholes.
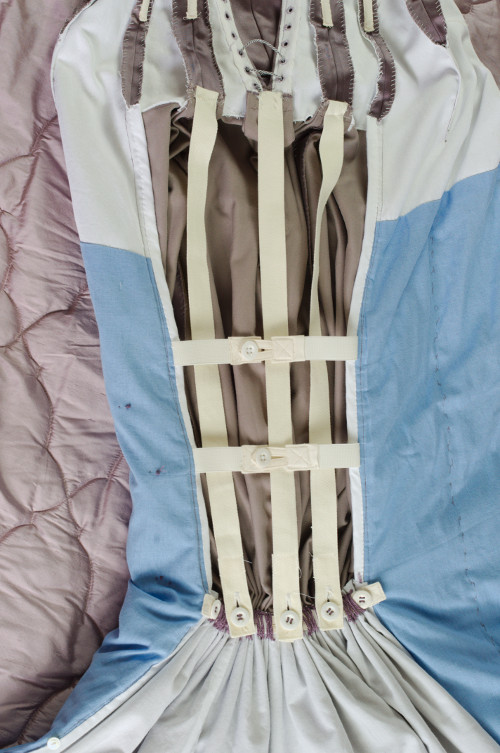
The dress still needed a few horizontal tapes under the puff from side seam to side seam to keep the front and sides of the skirt tightly fitting. Following period advice I made them of elastic band to give them a bit stretch when sitting. Just to make sure I would be able to dress and undress easily, and of course visit the bathroom I made these ties too with button opening, though this actually shortened the elastic part quite a lot, so it was maybe not such a great idea after all. I tested the right length carefully in the fitting, and of course I could in the end manage without opening them, but I guess its never a bad thing to be on the safe side.
In period Ladies magazines you can read half-horrified reactions to the never before seen extreme tightness of skirts and how horribly confining and impractical these new dresses are. I suppose this reaction was partly due to the ladies of the time being used to the freedom of wide skirts, especially cage crinolines, while with my experience of wearing modern pencil skirts I did not find it so uncomfortable. The weight of the train of course made matters a bit more tricky.
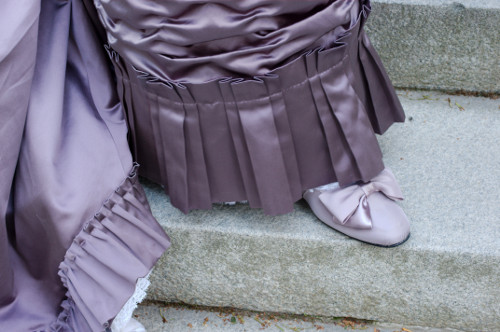
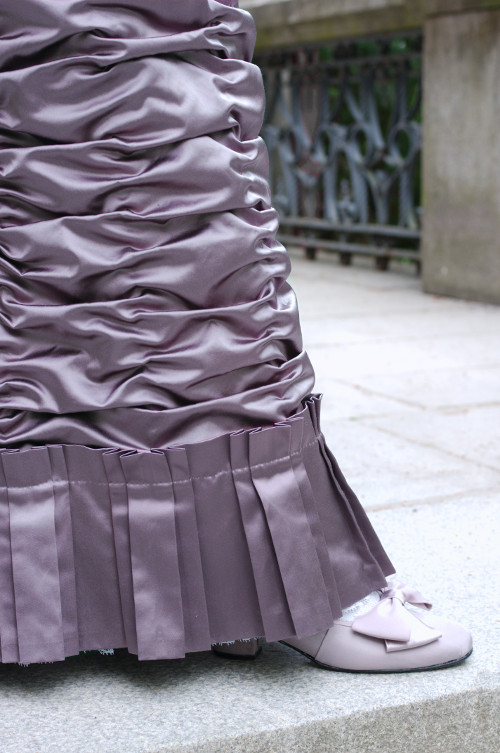
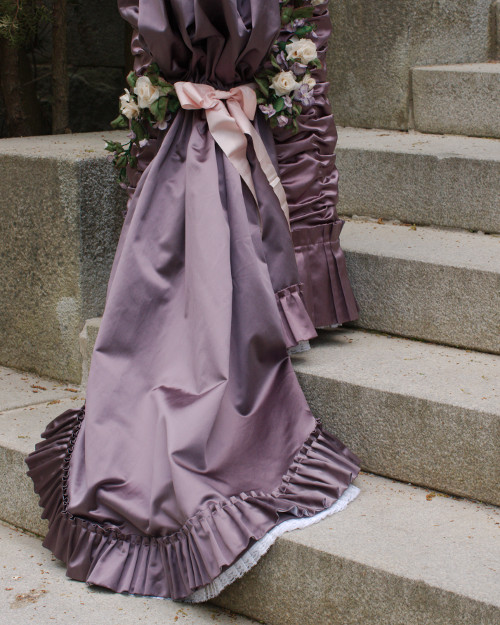
I looked at dozens and dozens of fashion plates trying to decide what to do with the front hem decoration. Finally I decided on a wide double box pleats. I joined pleated strip of several pieces, carefully calculating so that the joining seams would be hidden.
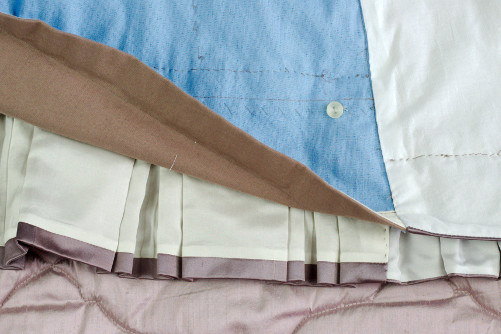
The satin was so thick that I thought two-fold hemming would make the edges look too thick, and besides every inch I could save counted so I lined the strip with a modern thin lining material.
The lining ends at the stitched line at the top and 1,5cm from the edge at the bottom, so from the outside you can't tell its there. I have no idea if they lined pleated pieces or ruffles at the period, but in a thick material it works well.
I pinned and ironed the pleats, basted them on and sewed them by hand with a row of stitches 3cm from the top edge. I rather like the look of the finished pleating, its sharp line gives nice contrast to the soft ruching.
Then I gathered all the pieces of satin I had left and cut them into strips which I joined into a pleating piece roughly twice the train edge length. I lined this too with thin lining material, and managed to get a 10cm wide pleating for the train edge.
I pinned the satin piece into about 1cm wide box pleats. Narrow knife pleats sitting edge to edge, called kilting in the period would have been lovely, but would have needed a strip thrice as long as the edge which was sadly impossible. My small box pleats ended up a bit stiff and would not lie completely smooth, but I'm happy I managed to get at least some sort of train edging to balance the ruched front skirt. For the last thing I sewed the ends of the front pleating at the side seams on the top of the back pleating.
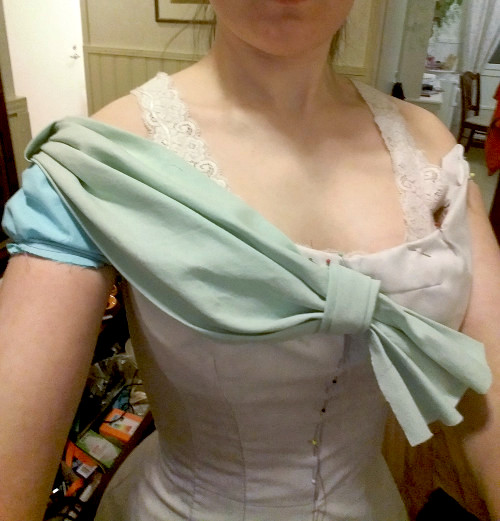
And then I had to tackle the terrifying bertha, whether I wanted or not. I lined the bias cut pieces with modern lining material again (This was a great project for getting rid of all sorts of odd fabric pieces in the stash). Following the lilac Der Bazaar dress I had also cut smaller bias pieces to gather the folded bertha at center front, back and shoulders. I finished their edges with overlock, sewed the center pleats and turned the edges under, joining them with whip stitch.
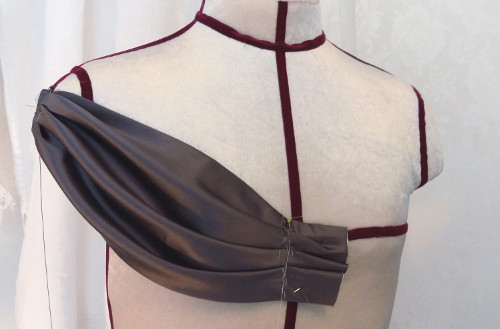
I had neglected to shape and fold the bertha to the final shape at the mock up stage, reasoning that it would be best done with the final lined piece to see how the material really shaped. That might be so, but it also meant that I had a lot of fitting, pinning, basting and beginning from the start again to do now. I could not get the dress on the dummy anymore and when it was on me I could only pin at the front side, and even there the off-shoulder sleeves restricted my arm movements quite a bit. At last I somehow managed to get the bertha nice enough and roughly symmetrical. I sewed the bertha and the gathering pieces on the bodice with machine at places where it wouldn't show and the rest loosely by hand. For the last thing I sewed a running stitch at the top edge and pulled it a bit tight to prevent the bertha flapping out at the neckline.
At the center back the gathering piece is only sewed on at the other side and hides under it hooks and eyes for closing the ends of the bertha. It did took a while to get the closing quite smooth and secure. To fasten the lower edge of the gathering piece I sank to the level of using snap fasteners - I know they were not used for ladies garments yet at the period, but they would make life so much easier for the poor unfortunate wretch who had to help me dress - often my long-suffering husband.
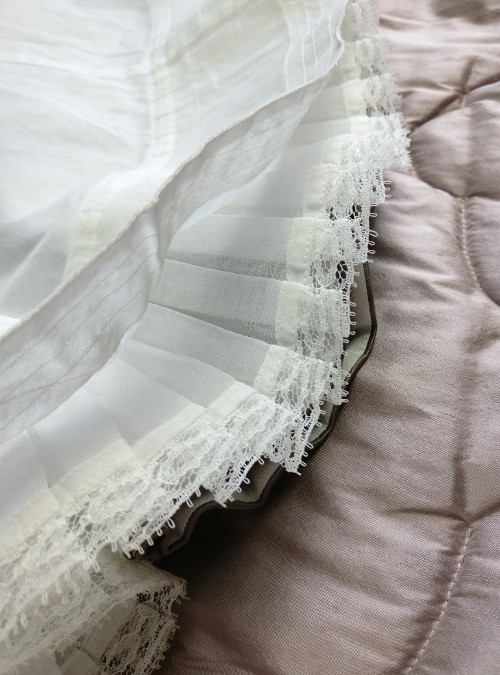
Like mentioned above, I had originally wanted to copy the bertha in the Der Bazaar fashion plate, but when fitting it and pinning on the lace to see how it would look like I began to wonder whether I would like the lace edgings on the bertha and the gathering pieces after all. All the lace began to look a bit stuffy and disrupt the lines of the dress, and draw attention from the beauty of the folded, ruched and pleated satin. Usually I'm very fond of lace, but in this case I decided that less would be more and ended up edging only the top edge of bertha and sleeve ends with a tucker of gathered lace.
The lace is rather modern, but at least its made from machine embroidered tulle ground which was known at the period as a cheaper alternative to real lace. In the tucker it does not steal the show from the simplicity of the dress, but rather gives it a finished look repeated on the balayeuse ruffle at the hem.
It was a huge relief to finally have the dress finished, as I had been rather nervous about how it would turn out and even whether I would get it done at all. There was, however, still stuff to be done before I could enjoy the fun part of waltzing under the chandeliers.
Balayeuse
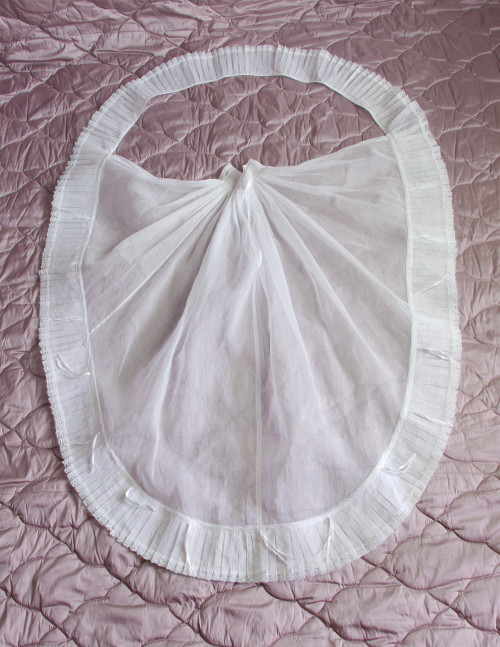
Besides the petticoat (or several) a Victorian lady would add an extra removable and washable ruffle called "balayeuse" to protect the hem of her skirt. I was lucky enough to come across a picture of a detachable button-on layer to protect the train for a skirt very similar to mine. It seemed amazingly handy so I decided to make one, if a bit simplified version.

I had sometime in the past found an Ikea curtain made of cotton organdy, which would be a perfect material for a fine ballgown balayeuse. It even had horizontal pieces of the same material stitched on at regular intervals for decorative purposes, but to me they were a super convenient way to get ready cut strips with ironed edge folds for the pleating. Once I had removed them I noticed that they were not cut straight nor had even seam allowances, but nevertheless I at last managed to turn them into a long hemmed, lace edged and knife pleated ruffle. To add a bit of stiffness I starched it with potato flour.
The rest of the curtain was just enough to cover the train. I hemmed the side edges and pleated the top edge finely to a wide band which would be buttoned on the gathered line. Like the gathering band the balayeuse also opens at the center back if needed.
After finishing the balayeuse top edge I buttoned it on and cut the hem to the final shape. I turned it with 3,5cm wide bias strip of the same material, secured with several rows of machine stitch to stiffen the edge. For the last thing I sewed the pleated ruffle to cover the edge and finished the top edge with narrow bias band, also adding the ribbon ties to secure the balayeuse edge on the dress.
The pleated ruffle also circles the front hem, but there it is only finished with a bias band at the top edge and basted on. On the train I marked the places of the tape ties and sewed small thread bars on the underside about 15cm from each other.
After tackling the dress sewing the balayeuse was really fun and relaxing in turn. It wouldn't really show much when wearing the dress so it didn't have to be super neat. It turned out quite nice and an important part of the dress, however. The stiff, starched edge really helps to keep the train in shape and even keeps it from folding over itself and collapsing into a mess of fabric as long as you remember to properly fan it out first. Despite the nice support the almost weightless organdy does not add to the weight to the train, which is important when you have to hold it when dancing.
While being dreamily sheer and light the balayeuse also does a surprisingly good job in protecting the dress from dirt. It gathered some dust on the ball and both street dust and pollen on the photo shoot, but both times it cleaned perfectly in machine wash and the dress lining remains spotless white still.
Anyway, after finishing the balayeuse I practiced dancing in the dress a bit, tested how to lift the train on my arm and decided placement for the loop hidden beneath the pleating edge where I would secure the loop I would carry in my wrist.

The flower trimming
The last detail in the dress were the flowers. Real or artificial flowers were a popular decoration for Natural Form ball gowns, so I wanted to have some too (artificial ones, that is). The problem was where to get them. Modern fabric flowers tend to look way too plastic, and while I could probably find vintage ones from Etsy of some other corner of the internet they would not come cheap. So, I decided to at least try to make them myself. I had of course made some simple fabric flowers before, and had planned to begin in good time and learn to make flowers for real, but of course with real life and whatnot I left the flowers for the last thing.
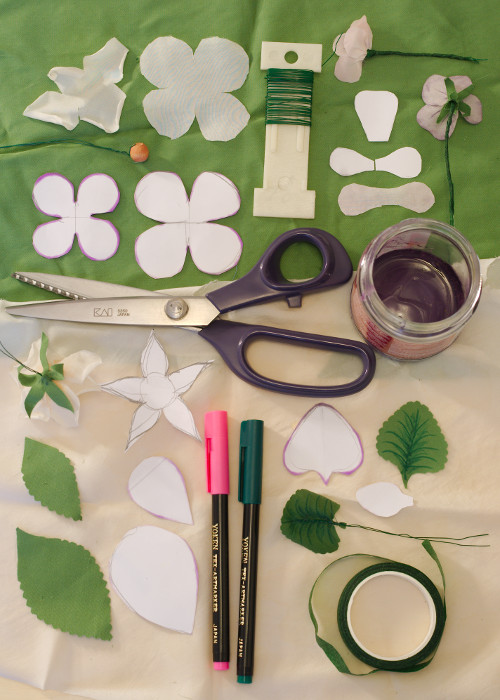
I took some fabric, glue, metal wire, a collection of fabric paints borrowed from a friend and markers of my own and began playing around aided by several tutorials found on Pinterest. Unfortunately most of them tell you to melt the petal edges with a flame, which would not work for me because I wanted to use natural fibers that could be dyed or painted. Another friend had given me a plastic bag full of old silk shirts worn at seams, which I thought would make great material. Happily the silk was rather densely woven at did not fray badly.
I had first decided to make lightly colored lilacs which would match the dress nicely. I experimented with petal shape until I came out with a nice template to cut the petals, then learned to gather them into flowers. I first tried shading the cream white petals with silk paint, which was much more tricky than I had thought and failed to produce the delicate ombre look I had imagined. Then I just painted the fabric with normal fabric paint, though it was a bit too thick for silk, and added darker whiskers with marker. To make sure the edges would not fray in use and also to prevent the flowers from getting pressed limp I sprayed liberal amount of hairspray into the flowers. I had some real fabric hardener liquid too but it proved way too heavy.
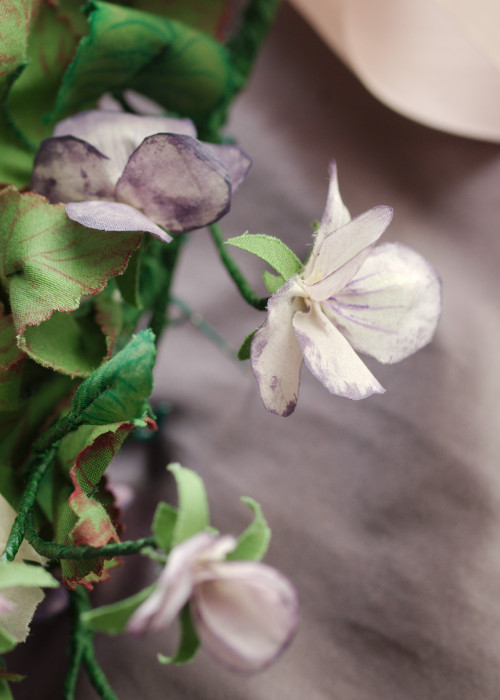
I made up a large number of violets only to realize that next to the dress material they looked way too pale and boring. I thought that darker violet edges would cheer them up a bit, so I painted every single one again by hand. The result is somewhat mottled, but also rather more visually interesting.
Then I decided that the lilacs were rather small and insignificant alone, and the wreath needed a couple of larger flowers as eye catcher. Cream colored roses were a natural choice that would blend nicely into the overall look of the outfit with the lace and gloves.

I found a very good tutorial where a rose is made of several sets of four petals cut from the same piece and joining in the center. Then the edges would be rolled between fingers to curve beautifully. I also tried to mold the base of the petal group with a wine bottle stopper with a rounded metal head, which helped to achieve the rounded shape. After some experimenting I found the desired size and shape for the petals and began making the roses for real.
I began by preparing the petal groups and tinting the bottom curve with peachy paint, stronger on the inside petals. Then I rolled a tinted and edge-rolled strip of silk around a wooden bead fastened on a metal wire, glued the end and added several rows of petal groups, adding a bit of glue here and there so the petals would not open way too much, though I did aim for a romantic overblown look.

And then there was the greenery. I needed several leaves for every single flower and the sepals to finish the flowers.
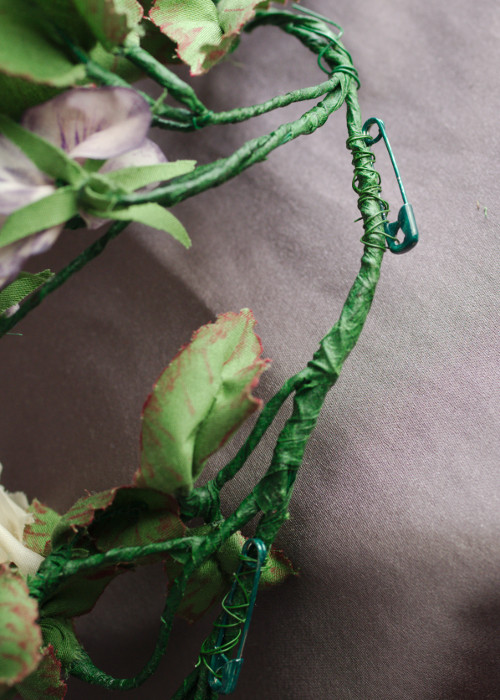
For the leaves I found a scrap of cotton sateen in a pleasant fresh but slightly muted green that almost matched floral tape. After drafting a basic shape I liked the marking, cutting and pinking the edges went quite fast. I cut leaves in two different sizes for both roses and violets. I was afraid the greenery would look too monotonous so I tried to differentiate the leaves by drawing veins on them with a marker, using pink for roses and darker green for violets. Then I sewed them into metal wire stems, gathering them a bit for a more picturesque shape, sprayed with hairspray and tinted the edges with marker.
For the last thing I covered all the stems with floral tape and gathered the sepals around the reseptacle.
I assembled the small bouquet on the bust first, picking flowers, arranging them to my liking and rolling the ends together with floral tape. The long wreath on the skirt was a more complicated thing.
I scattered all the flowers and leaves on the floor and began to throw them on the dress to see what would look nice. I had a rough plan for the wreath shape and placing, but of course I had to adjust it a bit. I assembled a couple of larger bouquets with the largest roses in the center and lighter, longer ends. Then I joined the different parts I had made into two branches, estimated the right distance between them and then joined them with a lot of metal wire covered by floral tape. Then I added a large bow with the idea that a central eye catcher would accentuate the gathered line and make a nice break in the long wreath.
I still had some flowers left, so I grouped them into hair ornaments which both make tie the hairdo in with the rest of the outfit and are handy in covering mistakes made by the inexperienced coiffeur, aka Yours Truly.
I could of course have just basted the flowers into the dress, but it occurred to me that at least the skirt wreath would get pressed flat when sitting at a car on the way to the ball (at the ball I could sit delicately on the edge of a chair), and they would be generally easier to pack separately. I settled the matter by putting safety pins (painted with green nail paint) on the wreath and the bust bouquet and sewing corresponding thread loops on the dress. Thus the wreath is fairly easy to secure on the dress even when its on and always ends up in the right place and shape, and its even faster to take of.
The mad flower workshop thing was very much fun even though I left it way too late. I'm actually rather proud of the result and will definitely experiment some more with fabric flowers in the future. The flowers add a nice touch to the dress without being too scene-stealing. Actually, while I first thought that the lilacs were too light and wanted to get them darker it turned out that now they rather blend with the dress color, and without the roses the wreath would just melt into the background. It can be hard to judge the overall effect before you actually see the finished thing from a distance! Also I think the skirt wreath might have been just a bit more voluminous, but I guess its better this way than to sport vulgarly large flowers.
To complete the outfit I covered a pair of thrifted shoes with a lighter lilac satin. More about making them here.
Final thoughts
The back fit was the first major irritation with the dress, and the second was revealed only when I was looking at the pictures taken at the ball. Like mentioned in the beginning, I had bought the material in three different pieces and obviously one of them had a subtle difference in shade. I had noticed a very tiny difference when I assembled the dress, visible in very warm light but not in daylight, but had thought it negligible at the time. So imagine my dismay when the dress pieces looked of totally different colors in photographs, especially taken with camera phones. It was made worse by the fact that the color did not alter in any logical way due to a lot of piecing I had made, so it would just change in the middle of the pleating and back again. Of course the color difference is seldom that obvious in nature, but in this golden era of snapping pictures all the time I am doomed to looked dressed up in a patchwork in everyone's Instagram and Facebook feed.
The thing bugged me so much that in the pictures of this post I have corrected the color difference a little where it was obvious (yes, I had the same problem in daylight and with a decent camera too) to correspond with what I think is the truthful shade seen through human eyes.
This little stupid thing is very annoying as other ways I really like how the dress turned out and am in no hurry to make a second ballgown. Well, I suppose one must make this classic mistake, often experienced by knitters once to learn to know better.
So, besides the back fit and the color fiasco the evening gown is actually very nice considering it's my very first dress of the era. On the first wearing at the Bath Assembly Rooms ball I was also happy to notice that while being figure-hugging it was comfortable enough to dance even at a brisk pace. I really fell in love with the whole look, the feminine silhouette, the elegance of long evening gloves and bare shoulders, the hair and everything, and felt very much at home in the dress. I can hardly wait to continue with other Natural Form designs!