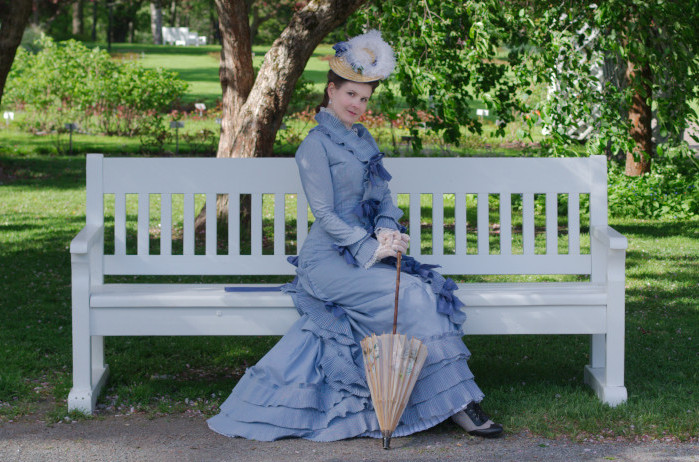
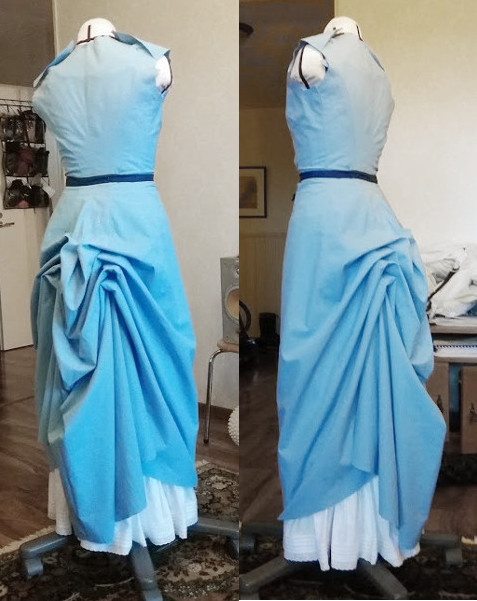
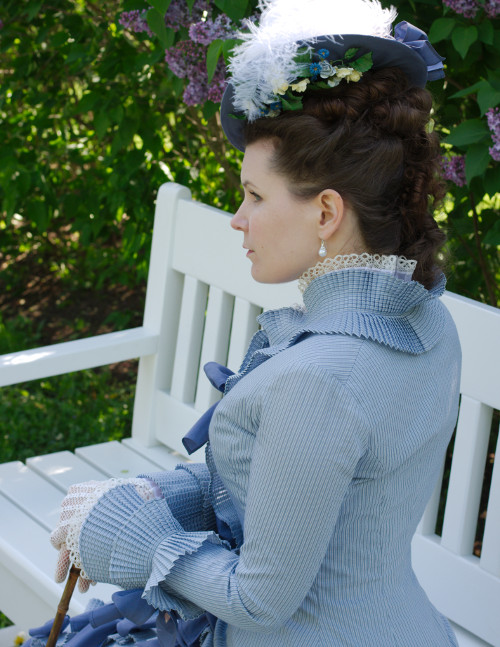
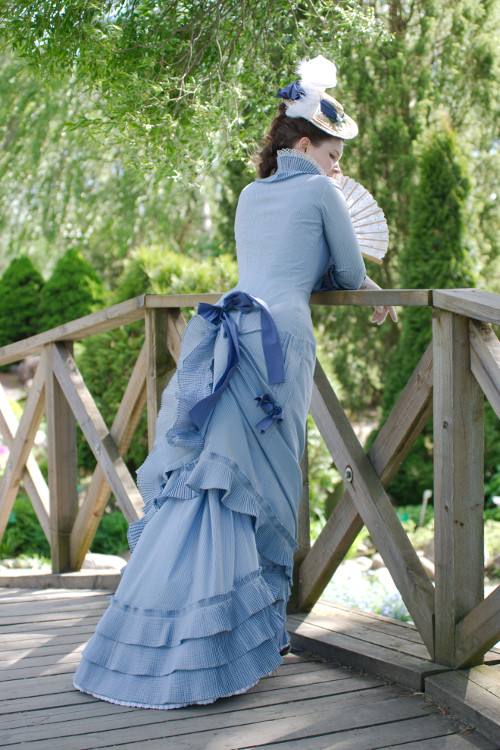
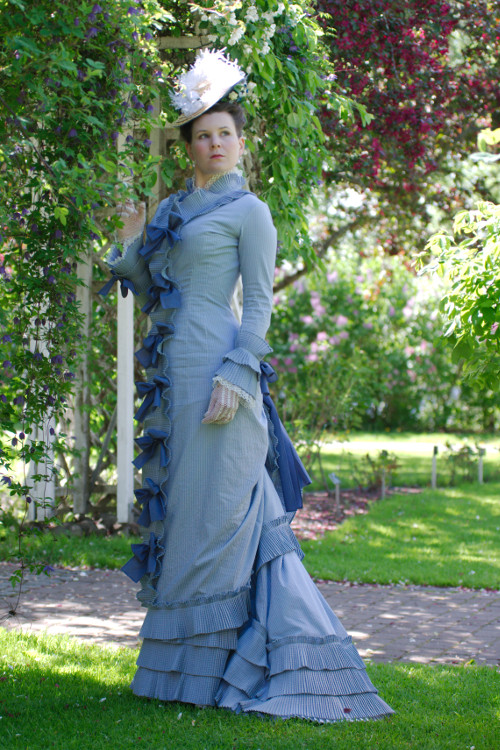
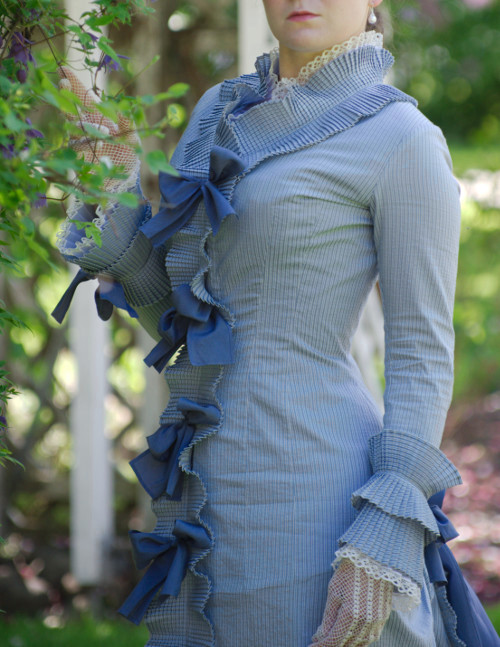
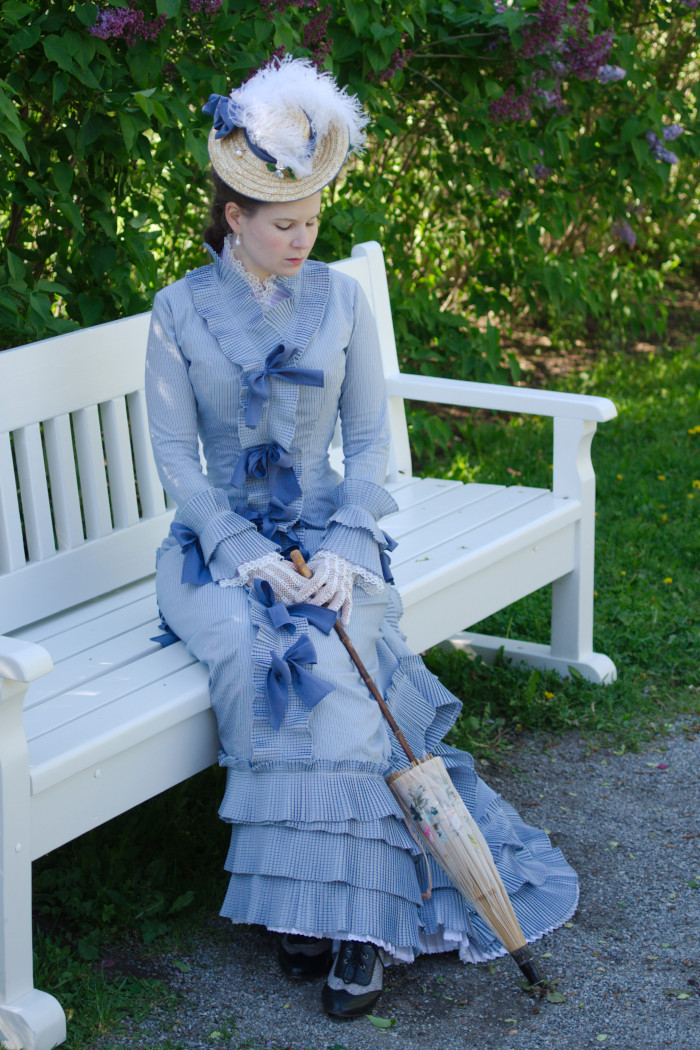
Polonaise
day dress, 2018-2019
When I finally got started on my long-time dream era, 1870s, I dived straight into the deep end with a ballgown as I happened to need one. I had actually planned to start off with some relatively simple day dress, but, well, you know how it goes when you have too many plans and too little time. Anyway, I would need a day dress sooner or later, so after the grand ball it was next on my list.
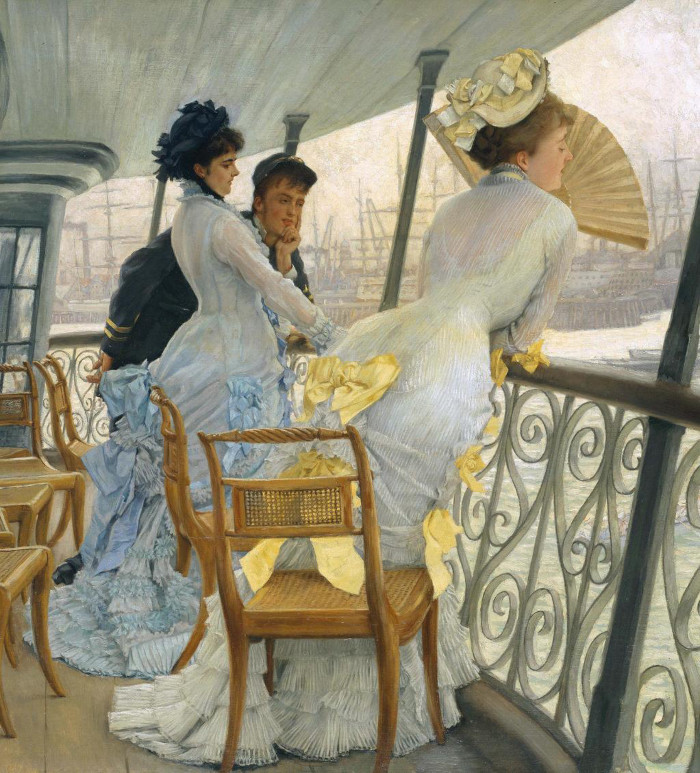
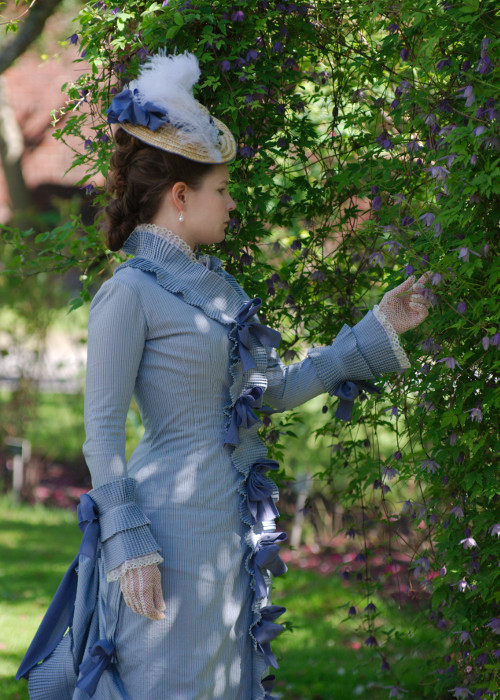
Already before beginning the ballgown I had stumbled upon a bolt of fabric that just screamed a Natural form dress decked with flounces to me. As it cost just 5€ per meter I could have all the ruffles I wanted, so I bought all they had left on the bolt on the spot. My next project would thus be a light summery day dress inspired largely by "The Gallery of HMS Calcutta (Portsmouth) (1876)" by Tissot.
Of course my fabric was not strictly period correct. It was a bargain bin bolt with no material tags on, but it's probably a blend of cotton and polyester, possibly with some viscose. I also suspect it has a tiny bit of elastane as it was slightly stretchy. At this price I was happy to ignore that, however.
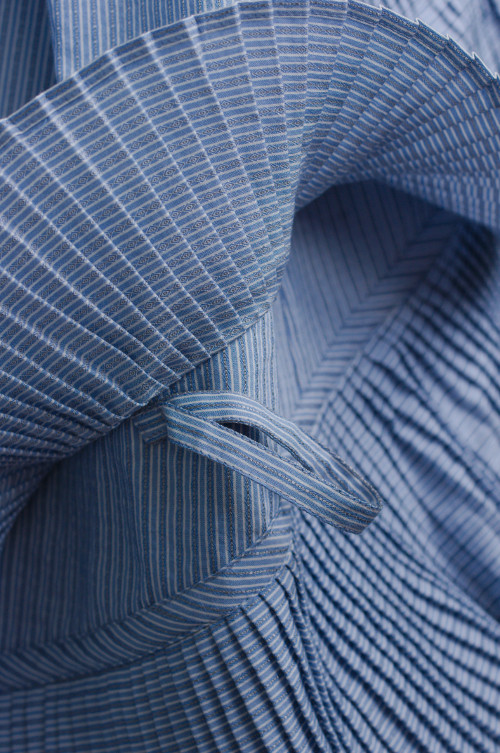
The narrow stripe was elegant and the very pale cornflower blue shade just lovely and subdued enough not to make the ruffle-covered dress totally over the top romantic. It would also be a bit more practical than white, which was very much favored in the period on light dresses of this type. While the fabric was very lightweight, it was not actually sheer, so the lightest sheer dresses popular on the period were out of the question. It was, however, thin enough for dense knife pleats (called kilting in the period) which is an important element of the Natural Form- style.
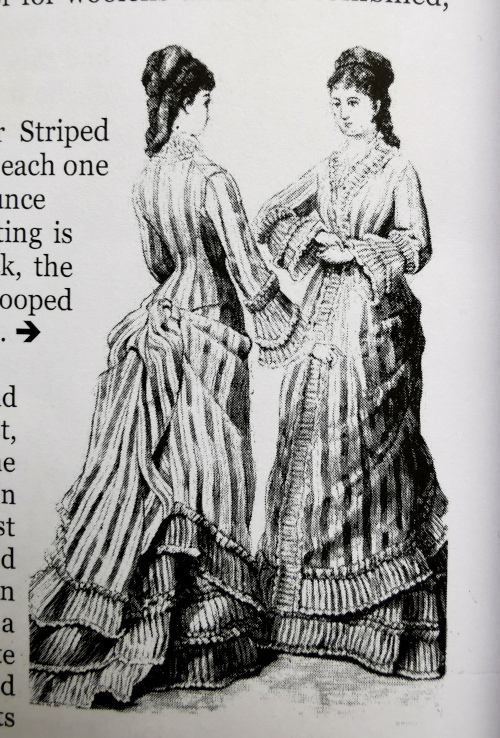
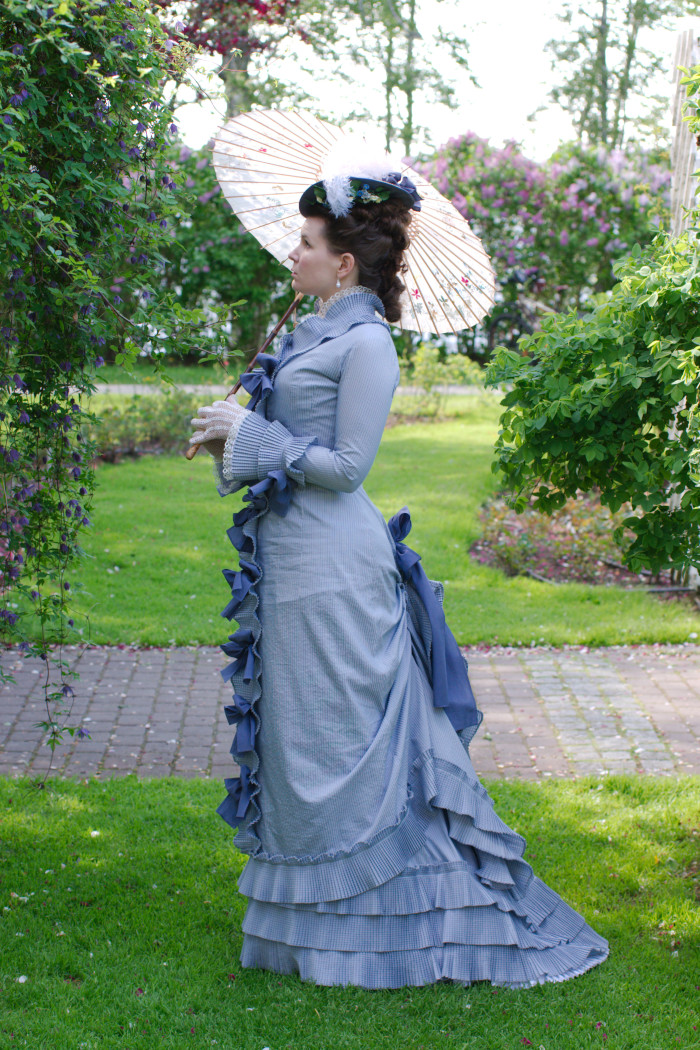
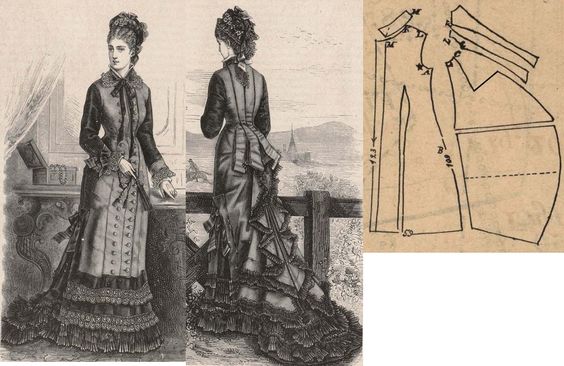
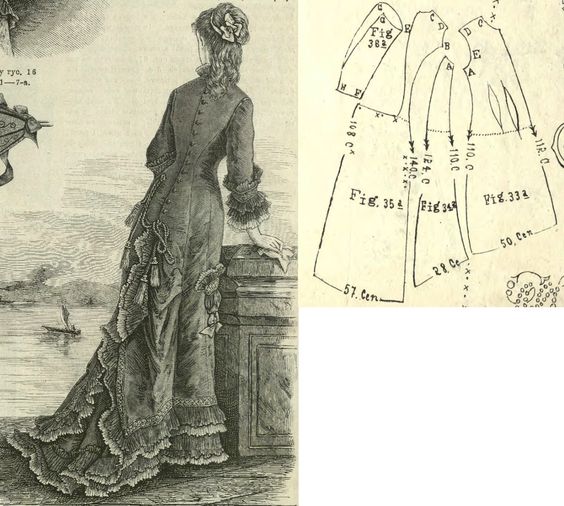
After the ballgown I was happy to make something pattern-wise more simple: A simple gored skirt and a polonaise looped up with a few buttons. In addition to the above mentioned paintings I found several attractive fashion illustrations. I especially liked "Afternoon dress for the Country", published in Peterson's Magazine 1878 and brought to me by the compilation book "The Art of Mantua-Maker: 1870-1879". It has a demi-trained skirt with two rows of flounces and a polonaise with wide pleated flounce on neck, center front and hem, and double flounces on the sleeves.
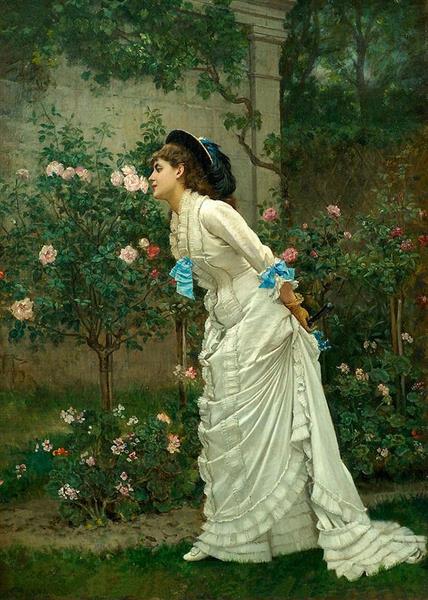
Besides Tissot, other paintings that I found inspirational for this project were "Girl and Roses (1879)" and "A Garden Stroll (1877)" by Auguste Toulmouche.
Pattern drafting
I had, of course, been a bit optimistic about the deceptive simpleness of pattern drafting: Nothing is quite that simple if you are a total newcomer to the period.
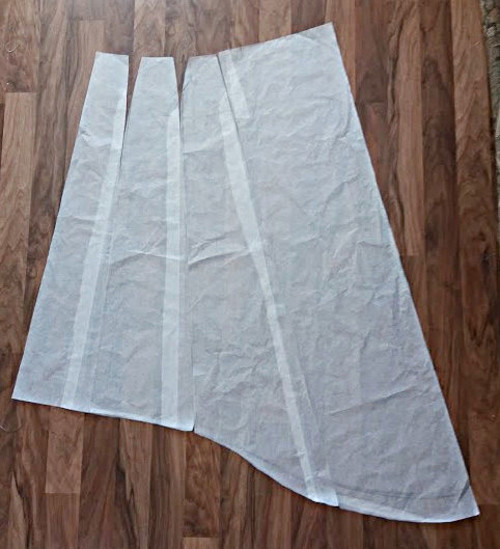
I began with the skirt. As I wanted the polonaise to fit smoothly at the hips decided to put the extra width at the back into a deep double fold instead of gathering it, which looked nice on the mock up. On the other hand I was totally lost on deciding the skirt width. I wanted it quite narrow at the front but then again even a short train would require some width. I had huge trouble figuring out how the finished skirt, with the ruffles and balayeuse and all, would drape compared to the flimsy mock up. In my ballgown the train had really stayed in shape only after being finished, thanks to the pleated trim and balayeuse, so I kind of hoped that they would fix all the problems this time too.
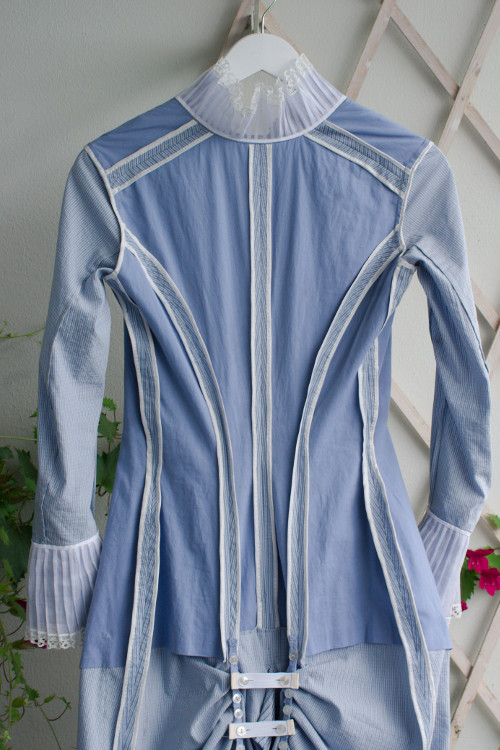
The polonaise was based on the basic princess line bodice pattern I had made for the ballgown. The ballgown had somehow ended up with ugly giant wrinkles at the shoulder blade area, so I tried to fix it for this pattern. (As you can see in the pictures, some horizontal wrinkles re-emerged on the finished dress however - I blame the sleeves).
The sleeve is based on the two-piece sleeve pattern shaped at the elbow I had made for 18th century, drafted into a more 19th century shape with a smaller under piece and with the sleevehead fitted to the bodice pattern. The sleeve pattern came out quite easily.
The funny thing with patterns on this era is that the princess bodice and sleeve patterns are actually quite close to modern patterns, if much more tightly fitting of course, but the complicated skirt and overskirt arrangements just blow my mind. In the 18th century its exactly the opposite, the skirts (apart from Robe a la Francaise of course) are just simple fabric widths pleated into a bodice, but bodice and especially sleeves can be more tricky until you get a grasp on what you are doing.
So, in theory the pattern for the lower part of the polonaise could pretty much be copied from the ballgown with slight alterations, but in practice I had some trouble determining would much width to put into the skirts. It should be narrow enough that folds would form on the sides when pulled back, but not as tight as the ballgown. For the looped up back puff I added 10cm extra width at each center back beginning at the hip level.
I had imagined arranging the hem puff to be a simple thing of a few strategically placed loops and buttons, but it proved to be anything but that. If I pinned just a few small pleats the hemline would hardly rise at the side-back and there would be no folds on the sides. If I pinned more, the puff became somehow heavy and awkward. I could, of course, have pleated the back pieces and side-back pieces each into the joining seam, which would have provided much more options for shaping the puff and folds, but then again I persistently wanted a draping that could easily be taken apart for washing, ironing and packing.

After taking a closer look at the Tissot painting I noticed that especially on the white dress the kilted ruffles come so high up that there is no way they are attached on the polonaise hem pulled up. Very annoyingly Tissot has also placed a chair in front of the back of the dress so that its hard to tell what the heck is going on there. One of my wild and uneducated guesses was, however that the back seam of the polonaise had been left open at the back, pleated a bit and edged with kilting. By this time I was totally fed up with pinning and unpinning the back of the skirts so I decided to try this theory out, take scissors and cut the center back open.
This hack magically transformed the ugly puff into a gently falling waterfall which looked quite appealing to my modern eye, but I still was not sure if this trick was actually correct for the period. I'm still too inexperienced to be able to figure out the cut from fashion illustrations, though I have learned a few things.
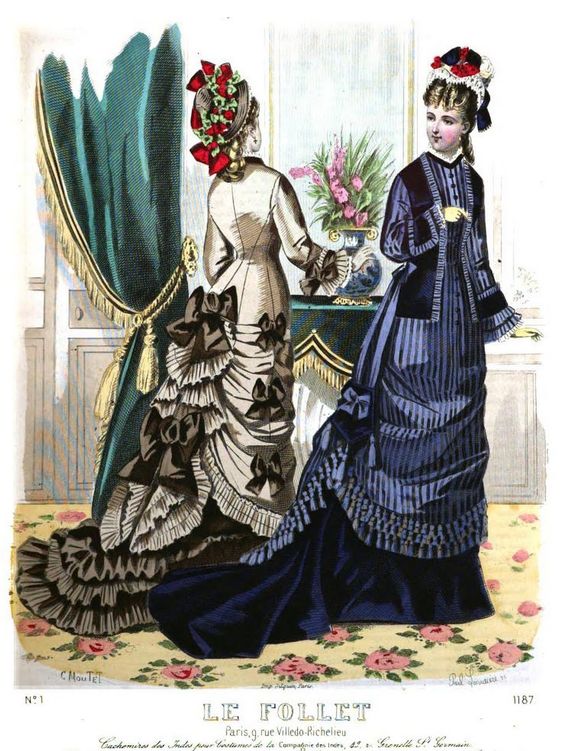
Le Follet 1876
After browsing through
a pile of fashion illustrations and patterns again I found a
few examples of an open back seam on a polonaise, with
pleating happening on one place or another. They are all dated
within a few years of the Tissot painting. However, I still
was not sure whether the open back seam was a good idea, so I
chose the procrastination technique of cutting the back in one
piece to begin with with the option of cutting it open if
needed. After all, the troublesome puff might still look
better in the flimsy dress material than in the heavier cotton
I had used for the mock up.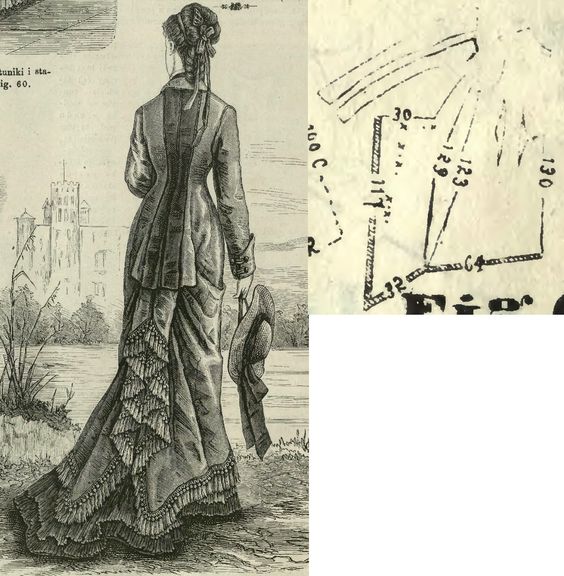
Tygodnid Mod 1877
Tygodnid
Mod 1877
Tygodnid Mod 1877
Compared to the ballgown I had
the luxury of possessing ample amounts of
material this time. After calculating just to make
sure that I would have enough material for the
dress and all the flounces planned (they take
surprisingly much) I could finally began
cutting. Tygodnid Mod 1877
I had prewashed the fabric, but unfortunately washing caused the edges to mysteriously stretch and the fabric also got some tiny wrinkles that I was never able to get fully rid of. Oh, well, it was a cheap fabric and now I know why.
Cutting the flimsy fabric so that the small stripe would roughly match or at least keep straight was bit of a challenge, especially as the edges had stretched.
The skirt
I began the actual sewing with the skirt. I veered back and forth for a long time trying to decide whether the thin material needed underlining all the way, but finally I decided to only face the hem under the flounces.
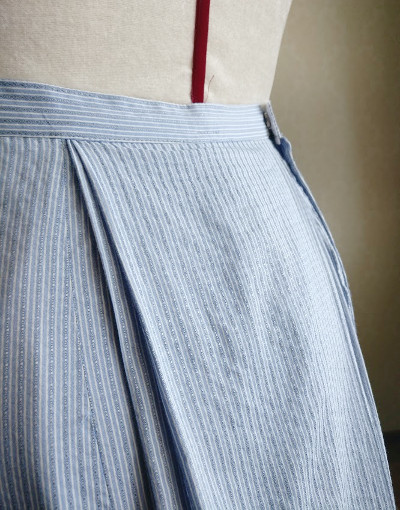
I marked the back pleats with basted threads and pressed them from the waist downwards to about knee level. I sewed the seams as french seams and made a placket opening on one side-back seam. Unfortunately it didn't turn out terribly good, as the tiny and neat hooks and eyes I had chosen tend to open in use. I did not worry about this overly much as it will be covered by the polonaise, but I have to keep this in mind for future projects.
On the skirt hem I basted on a cotton facing and then sewed on the waistband.

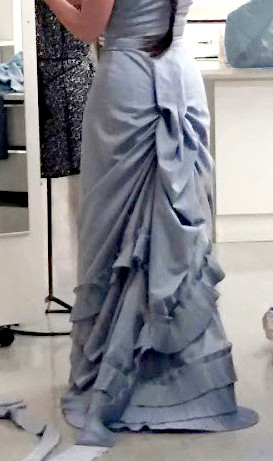
Apart from a few little things the skirt looked okay at this point, but when I either tried it on or put it on a dummy the back just would not hang right. There was something awkward about the train. Perhaps the skirt had been too narrow after all. I shortened the train a little and hoped it would look better with the shaped balayeuse I had planned to make next.
I spent a few evenings making a pretty little balayeuse with cotton lace edged flounces and pinned it on the skirt hem. The result was just plain terrible. The stiff balayeuse turned the softly folding hem into a decidedly awkward lump. It did not make the train sweep gracefully, but rather made the hem curl back over itself. I spent some time trying to pin it on more evenly and said some very rude words aloud, but finally I had to admit that the deep balayeuse had been a very bad idea and the skirt cut probably had something wrong with it too.
I had, however, put some effort on that sorry concoction of cotton ruffles, so I decided as the last effort to pin it on the petticoat hem instead. I had to adjust the shape a bit, but it kind of worked. More about this shaped balayeuse turned removable petticoat train can be found on Underwear page.
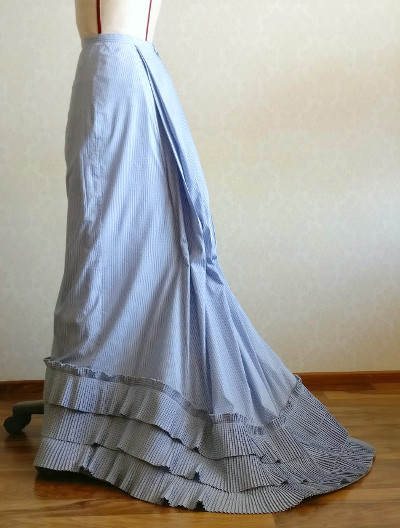
Over this lengthened petticoat the skirt looked much better already, though I still had to cut the train a bit shorter. Finally I decided that the hem shape was good enough and turned the edge with a bias strip.
I also made a whole new balayeuse, this time a simple 13cm deep pleated flounce that would go around the whole hem. It has three tape ties at the back which can be tied to loops in the petticoat train to keep it securely under the train.
The back of the skirt still did not fall very gracefully, somehow the pleated back breath seemed to be too long for the train width. Yes, they sometimes cut gores or extra width on the bottom of the back panel, and now I know why. Of course, in my ballgown with much more width provided by pleats in all 3 seams at the back this problem never occurred.
The ballgown also had the the skirt back pieces gathered at knee level, so I finally realized I might attempt something similar with this one too. I had already put on the tape ties under the back breath to pull the skirts back, and now I experimented with pinning the loose pleats on the lower tie so that the center back was looped a bit.
The train instantly got a nice fan shape and stopped folding back. I fine tuned the pinning a bit and marked the places. As the fabric was thin I added a cotton tape on the wrong side to back the gathering loops I was going to add. I sewed it on with a few vertical stitching lines hidden on the underside of the pleats, well disguised between the stripes. Then I added tape loops on the underside of the pleats through which the elastic band that forms the horizontal tie is threaded. I further added a vertical tie on the waistband to be buttoned on the center pleat to support the puff.
By the way, I confess I don't have any idea whether or not they had ready made elastic band with buttonholes on the period. I want to use it anyway as it's so awfully convenient.
I was a bit worried about the strain this improvised fastening might cause on the thin dress material, but it looked good so I went with in. In retrospect I really should have interlined at least the center back piece. As you can see in the pictures, the skirt still tends to ride up over the pleated trim, but happily the polonaise edges disguise that a bit.
I had imagined the skirt to be the easy part, but had been very very wrong. Well, at least I learned a lot about what no to do with my next skirt.
The
Polonaise
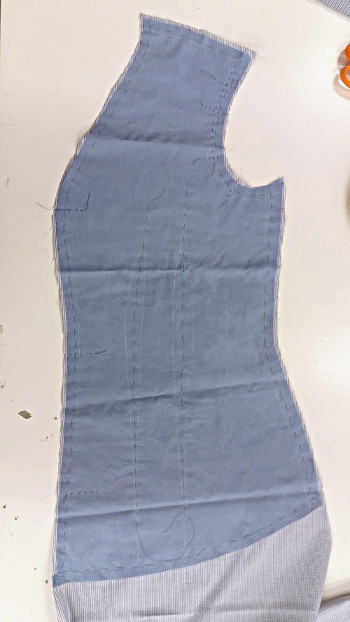
The polonaise began more promisingly. As the fabric was thin but not really transparent I decided that construction methods for "sheer dresses" , ie using mainly narrow french or felled seams would not be necessary, and instead opted for a lightweight flatlining for the bodice to hip level.
The fabric was still thin enough that the bright white cotton batiste I had chosen for the lining just might show through, or rather the edge of it against the skirt. As I found a blue-grey dye I decided to try to dye it. I used only part of the dye so it would not become too dark, (it still ended up a bit darker that I had intended) and threw some bias tape, twill tape and two pieces of different silks into the machine as well. On of the silks turned out absolutely beautiful and perfectly matching the blue stripe in the dress so I decided to use it for the bows - more on that later.
I cut the dyed batiste, turned and whip stitched the bottom edges by hand and basted the batiste pieces to the fashion fabric pieces. Then I marked the edges and darts and basted balance marks and any other markings I might need.
I first sewed the darts, shoulder seams and back seams, and the lower part of the front seam. Then I run the side seams together with a long stitch for fitting, and the tried the polonaise on over underwear, corset and skirt.
The front edges needed just a tiny bit more width, but happily I had ample seam allowances. At the back I had messed something up while trying to get rid of the stupid wrinkle, and now my armhole gapped at the back. I fixed that as well as I could.
I cut the seam allowances into even width and edged them with thin silk bias tape sewn by hand. It was a bit slow, but the result not only looks neat inside but prevents rather effectively the allowances both fraying and showing through on the outside. Hand stitching is much more elastic than machine stitch, so the allowances curve with the seam shape.
On the side seams the bias edging goes all the way down, but the side back seams turn into french seams below the bodice lining edge. This was done in case I would decide on the open back seam, when they might show. On the center front seam I pressed the seam allowances open and hemmed them by machine, as they would be covered by the flounce anyway.
I left the sleeves unlined, as this was to be a rather light dress, and used french seams on them.
Either I had been overly careful at the patterns drafting stage of had messed up my seam allowances because the sleeves looked too big, especially at the lower arm. Of course, as we are still on the 1870's the sleeves were not supposed to be as ultra tight as on the 80's, but they still jarred my eye. I unpicked them and sewed them again much narrower, maybe too much, but they look better to my eye anyway now.
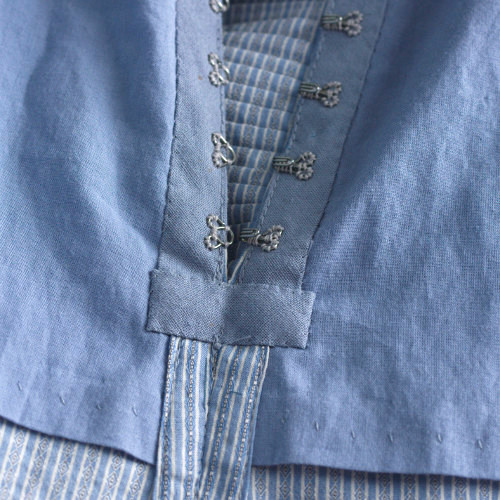
I turned the front edges on the underside with the bias tape I had dyed, and sewed hooks and eyes to the edge spaced 2cm apart from each other. Sewing hooks and eyes is not the most exciting thing in the world and there was a lot of them. The finished result is okay - as with the skirt, the small hooks may pop open, but are relatively secure, and the front edges don't gap. If you look really carefully, you can actually see that they have opened for a short bit in the bodice, which is really annoying, but I have to be a bit more careful then dressing up the next time.
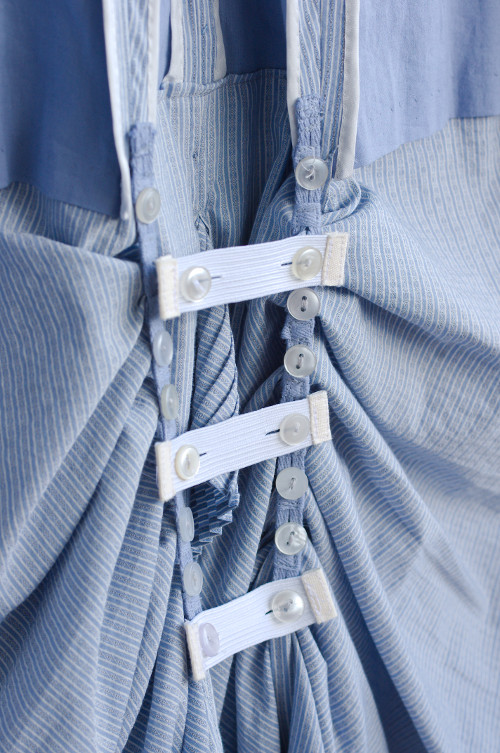
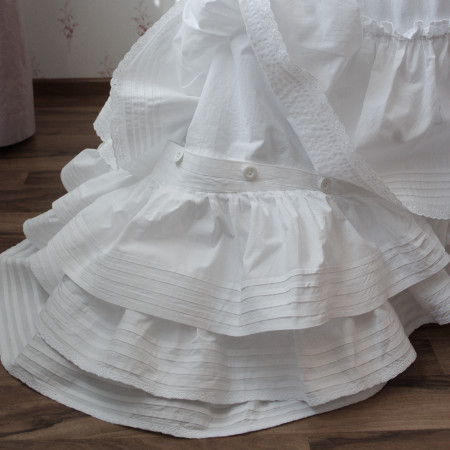
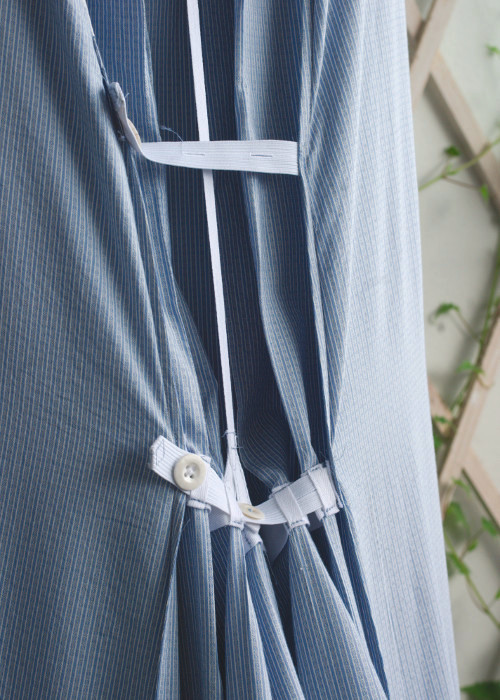
Like I mentioned earlier, I wanted the looped up back to be easily opened flat. I sewed 8 buttons on each side of the side-back seam allowances, 6cm apart from each other beginning from the top of the back pleat. Then I made a cotton tape thingy with holes to which the pleats could be buttoned so that they would hang 2cm apart. I sewed the top of these to seam allowances and added 3 pieces of elastic band with buttonholes which keep the skirt fullness back.
On the lightweight material the folds created by the looping looked much softer that in the mock up as I had hoped they would, but I still did not like the back puff. I guess the back piece should have been wider still to form a nice puff. Nevertheless I could still not make up my mind about what to do with it, so I turned to the trimming instead.
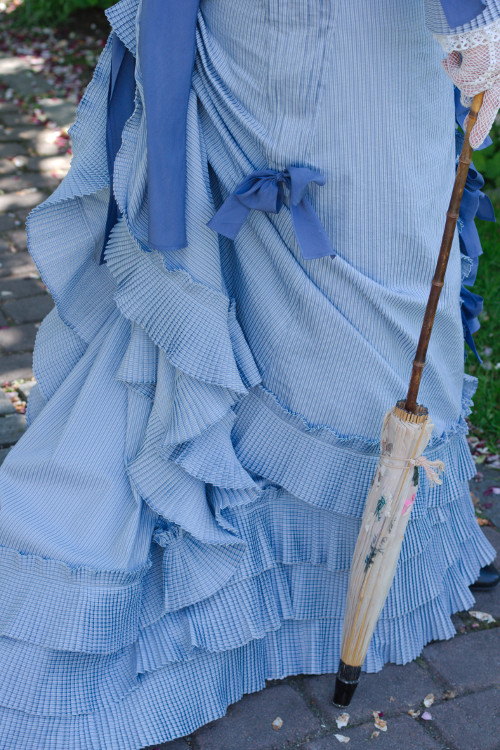
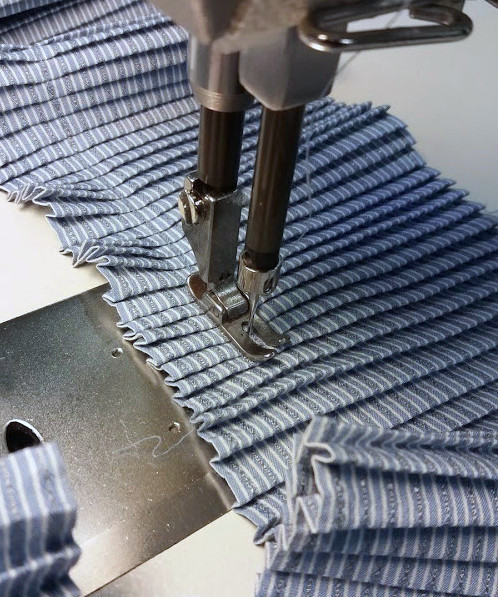
The pleated trimming
As already mentioned above, I especially wanted small tightly packed knife pleats called kilting as they are very characteristic to the period look. 5mm pleats on a flimsy fabric would be a pretty impossible feat without some kind of equipment, and the famous Perfect Pleater sounded really tempting. They are however a bit pricey, especially delivered over here, so encouraged by some crafty friends and You Tube tutorials I decided to try and make something similar by myself.
The materials (wallpaper from discount bin, random leftover piece of cotton twill and glue spray) did not cost much, but marking and folding the pleats took some time and patience. I'm not going into details of making the pleater here, as you can find plenty of good tutorials elsewhere. I have one word of advice only for dummies such as myself: Please check that the end of a wallpaper roll is cut in straight angle, even though it's straight out of package. I naively thought it would be so, but it wasn't. I only noticed this after marking the pleats.
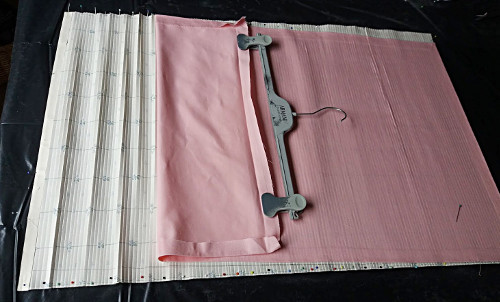
With my not so highly specialized craft skills (I can only make things with fabric and thread, though I have become better with glue) handling the long pleated piece of wallpaper was a bit tricky. As I already mentioned, the pleating was not in the straight angle so I had to cut off a bit at the sides, and it still is not straight because I made some kind of mess in gluing on the backing fabric. The pleats are also slightly irregular at some places, but then again small differences in pleats width will hardly show in the finished garment.

I threw my first test run of the pleating on the dress material into washing machine to see whether the pleats would keep at least some shape in the wash. I theory the probable polyester in the material just might take permanent shape with enough heat, but of course in practice it didn't. They could be ironed more or less back into shape with very slow and careful ironing, but the result was far from the neatness and evenness of the original. Yeah, well, the period magazine excerpt in "The Art of the Mantua-Maker" does recommend gathered flounces instead of pleated ones for washing gowns.
I had of course sort of hoped that a light colored, trained dress would be washable, but I was not ready to give up the kilting either. As the fabric itself is very much washable I would at least be able to carefully spot clean it and if needed, and maybe very carefully hand wash the pleats and press them back on when still wet.
I cut the flounces on the direction of the stripe, which was of course awfully convenient as I didn't have to do much measuring. Another advantage of the stripe was that the hemming stitch was almost invisible over the patterned stripe. On the other hand it showed annoyingly across the stripe on the joining seams, which I ended up finishing by hand to prevent this.
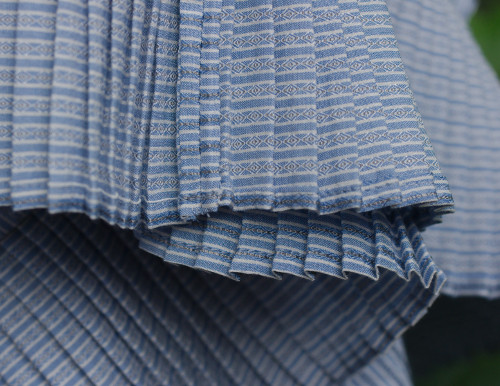
The flounces took up about 30 fabric widths and close to 4 meters of material in total (I had to cut off a bit in the edges as they had stretched and would not be of even width), and there was about 43 meters of sfounce to be hemmed and pleated. Aven by machine the hemming took considerable time. Happily the two lower ones in the skirt had to be hemmed only at the lower edge while the top edge would be just run with overlock stitch before pleating.
The pleating itself was surprisingly easy with the pleater I had made. I tucked the fabric in, sprayed it with a water-vinegar mix and ironed it through soft muslin rag until it was almost dry. Then I usually left the fabric in the pleater overnight for the pleats to set. Thus I made small progress with the pleating every day, it almost became my new "before bedtime"-routine.
The joining seams ended up where they would, some neatly and some not so neatly, calculating them would have been way too complicated. I chose to accept that with the small irregularities that occured in the pleating process now and then anyway, as they would hardly catch much attention on the finished thing.
After pleating I stitched the pleats together, which was also very easy to do by following a stripe.
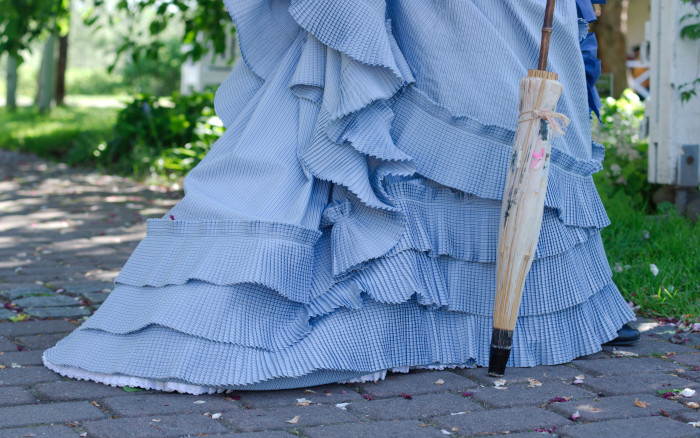
All the flounces in the dress are 10cm wide when finished, which of course made cutting and hemming so much easier since I didn't have to know exactly how much fabric each flounce would need. I could just made a long pleated piece and cut and join it as I went. Of course in theory kilting takes 3 times the length of the finished piece, but in practice with this small pleats the finished length can actually vary a lot depending on how careful you are at the pleating and whether you push them together or pull them apart even a little when stitching.
The 10cm flounce width looks right in the skirt and polonaise hem, but on afterthought its perhaps slightly heavy for the neckline and center front. I did try to pin my test run for the flounce on the mock up, but it was still hard for me to picture the effect of the finished look.
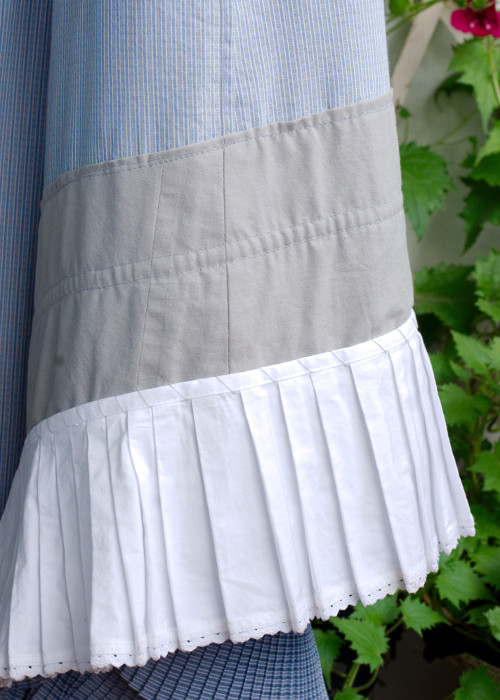
I sewed the two bottom flounces on the skirt and covered the overlock stitch with bias tape. I joined the ends of the flounce at side seam, trying to hide the join under a pleat as neatly as possible, hemming the seam allowance by hand. At the top flounce the pleats are stitched together 2cm from the top edge and then stitched on the skirt following the same line. Before sewing on the top flounce I had finished the edge of the skirt facing and turned it under.
The flounces overlap by 3cm. The bottom one reaches the edge of the skirt hem but doesn't extent over it, so that the hem edge reinforced with facing and bias tape will hopefully take most of the wear instead of the flimsy flounce.
After sewing on the flounces I added a small loop for lifting the train under the top one.
On the skirt all the pleats run leftwards, but when beginning trimming the polonaise I suddenly realized that it would not be so simple here. In which direction should they run on the neckline, and what about the sleeves? In the end I decided that the pleats should logically run downwards at the neck and front edge, which meant an extra joining seam at the back of the neckline for turning their direction. On the sleeves I mirrored the pleats to run always outwards.
The lower flounce of the sleeves is sewn straight into sleeve end and the join finished with a bias tape turned on the right side. The top flounce is sewed on top to just cover the bias tape.
At the neckline I pinned the flounce on the neckline and tried the polonaise on before sewing it for real, luckily so as the wide flounce didn't look that great after all on the small neckline. It was nice at the back, but looked totally stuffy at the throat and overlapped way too much. I tried to pin it a bit farther from the edge, and this small change improved it a lot, though it still looks a bit heavy handed and threatrical.
I sewed the flounce on by machine at the neckline and center front seam, but in between I had to sew it by hand as I had already sewed on the hooks and eyes. Otherways sewing on the flounces went pretty fast overall.
I had almost all the flounces on their place now and pretty much the only thing that remained was finishing and trimming the polonaise hem. Yes, I had managed to postpone the final decision about the polonaise hem back arrangement this far, but now it had to be solved one way or another.
I still did not like the puff. While it had looked too stiff in the mock up, in the thin dress material it looked just limp and sad.
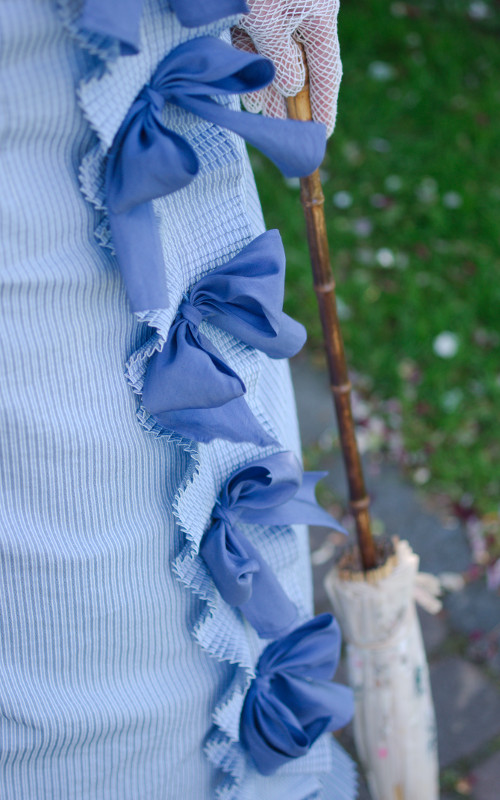
So, I braced myself, took scissors to it and cut it open, rounding of the bottom corners a bit. Now the tails fell softly, curling over themselves, and at least to my modern eye the effect was totally charming.
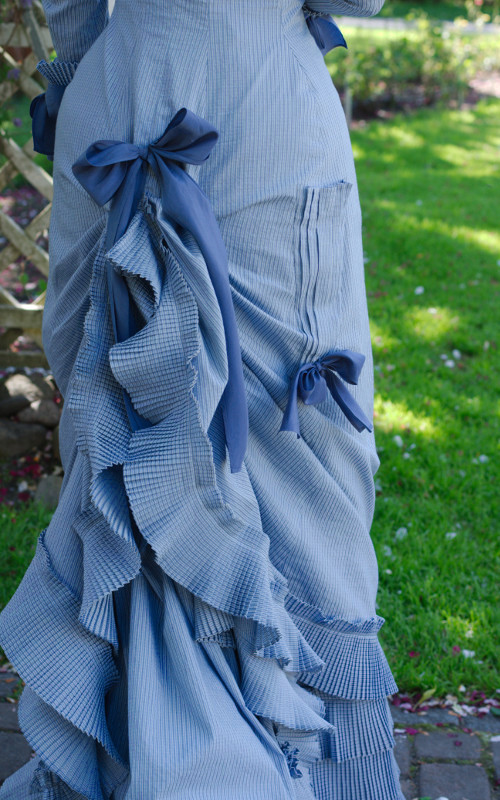
I finished the polonaise hem by a narrow hem turned on the right side, then sewed a flounce on the top of it. Then I sewed the underside of the pleats into the hemmed edge by hand. At the top of the back slit and at the bottom corners I sewed the flounce on by hand altogether as they would have been a bit tricky with a machine.
The polonaise would not have been complete without the silly fashion fad of the period, a decorative pocket on one side. I was a bit lazy at the pattern drafting stage and did not make a pattern for it or mark a place on the hem, but rather thought to make it out of fabric remains later and try it on in some later fitting.

The pocket was really left to the very last. After looking through fashion illustrations I chose a slightly tapering pleated model. I cut a roughly right sized piece of material, hemmed the top and bottom edges by hand and pressed on some pleats which may not be quite regular. About 3cm below the top edge I sewed the undersides of the pleats into a narrow elastic band, so the top edge keeps its shape but opens a bit when you want to use the pocket.
I first sewed the sides on the pockets on the polonaise on the front side, trimmed the seam allowance and pressed another fold into the edge and sewed it down by hand so that the seam allowance ends up in between. The pleats are sewed down 3cm from the bottom edge to close the bottom of the pocket.
The finished length of the pocket is 24cm and width at the top 9cm. It could have well been a bit larger, but what can I say, I guess I estimated the finished look wrong again.
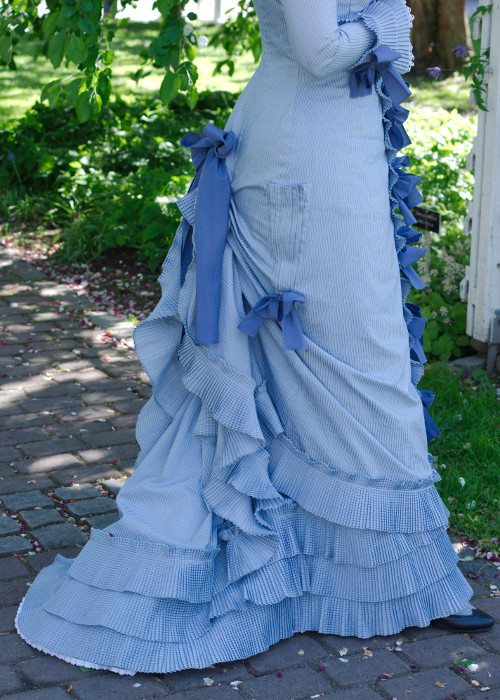
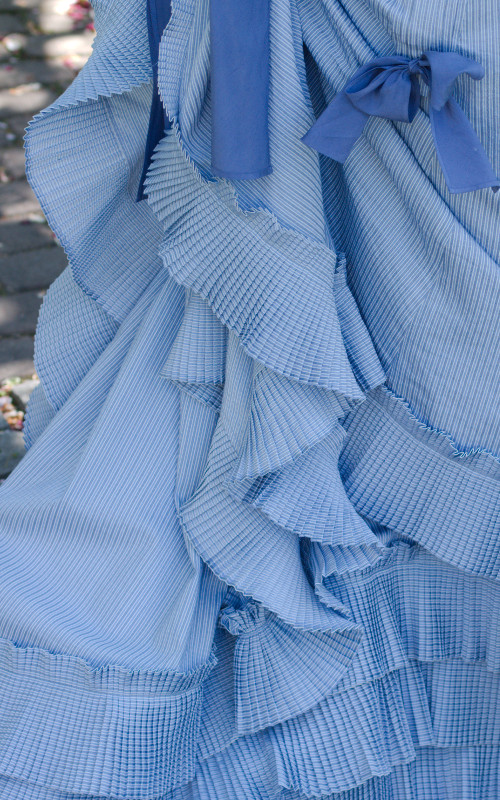
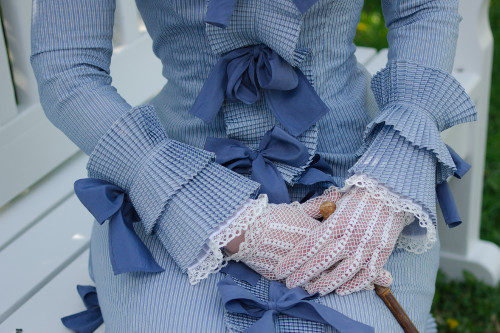
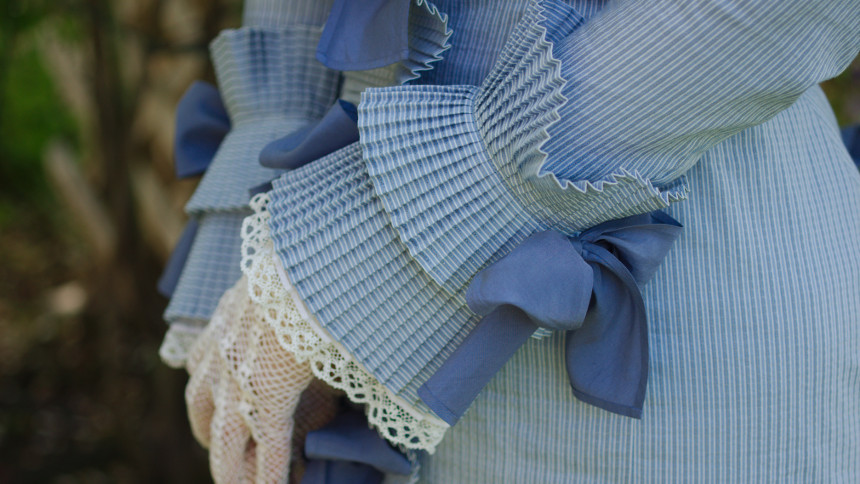
The bows
This type of dress, especially as portrayed in the Tissot painting gains lot of its feminine charm from a large number of bows, though I decided to add less than I plausibly could have. My first thought was to trim a blue and white striped dress with white bows, but after looking through fashion illustrations and paintings I noticed that bows were almost always either of a darker shade than the dress fabric or a contrasting one, I don't think I saw anything besides white dresses trimmed with white ribbon.
I tried several different ribbons in my stash over the fabric, but most of them were too dark, and I didn't have enough of any of them anyway. Dark, even black bows on a light colored dress do look very Victorian in a way, but the pale color of the dress fabric looked totally washed out next to any strong color. Also the greyish cornflower blue made most of the blues look greenish. (In some of the pictures the dress seems to be a much warmer blue than it actually is, as light and cameras do funny things sometimes, it turns much more to violet in real life)
In the end the matter of the bow color was settled when I as a last minute whim dyed some silk samples with the polonaise lining and accidentally got a perfectly matching color. The thin silk would make lovely, airy and soft bows, and besides it was a very affordable solution as quality ribbons do not come cheap and I needed a lot.
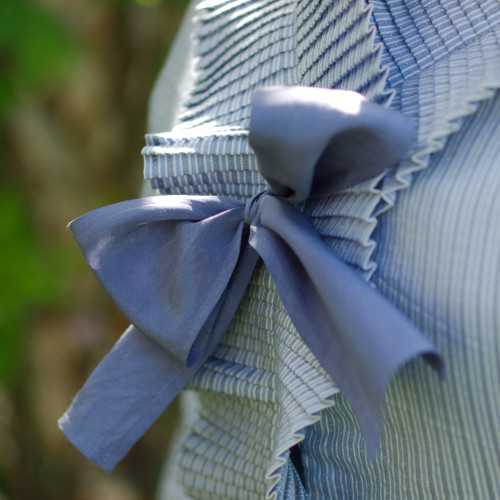
I decided to cut the silk strips on bias, which makes the bows form beautifully. I also decided to hem them before dying rather than cutting them out of dyed material, so that the silk thread I used would dye to match the fabric perfectly and thus disguise the stitches better.

The finished width of the bow tapes is 6cm and they are 55cm long, apart from the ones in the sleeves which are 5cm shorter. The front got 7 bows spaced 15cm apart. For the back I made to 10cm wide and 135cm long bow tapes, but ended up putting only one on the dress and using the other in the hat.
I pressed narrow hems on the edges and hemmed the strips by hand. The weave was so tight that I had to use a thin wobbly beadwork needle, so it didn't go very fast.
When I had finally hemmed tapes for all the bows (and an extra one just to be sure) the time came for the nerve-wrecking event of dying them with a piece of the same silk for hat trimming. The previous dye test had been successful, but as we all know dying is a very unpredictable art especially to amateurs. When I opened the washing machine I was totally shocked to find lilac instead of blue silk.
It was again a moment for some very rude words, as I had put hours and hours of work into those bows. At first I tried, panic stricken, just wash them a few times in faint hopes that the color would fade a bit, but of course it didn't. At last I bought another packet of dye, reasoning that it would be worth trying to get a darker shade to cover the lilac. This time I put on a lot of dye and dyed them in a bowl, as I should probably have done in the first place.
The bows turned almost ink blue very fast, and I panicked again that they would be ruined for good, or at least totally unsuitable for this dress. Well, at least that got rid of the violet. Happily the color faded a lot when the silk dried, and the final result was not bad at all. The bows ended up darker than I had originally intended, and jump out a bit rather than morphing into the the general frothiness created by the flounces, but on the other hand the final the look is rather true to the period. And of course the color itself is just lovely.
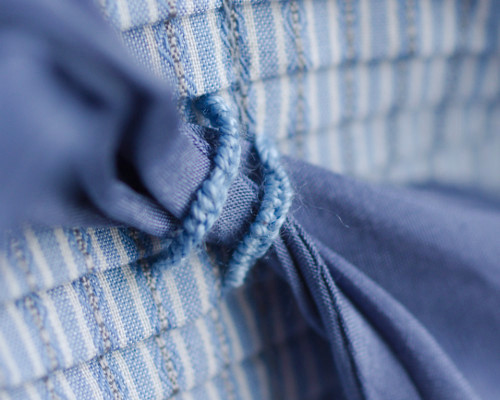
I had planned the bows to be easily removable, again while still imagining I could actually wash the dress. This didn't happen, but I still thought it might be a good idea not to sew them on. Instead I worked pairs of thread loops covered with blanket stitch and set a little askew on the places the bows would go.
This proved to be very practical when flying to UK for the Bath weekend - I just rolled the silk tapes over an empty toilet paper roll and put them back on for wearing the dress, getting nice and fresh bows not crushed in the tightly packed suitcase.
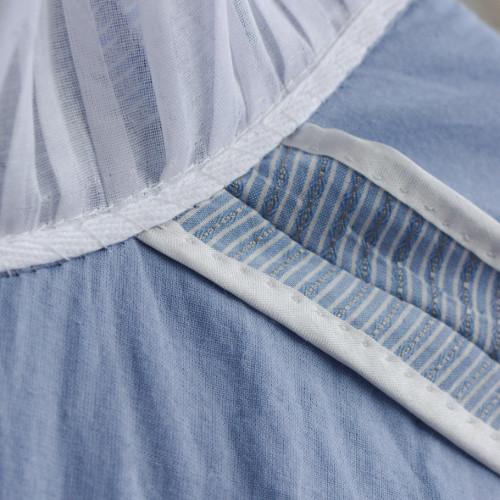
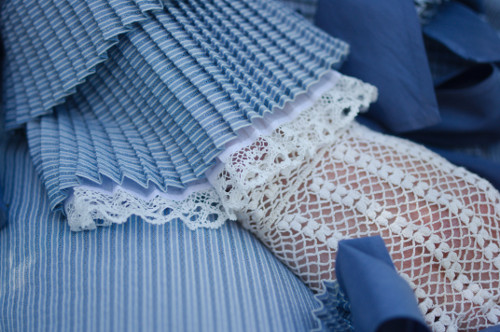
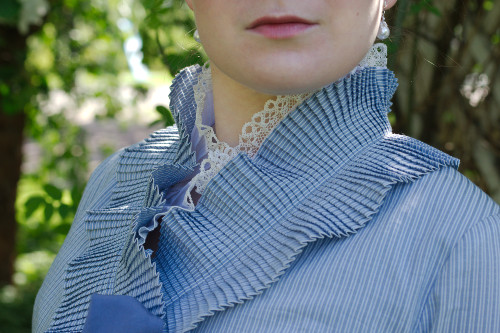
The lace
The finishing touch for the dress would be the lace-edged ruffles at neck and sleeves. At first I tried very hard to tell myself that any half-decent lace would do for such a minor detail, but still found myself dreaming of real bobbin lace. After all the thought of making something simple and narrow for change had occurred to me many times during the hours I had toiled over the lace for Robe a la Francaise, and this seemed a nice opportunity to do precisely that.
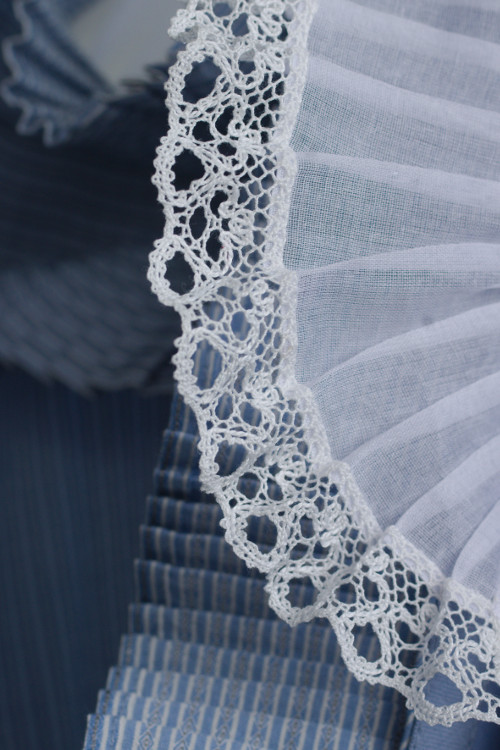
The lace pattern comes from a Finnish book "Raumanpitsien aatelia" (Helena Honka-Hallila & Pirjo Vänni, 2017), and this model A 9081 is from a sample collection from 1830s. It may thus be a bit old fashioned for 1870s, but I just fell in love with the charming yet simple pattern and wanted to try it out.
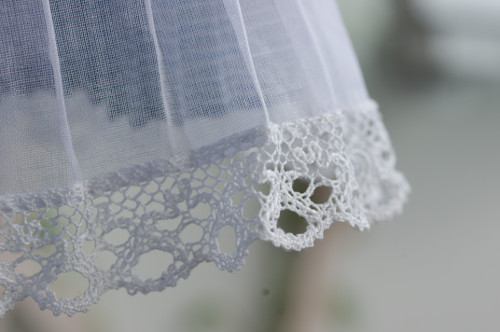
The 2cm wide lace with just 15 pairs of bobbin and one gimp thread was a joy to make, as all the bobbins fitted on the pillow at the same time without piling them into layers and taking them out again. I also learned the short repeat quite fast. I did, however, begin the lace rather late, and while it was a lot faster than with a wider lace bobbin lace is never really fast to make. I made quite a long piece during the long Easter weekend but also payed for it with a terrible shoulder cramp.
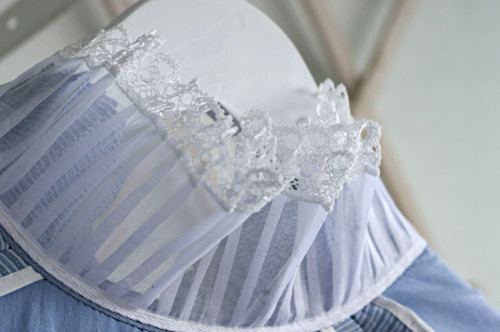
The actual ruffles are made of wonderfully sheer and fine cotton organdy. I hemmed the edge by hand and pleated them with my trusty 5mm pleater, but this time hopping over every second pleat. Thus the airy transparency of the fabric showed better, and I did not have quite that much lace to make. Besides I didn't want to cram the lace in too tightly either, but rather let the beautiful pattern show.
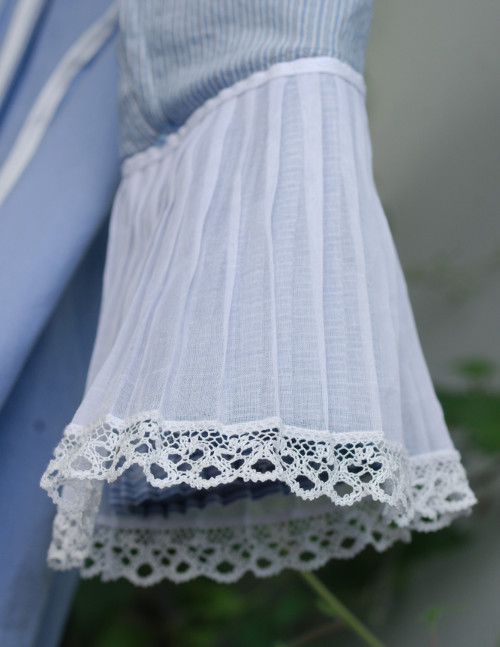
I sewed the finished lace on top of the hem to the already pleated ruffles. At the sleeves I had joined the lace edges and had to ease the lace into the folds a bit to get it match the ruffle length so that the ruffle seam would end up neatly under a pleat. The pleating opened a bit when adding the lace, but I carefully pressed the pleats back into shape without really touching the lace. Then I gathered the ruffles on cotton tape and basted them on.
The ruffles, albeit a small detail added a lot to the overall look, and I'm really happy about how they turned out.
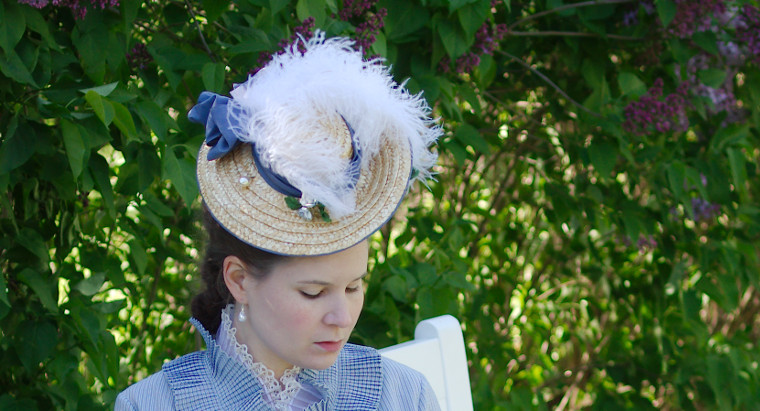
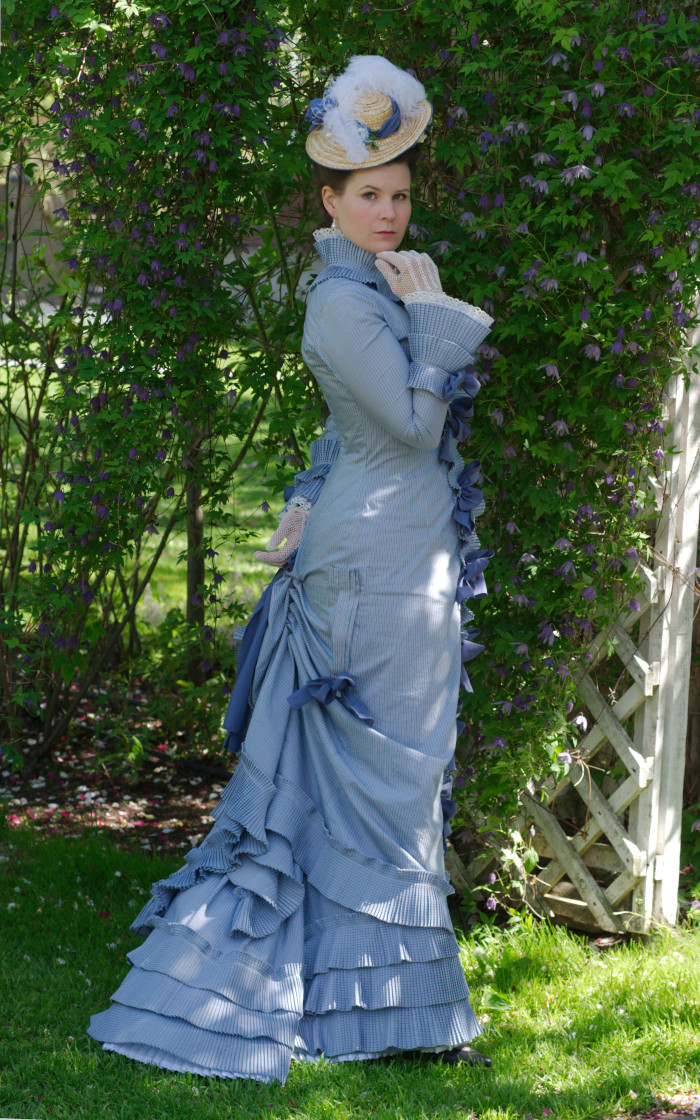
Accessorising
Further additions to the outfit were a cute little hat and small reticule. More about the hat here.
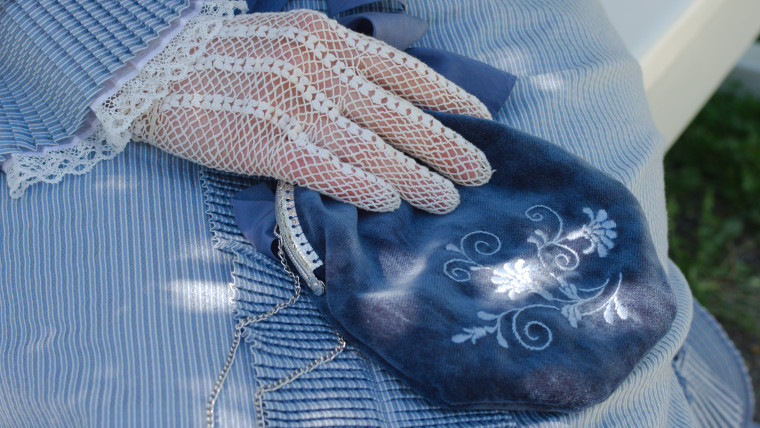
I found a leftover piece of velvet that matched the silk bows quite nicely, and added some embroidery. The crochet gloves are a gift from my boss, originally belonging to her mother. The shoes are blatantly modern ones that I thought would do.
All the accessories were happily finished in time for the Bath weekend, so I could this year attend both the ball and the brunsch.
Final thoughts
Like I had hoped the material proved to be excellent for traveling. The dress is really lightweight, didn't take up much luggage space or wrinkle almost at all. The pleats have also stayed beautifully in shape. The fabric was really a lucky find, and while of course I dream of making a real silk dress some day its much less stressful to practice with cheaper alternatives.
The whole day dress project turned out to be a bit harder than I had expected, but I learned a lot and honestly think the result is beautiful. Like with my ballgown, the first time I wore it I was just very happy and felt that I had always wanted to wear just this dress.