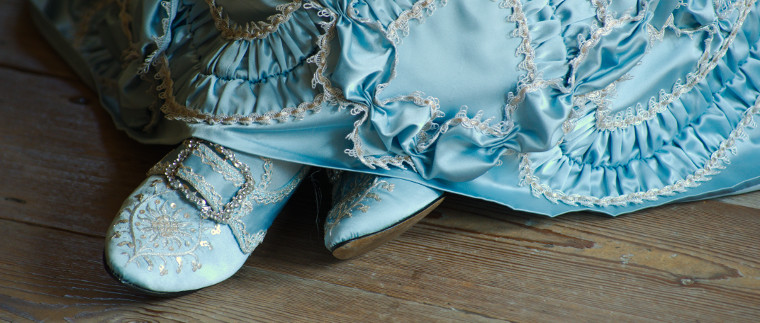
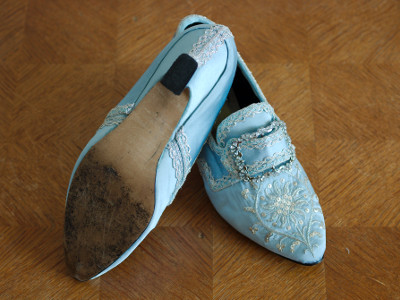
Shoes for Robe a'la Francaise, 2017
The pretty new Robe a la Francaise needed a matching pair of shoes, naturally. I was not happy to merely follow the familiar route of my pink shoes in throwing in metal braid for the edges but this time wanted to try adding some extra decoration as well. Because, well, more is more when it comes to period fashion.
Choosing
the style
My early inspiration for this project included Queen Lovisa Ulrika's coronation shoes as well as Martha Washington's wedding shoes. The latter in particular had a fascinating passementerie-type decoration, and I toyed with the idea trying to create something similar in bobbin lace.
But then everything got delayed, the shoes were left to be the last stage of the huge " a Francaise & accessories"-project, and suddenly I was in a hurry to get everything finished for the photoshoot. Needless to say, this is never a good beginning point for anything, ever. The bobbin lace class was on a summer break, too, and as I had only done some relatively simple continuous Bucks point this far I realized it wouldn't be a terribly great idea to try something new all by myself with a deadline.
So, I deciced to settle for some rather basic embroidery instead, like in the pocket book project some years ago. You do see rather simple embroidery designs on shoes from the latter half of the century.

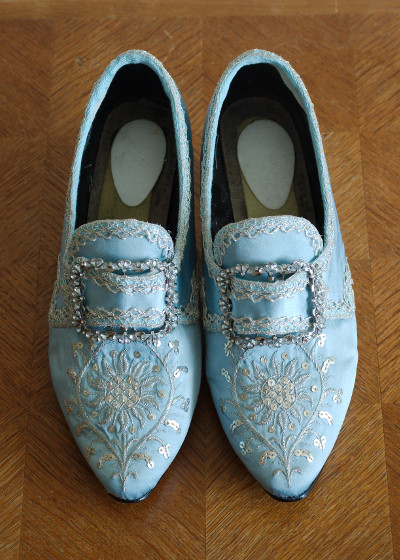
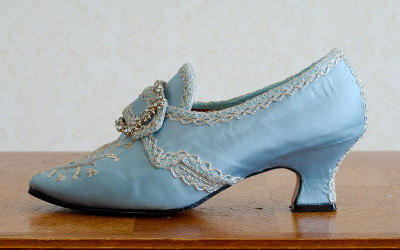
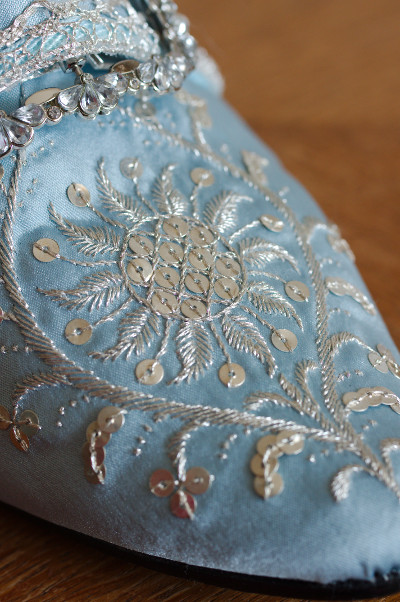
1785-1790, Galleria del Costume di Palazzo Pitti
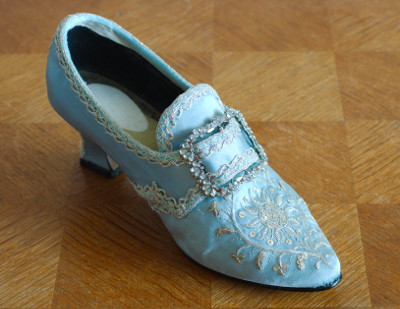
After some scanty browsing through images I fell in love with these beauties. They are dated a bit later than the 1760's Francaise, and of course I had to pick the one source I could not find any other pictures of. But they are satin shoes, edged with metal braid and with metal embroidery, in other words a sound enough base for my shoe project. I decided to just draft an embroidery design based roughly on what I could see of the original.
Re-styling
the basic shoe
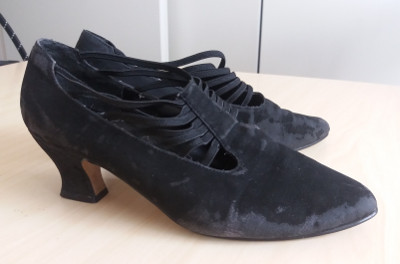
I already had a few second hand pairs of shoes in my stash purchased for upcycling purposes. I picked this pair with a fake suede top which was literally falling apart but with a rather nicely shaped heel, which I was more interested in.
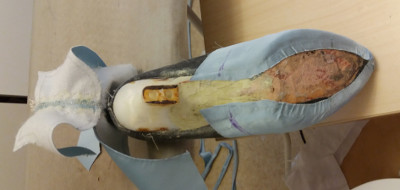
So, I began to pull the shoes apart. This is always the funniest part of the whole thing as you can easily imagine. The glue in old shoes generally gives way quite easily, especially if you treat them with a bit of steam. I removed the outer soles, heel tips and the top fabric, cutting it very carefully away at the seams.
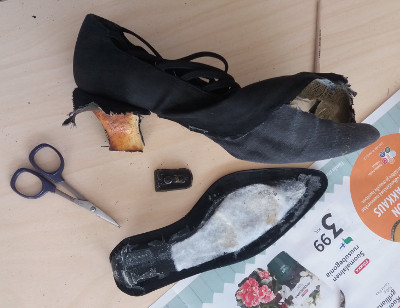
The lowered side edges with the elastic bands sewn inside them had to go too, so they would not leave a visible line on the finished shoe. I left some of the original narrow tongue piece though to support the tongue I would build over it.
I have wide feet, so often when re-fashioning shoes I try to enlarge the toe part just a bit by cutting a slit or too on the top of the toe and inserting wedges of leather. I also like to wear shaped insoles which support the arch of the foot and add a bit of padding for the ball of foot, which add greatly to the comfort (especially in cheap shoes which tend not to be very comfy). They also take a bit of room inside the shoe, so it's important to fit the shoes with the insoles when altering them.
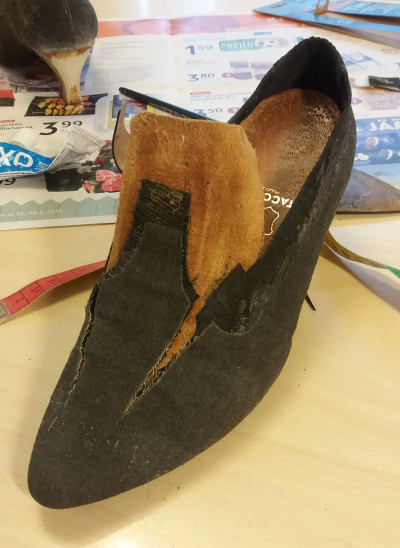
After cutting the shoes to shreds it was the time to begin to assemble them again. First I glued thin strips of leather to build back the lowered side edges. Then I glued a large piece of thick leather under the top of the toebox, continuing up to form the base for the tongue. I fitted this piece carefully.
Then I glued small pieces of leather to fill the opened slits of the toebox and to cover the underside of the tongue. At this point it's important to get as even surface as possible under the final fabric tops. At this point I left the tongue a bit extra large to be cut to the final stage later.

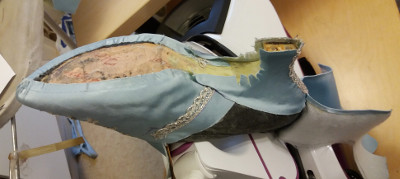
The heel had a pretty nice shape to begin with, but I thought I could still alter it slightly to get closer to an 18th century shape. Unfortunately the bottom of the heel was narrow lengthwise, not a very period correct shape, but that couldn't be helped. The heel also had a slightly squared shape, and the back was more rounded than the sharply narrowing profile of the original shoe.
Well, plastic is easy to shape with a knife and a file, and I did manage to get a slightly more sharply waisted shape in the end. I had to be careful not to cut into the heel tip pin holes of course, so the amount I could actually remove from the heel was limited.
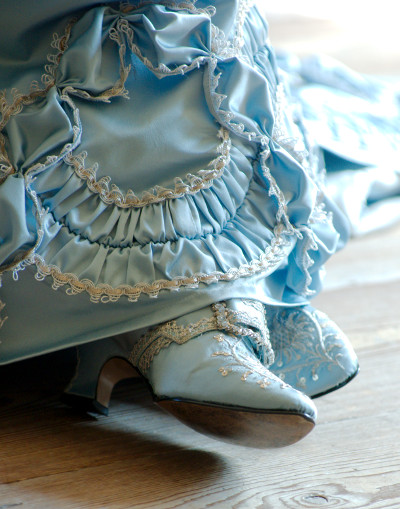
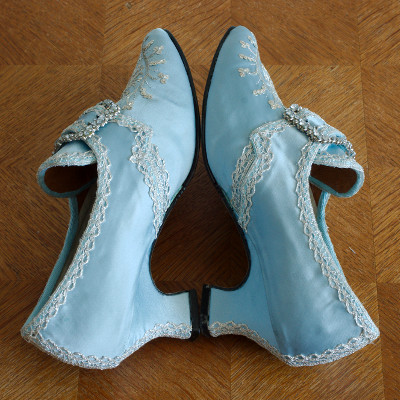
18th century heels continue long under the foot in a graceful curve, a very different silhouette from the modern sharp angle joining the heel. Of course this makes the heels appear lower, but it also together with curved heel shifts the visual balance of the shoe forward, thus making the feet look smaller, which was very desirable at the time.
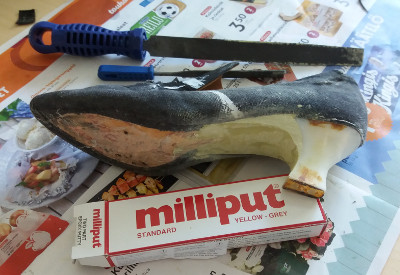
So, after taking some off from the heel it was now the time to add some padding for change. I have a few times experimented with using epoxy putty to pad the inner curve of the heel with good results. It can be shaped by hand and finished with a file when it's hardened. You don't even need very much to create a much nicer shape that really gives the period feel to a shoe.
Anyway, the finished heel was still far from the graceful sweep of the original (which is somewhat higher too, to be fair), but okay.
Fabric uppers and
embroidery
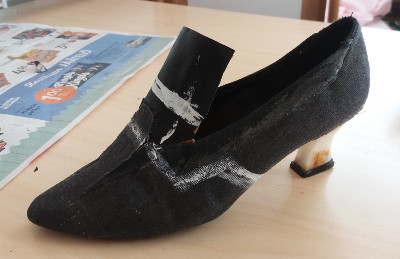
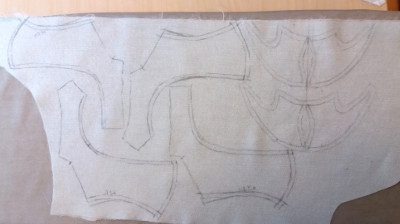
The shoes were in their new shape now, so it was time to draft the patterns for the tops. I marked lines for the pieces and a center line for the embroidery. Then I fitted pieces of calico over the different parts of the shoe and marked the seams and edges with pencil.
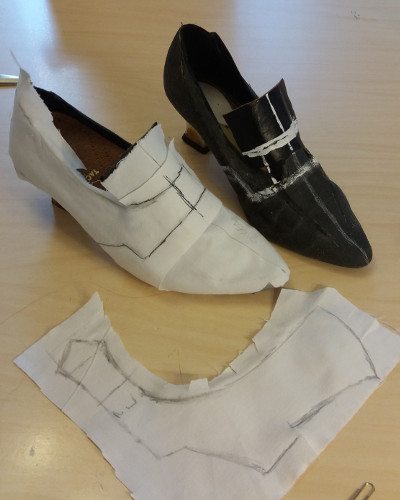
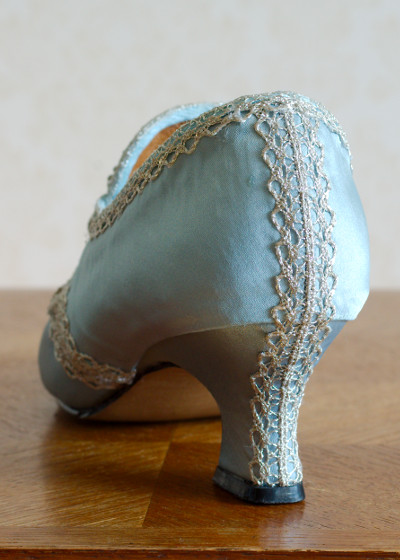
My lovingly crafted curved heel proved problematic at this point. I just couldn't get a single piece of fabric to shape itself around the heel no matter how hard I tried. Well, I might have managed with the soft calico, but I was realistic enough to admit that it would never work in satin backed with a fusible interfacing. In the end I gave up and decided to just draft a seam down the back of the heel and cover it with braid. You do see braid decoration on the heels sometimes.
LI cut the pieces from the satin left over from the Francaise and added a heavy but soft fusible interlining with a fluffy surface. This is not a period correct solution, of course, but the interlining helps to smooth any unevenness in the surface to be covered and, most importantly, absorbs most of the glue so it does not stain the top material. Both are quite essential points when working with satin.
As you can perhaps spot in the picture, I somehow managed to cut one piece twice in the same direction rather than mirror image, so I had to cut it anew later. I had plenty of material, thankfully, but still felt somewhat foolish.
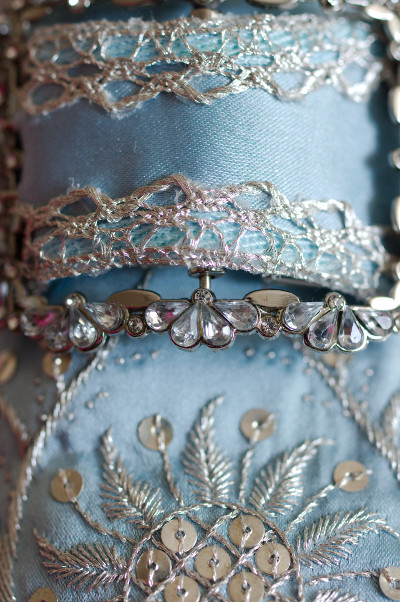
At this point I could say a word about the materials. The metal braid I used in the Francaise was a mix of pale reddish gold and silver. I pretty soon realized that the same braid was too thick to be used on the shoes, and I used all of it in the dress anyway, so I had to find something else. Happily I found a very nice narrow silver lace in a very pale and warm silver color that matched the dress trimming rather closely.
I already had some metal sequins in my stash which matched the lace. And then I also ran into a perfect metal embroidery thread when searching for something else. It was even rather easy to work with as metal threads go. All too often the best of plans fall with the difficulties of finding just the right materials, but this time I had the luck to find three different goods in the same color.
I had also planned to dye the edging tape that would go under the lace to match the satin, but before I got around to it I happened to find the perfect tape in the right color too.
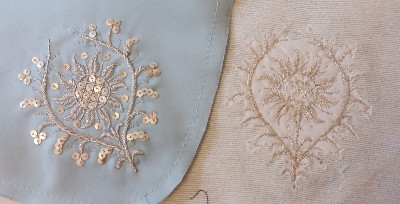
Then there was the embroidery. Like mentioned earlier, I zoomed the image of my inspiration shoes to get some idea of the embroidery pattern, then pulled the rest out of my head. I did take a look of some other period embroidery works, though.
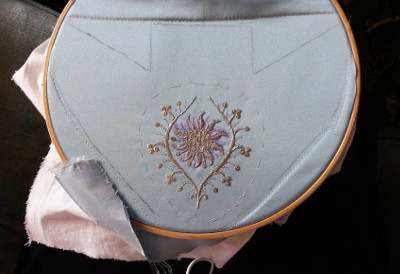
I marked the toe parts on a bit larger pieces on material and sewed them on a piece of calico to get them secured on an embroidery hoop. I have sometimes had problems with not getting rid of the fold that the hoop presses on fabric no matter now much I ironed it, so now I made sure to use a hoop large enough to fit the whole piece and not just the embroidered area.
From what I could tell the original seemed to be worked in rather simple, not very dense satin stitch and stem stitch with metal sequins, some of which seemed to have fallen off. I tried to imitate the style but of course you almost unconsciously add your own touch. Getting both shoe tops identical was bit of a challenge, but then again the originals were hand made too and no one looks at your shoes that carefully anyway. Anyway, the embroidery was, not surprisingly, quite my favorite part of the project.
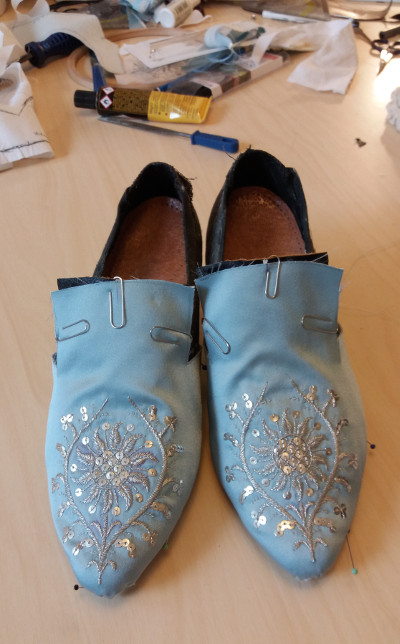
When I had finished the embroidery I cut off the extra fabric and tried the toe pieces on. Happily they seemed just right and I could continue with the rest of the uppers.
Putting
the shoes back together
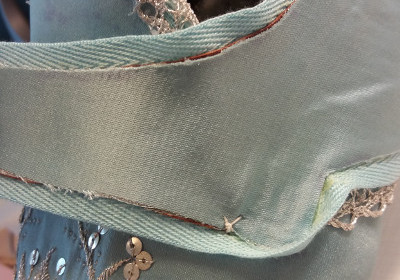
I sewed the back seam on the heel and the counter tops, cut the seam allowances to a minimum and clipped them for a smooth fit. I tried both pieces on and checked the place of the joining seam. Then I sewed a few centimeter of the joining seam at the center back, only just enough to be able to sew the lace over the seam.
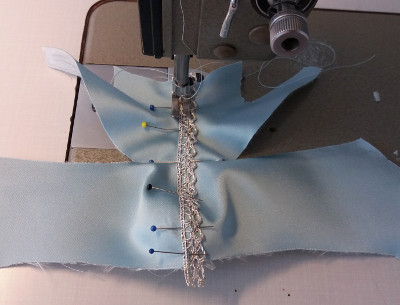
I sewed two rows of silver lace to cover the seam, first by machine and then the curved edge by hand. Elsewhere I would just glue the lace on, but as the heel gets so much wear I wanted to sew it.
Then I glued the rest of the side piece seam allowance to turn under following the edge of the heel.
Next I began to gradually glue the uppers on, beginning with the toe and the counter. I used contact adhensive. As before, I sewed a gathering thread on the toe piece seam allowance and pulled it to shape the seam allowance turn neatly under on the pointed toe. Another useful tool was a self-erasing fabric marker, which I used a lot both in marking the embroidery pattern and copying edge lines on the satin.
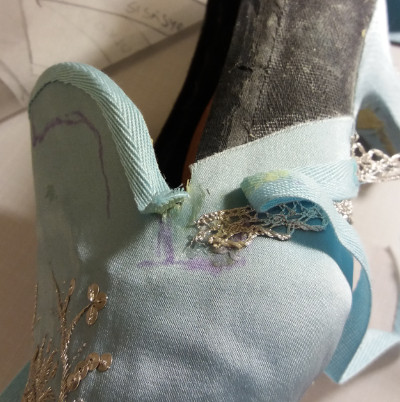
I cut the tongue to the final shape (In the picture you can see I have traced the outline of the buckle to guide the shaping) and glued the tape to cover the edge, then adding the silver lace for the final touch. On the sides I glued one side of the tape on the shoe for the side piece edge.
I glued the side pieces on, glued the leather backing on the wrong side of the buckle straps and trimmed the edges. Then I glued the edging tape all around the buckle straps and the edge of the shoe. Before glueing the other edge of the tape down I reinforced the buckle strap base with a few stitches with strong thread.

I finished the edging with the silver lace, glued on with a hot glue gun. It's a bit messy business. Hot glue dries transparent, but of course with a closer look you can see puddles of glue in the lace. Seen from a bit more distance all the bling fools the eye to overlook that, though.
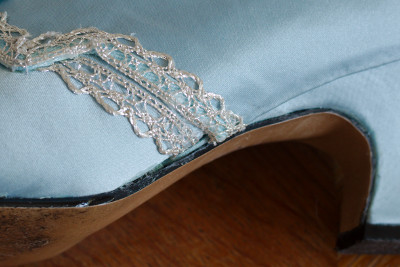
I did mess a bit with aligning the side piece edges on the underside on of the shoe. All the seam allowances were also so thick that I had to resort to some last minute padding to fill the gaps and get the outer sole to settle smoothly. The undersides remain slightly asymmetrical, but then again it's something not very easy to notice when the shoes are on. It nevertheless piqued the perfectionist in me.
I glued the outer sole back on, starting from the toe backwards, shaped it to fit the altered heel and for the last thing hammered back the heel tips with a healthy dose of glue.
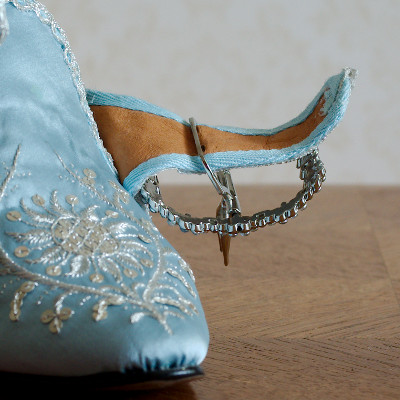
Then the only thing left was to fit the buckles and punch holes for them.
The fancy "Dauphine" buckles come from American Duchess Historical Footwear
Final
thoughts
I have really enjoyed my shoe remaking projects before, but this time I often found myself totally lacking enthusiasm for it. I had looked forward to making the Francaise Shoes, planned them a lot beforehand, and them I found myself on a hurry it all took more time than I had rather optimistically calculated, and there were things I would rather have been doing.
Also when I finally got the shoes done I could at first see just all the imperfections. The blue satin, lovely in itself, highlighted all the bumps, ridges, wrinkles and seam allowances. And of course there remain some glue stains. And they still look quite modern in shape. I guess to get perfect period shoes one should really learn to make them from a scratch like Merja from Before the Automobile, and not just play around with modern shoes and glue.
But then again, for the re-done modern shoes that they are the shoes look very pretty. The semi-modern shape is at least comfy on feet used to modern footwear, and of course one has to be able to dance. On an afterthought I might add that after dancing in these at one ball already I might have gone just a bit overboard with widening the toe. I had also left the buckle straps a bit lose, and in wear the shoes stretched just enough for my feet to slide too far into the narrow toe which is not very comfortable. Oh well, you learn.
The shoes look very nice with the Francaise, and finishing the outfit was the main reason for making them. After some time I warmed to them considerably myself and am now rather in love with them again, having happily forgotten most of the frustration associated with making them.