Knit bolero, 2010

For the first thing I apologize for the possibility of this project page being quite unintelligible, as I'm not familiar at all with knitting terms in English. Not that my sewing rants always have the corrects terms, either... That being said, let's move on to the project...

Receiving a wedding invitation some time ago I was happy enough to already know what I would be wearing, as I had found a pretty chiffon dress on sale last summer with only a bit over 20 euros. As I suck at working with chiffon, if I want a chiffon dress it's better to buy one. The wedding date being on January, I would also need some kind of bolero with it. A bolero is always a bit tricky, as it should go well with the dress and not be too conspicious.

At first I of course thought of sewing one, but then realized that such a tiny garment would not take too long to finish by knitting either, and would look nice with the chiffon. Moreover, it's often easier to find a matching yearn than a matching material, and a woollen knit would be warm too. The dress was of an odd bright lavender blue shade, and I was lucky enough to a fluffy mohair yarn in light greyish blue. I searched through all the magazines I had for a pattern, but couldn't find any that matched my vision precicely, as I wanted a fitted one which would not cover the beautiful bodice of the dress. I could of course have continued my hunt for the perfect pattern at library, but knowing from experience that using a pattern is not a fool-proof way to perfect fit either, I decided to try and figure out the pattern myself by experimenting. After all, knitting can (at least in theory) be unraveled completely at any point, but on the other hand, unlike in sewing you won't have the advantage of the precaution of generous seam allowances.

So I begun to experiment with different sized needles. I wanted a rather loose stockinette knit which would be relatively easy to unravel and also have some elasticity. When I was happy with my test strip, I measured it to estimate the number of stitches I should be using.

I began the sleeve by casting about 40 stitches. I thought it would be a good idea to knit the sleeves with 5 needles like socks. The only part of the idea which worked was that they were indeed easier to try on, but otherways it was a very bad idea – the I kept dropping the needles all the time, which wasn't very nice, especially as I knitted a lot in a bus, the places where the knit was continued on another needle showed very clearly, and for some reason the rest of it wasn't very regular either. At last I gave up and unraveled the first sleeve, and began anew with only two needles.

The round-knit attempt at sleeve had, however, served as a good mock up, and as it had been slightly tight on the upper arm I now cast the same number of stitches on the elbow but gradually increased in total 5 stitches on both edges. Now the knit was much more neat and regular, and I was happy to have taken the trouble to begin anew.

Having reached the armhole (again) I bound off 3 stitches (or so) in both edges, decreased some more in the next few rows to create a smooth curve, and then began to decrease one stitch every 6th row on both edges in order to create a raglan-shaped sleeve. After about 12cm I reached the estimated point of neckline, and began decreasing one stitch every second row in the front edge and one stitch every 4th row in the back. About 19cm from the armhole, close to neck I began decreasing one stitch on every row on front edge and one stitch every second row in the back, thus getting to the top of the sleevehead. Of course I tried the sleeve on several times in between knitting, which slowed the project down somewhat, but the knitting itself went pretty fast.


Happy with the sleeve, I made the other one, and then pinned them on my dressmaker's dummy. I had already begun the back piece with 62 stitches, and knitted about 7cm, thus reaching the beginning of the armhole. I bound of 4 stitches (or so) on both edges, and then some more on the next few rows to create the curve of the armhole. I had estimated with the dummy and the sleeves that decreasing one stitch every 4th row on both edges might result in the correct shape, which it actually did, and I ended up with 22 stitches on the top of the back piece. Having first basted the seams and tried the thing on, I sewed them.

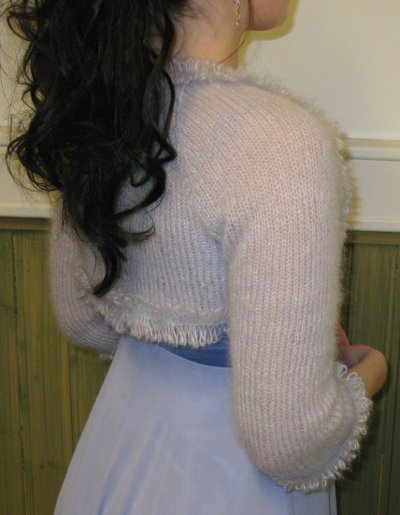
Now there was only left little pieces on the front edges. I cast the required stitches straight from the edge of the sleeve from side seam to neckline point, and began to knit, decreasing one stitch every second row in the front edge and increasing a few times on the side seam edge. Towards the end of the piece I decreased a stitch on every row, and when the side seams were about the same length I bound off the few remaining stitches, thus ending up with a smoothly curved edge.

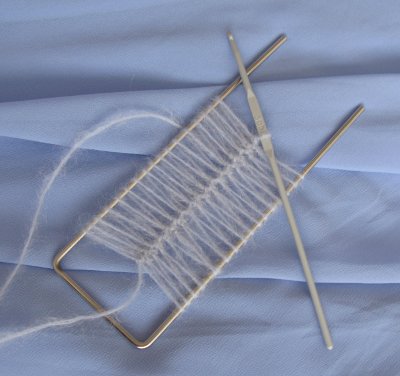
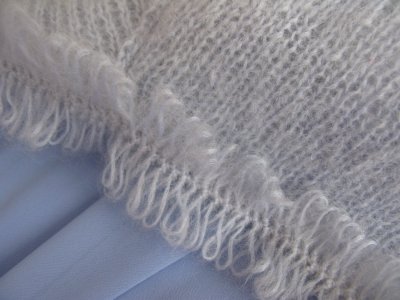
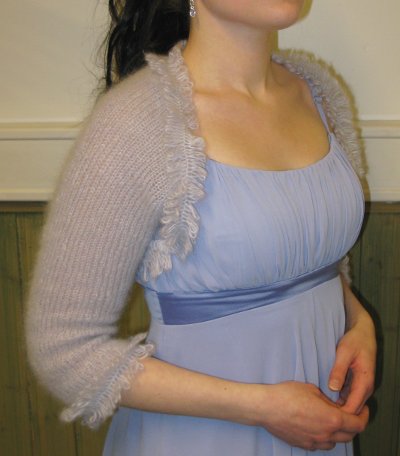
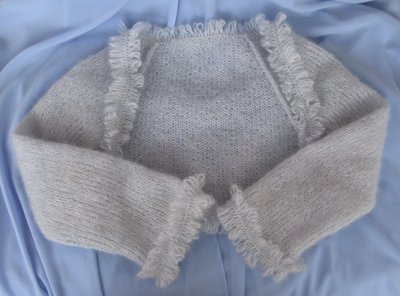
I wanted the bolero to be quite plain, but not too casual, so I decided to edge it with crocheted hairpin lace, which is fast and easy to make. I sewed it on the edges, which finished them neatly and prevented them curling upwards, and created a pretty effect.

The bolero turned out quite like I had intended, and accentuates the dress prettily – though the colour could perhaps be just a bit brighter, as the dress has a rather vivid hue. Perfect colour match is often so hard to find, however, that I'm quite happy with what I found. Like with the dress I made in school, I'm enchanted by the soft combination of chiffon and knit. The fit of the bolero appeared to have some problems, though, when I had worn it for some time it began to slide too open at the front. I think I may try if hooks on the bolero and corresponding loops on the bodice would solve the problem. Anyway, what was really great about the bolero was that thin as it was, it was actually quite warm, which was a good thing as the wedding day was very cold. I think I may even make another black one sometime.
<< Back to the Project gallery