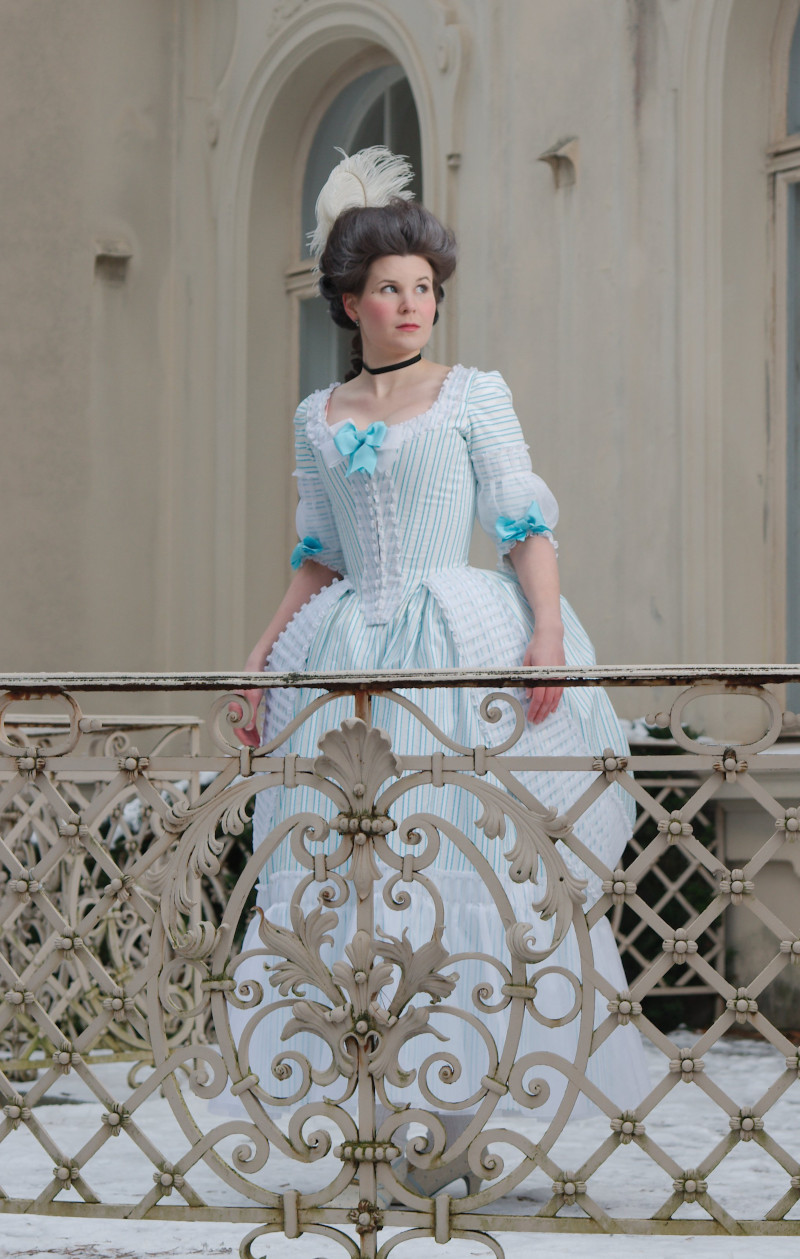
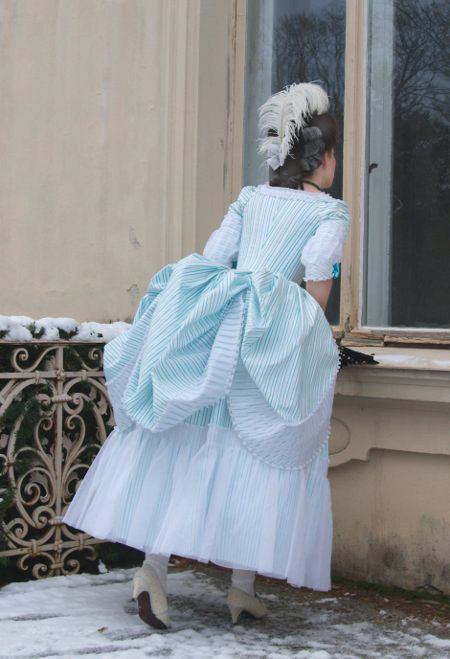
Robe á la Anglaise, 2012
A few years ago, in a little fabric shop near Stockholm, I met with this supremely lovely striped material which looks almost like silk (probably it's a blend of viscose and polyamide). It was totally late 18th century, and I just had to get it. 2012 saw the perfect occasion for it: A ball in honour of the founder of my hometown, Gustaf (Gustavus) III. Late 18th century styles in fashion and especially in home decoration go in scandinavia under the term "gustavian", and elegant striped materials in light tones are considered very gustavian.
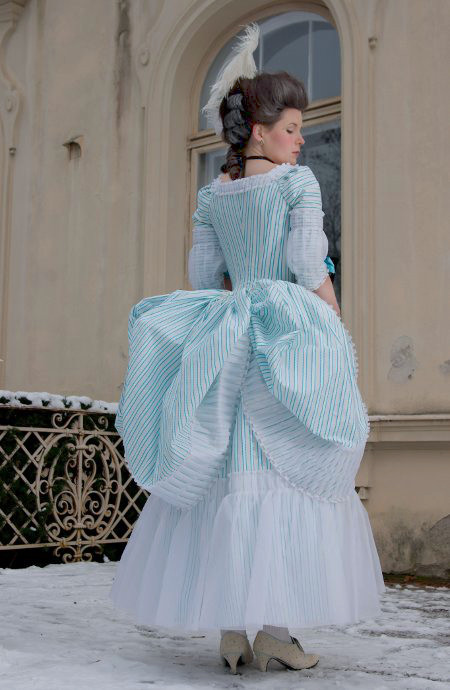
After musing over different 1770/80's dress styles I ended
up with my favorite, the ever-charming robe anglaise with
the skirts lifted to puffs at the back. Although I already
have one, making another would hardly be boring. My closet
has so far lacked a real fancy ball gown, and although a
polonaise is strictly speaking a day dress I thought that in
(fake) silk it would go as evening wear too - at least in my
not-terribly-period-correct world. The first step towards a
ball dress was to make a new, well fitting pair of stays
to wear with it. Having finally finished them earlier the
same year I could began planning the dress in earnest.

The Material
I had bought all that remained in the bolt, hoping that I would get something out of it. How much I needed was surprisingly hard to estimate as the stripes run horizontally and the material was only 90cm wide. My original plan was to make a separate petticoat of different, preferably washable material if needed, which would also have been sensible as the petticoat gets most dirt. But then again I have so many jacket and petticoat ensembles that for once I wanted a complete dress with a matching petticoat.
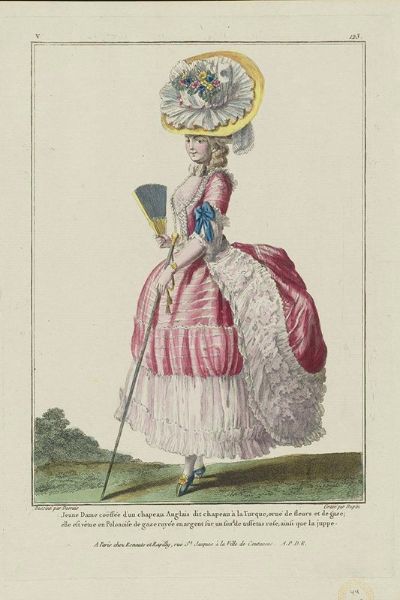
I calculated that I would have just enough material for a polonaise and a petticoat if I used something else for trimming. I was at first reluctant to give up the idea of delightful striped ruffles, but after browsing through several fashion plates I warmed to the idea of gauze trimming.

By the way, I realized only later that at least the blue dress above is a real polonaise dress, which has the robe fronts hanging open over a waistcoat, not a closed front anglaise-type of dress I was making.
As I intended the dress for evening wear I decided to make them of silk organza, which was also sheer enough to let the lovely stripes show through. This, of course, banished any remaining hopes of washing it, but I had already decided that I wanted one super pretty dress in my comparatively sensible closet, even if I'd have to pay for dry cleaning now and then. As as it would be a polonaise, I could also make the petticoat ankle-length, which would to some extent protect the silk ruffles from being torn and gathering dirt.
Drafting
the pattern
My main pattern source was Janet Arnolds "Patterns of fashion", and of course the cut was heavily based on my first robe a la anglaise. I had cut the back en fourreau on that one, so now I wanted to cut the skirt separate for change, a later cut which also went with the 1780's inspired narrow stripe.
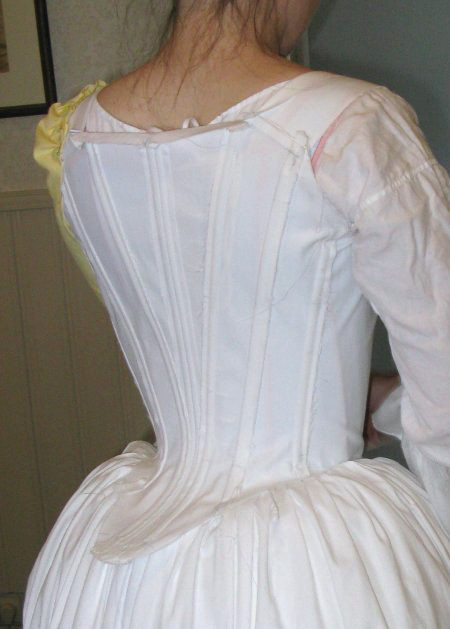
Following Arnold I also added light boning on the bodice seams, which seemed to work well on my mock up. Especially the bones running from the sides of the neckline down to the tip of waist proved marvellous in keeping the front straight, unlike in my first polonaise where the lower edge tends to fold and crumple. Another great thing was that the bodice didn't seem to move at all when I moved, which is highly desirable with a low-cut decolletage.

The sleeve pattern was also based on that of the polonaise number 1. I had remembered the sleeve to be wider than it actually was, and possessed by some mental disorder had actually first drafted it smaller this time, which resulted in utter waste of mock up material. Having quickly came back to my senses I returned to the original sleeve pattern, only changing the sleeve end by removing the vertical darts in the front and curving it more instead in order to make pleating the organza easier.
This time I wanted the shoulder pleats more on the back of the shoulder, and to get enough room for my shoulders (which tend to curve frontward because I spend too much time crouching over sewing and too little sitting upright wearing stays) I added a bit on the front of the sleevehead. This of course caused the sleevehead to be way too long for the armscye, and the extra allowance wouldn't settle very smoothly on taffeta, but the only other alternative was to make the pleats go too far on the front of the shoulder, so I decided to give them a try. Another thing that helped a bit in the mock up sleeve fitting was to rotate it forward for about 1cm, which seemed to work well.
I had made the mock up version and final pattern soon after finishing the new stays in April, but it was July until I had time again to turn my attention on this project. The only thing I had done since April had been to begin hemming some of the organza ruffles. Now I had my summer vacation and plenty of time to concentrate on the polonaise. Thanks to my previous, carefully made final mock up I was now able to work on the dress without having to worry about the fit or leave room for alterations.
Sewing the dress
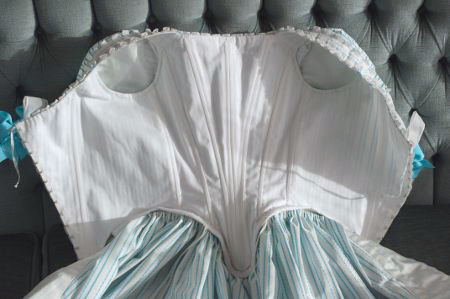
This time I wanted to try a period construction technique in which the lining is made up first and the fashion fabric pieces are mounted on it one by one. It requires some hand-sewing, but seemed interesting and what's more, an extremely strong and durable construction i a very tight garment as the lining takes most of the strain. Your Wardrobe Unlock'd has a wonderful tutorial on the subject ("c. 1775 Dress") by Serena Dyer which was immense help in figuring out how it works.
So, for the first thing I attacked the lining. For it I chose coutil instead of the more period-correct option of strong linen, because I've become such a steadfast believer in coutil lately. It's also thick enough to mask boning channels very well. Coutil lining made the bodice quite stiff, but that can't be a bad thing. For the boning I used plastic boning, as it was slimmer than the cable tie I usually use. I'm not perfectionistic enough for hand sewing lining, so it's put together by machine. At this point I also sewed the hooks and eyes on the front edges. At the quick fitting the lining seemed to fit well.
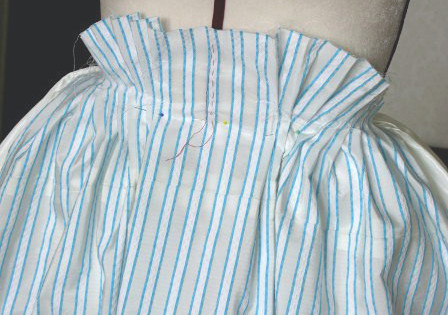
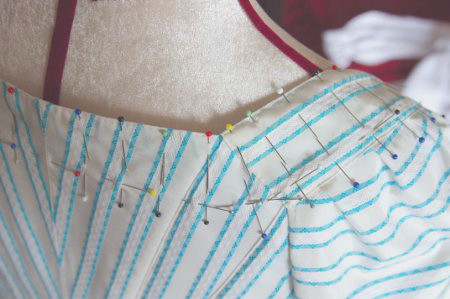
I had planned to cut the center back pieces on bias to get a nice chevron pattern, but on the last minute changed my mind an cut them on the straight grain as the stripes did form a chevron v-shape above the waistline that way too. I cut the next pieces so that the stripes would be evenly spaced at the waist, which made the upper parts go more ramdomly. I cut the front pieces on the straight grain (taken from Arnold's pattern) so that both sides of the center front point had a stripe in the middle. In the shoulder pieces I cut the stripes to continue from the front piece so that the seam would be almost invisible on the front side. I should perhaps planned the cutting and matching the stripes a bit more carefully, as we shall see later. Stripes teach you a lot about cutting, and I certainly have much to learn yet!
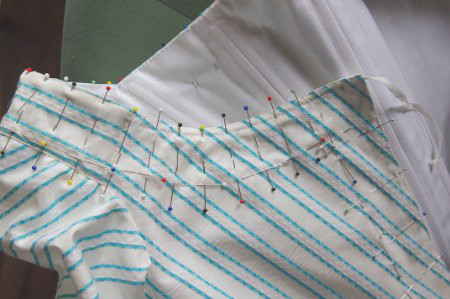
I closed the center back seam on machine and then basted the center back pieces on the lining. Then I began pinning and mounting the other pieces from the center back outwards. The stripes again caused an added element of challenge, but luckily I had cut the pieces with ample seam allowance as I had to do some adjusting along the way.
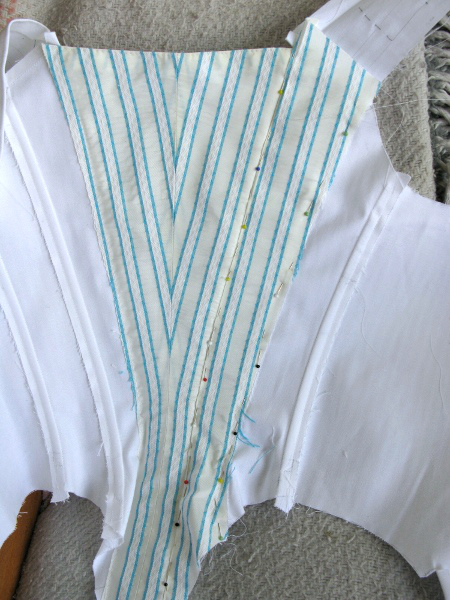
I tried to position the stripes with an even distance at waist, and on the upper back parallel to the stripes on the center back pieces. Despite all my efforts some broken stripes were inevitable. The result might have been better if I had palled the cutting with more care, but I confess I had been impatient to get to the sewing phase even though there was no hurry. Anyway, when I had finished I noticed that the pattern created by the stripes camouflages my carefully drafted seams quite completely. Well, at least I know they are there, right?
When mounting the front pieces I noticed to my great annoyance that something was amiss: If I matched the stripes symmetrically at the front edges they ended up irregular at the side seams. I had already had to adjust the pieces a bit at the back to get both sides symmetrical, so prabably that caused the stripes meet the side seam differently on each side. This was particularly frustrating as one of them happened to be perfect and the other one with a half-stripe looked very tacky in comparison. The was nothing to do about it anymore except perhaps rip all the taffeta pieces off and begin completely anew, so I decided to live with it. I consoled myself with the wisdom of my Great-Aunt, who is reported to have made the following comment regarding her decision to add a gore only on one side of a crocheted vest that had come out too small: "No one is ever going to look at at both sides at once." (Sadly the Karelian dialect is lost in translation.)
When mounting the front pieces I also added a drawstring channel on the neckline from the shoulder piece seam to the front edges. The drawstring gathers the neckline just a bit so that it doesn't gap.
At this point I switched to the skirts. I used all the material I had left after cutting the bodice and sleeves, giving the dress skirt 3 meters and leaving the rest 2,5m to the petticoat. As the fabric was only 90cm wide and the stripe was running on the weave my skirt length would thus be only 90cm, which would as it would be worn looped up anyway.
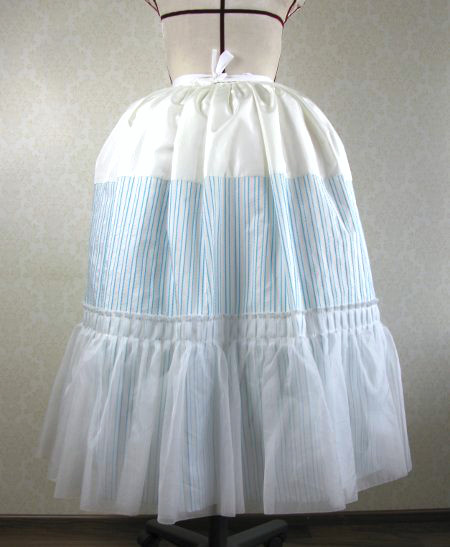
The petticoat, however, had to be at least of a decent length, polonaise or not, and my transparent hem ruffle wouldn't cover anything either. Thus I cut the top of the back piece of white taffeta and added the extra strip on the front piece. This fabric saving trick was also commonly used in the period and the patchwork is just covered under the top skirts even when they are looped up. On the front the fabric join would be mostly covered by by the dress bodice tip and skirt fronts.
I had cut the back of the petticoat about 20cm wider than the front to accomodate the bumroll. I closed one side seam, leaving pocket slit on the top, but left the other open so that pleating the ruffle would be easier.
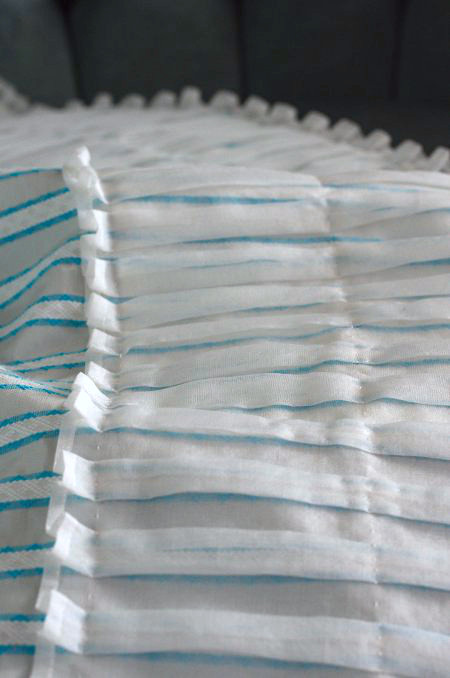
I had decided to pleat the organza in box pleats. I reasoned that since pleating alone would take considerable time, I could as well give free rein to my perfectionish here (again, I had made so many quickly done projects lately) and hem all the trimming by hand. I could use a small running stitch which would go fast. Well, it was relatively fast, but there was over 30 meters of it.
I worked on the hemming throughout the summer, as I didn't need all the different trimming pieces at once. The sewing was okay but ironing the tiny hem required a certain amount of patience that I didn't always have, which explains the hemming width varying wildly between 3mm and 6mm. I used silk thread, as in most of the hand sewing in this dress (save parts that needed a stronger thread), as it's so nice to work with.
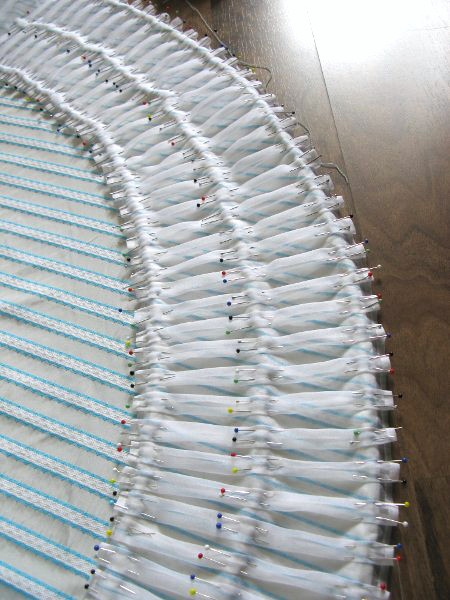
The petticoat ruffle was 42cm wide and I had cut it generously long. I basted a guideline thread on the petticoat where the top edge of it would go, and then began pinning the pleats. It was surprisingly easy. Silk organza, which had been a stranger to me until now, is totally different from it's (distant) polyester cousin. It was a pleasure to pleat and the pleats settled beautifully without any ironing. Pins also stayed well on the densely woven material, unlike in many sheer materials which seem to spit pins out. Here the stripes also showed their good side, I could easily make even pleating based on them without any measuring at all. I pinned the pleats over the stripes, making them a bit wider than the stripe to get a fuller ruffle. I attached them with two rows of stitching, the first one 1cm from the top edge and the other 4cm below.
I left a large gap on the pleating at the open side seam. I closed the side seam, hemmed the seam allowance by hand and finished the pocket slits. Then I measured where the seam would go in the organza, trimmed away the extra and finished it with a french seam. I was sceptical at first how a machine sewed seam would look in the organza, as my machine tends to crumple thin materials, but the wonderful silk organza tamed my machine and settled neatly with ironing. For the last thing I finished the rest of the pleating.
I pleated the back of the petticoat into a waistband, but left the front alone at this stage.
I was beginning to think that my old bumroll might be too small to create the ultra-puffy look I was after, and a bigger one might alter the balance of the petticoat so that the front was better left unfinished before I was sure what would go under it.
Next I moved on to the dress skirt. I cut the front corners rounded and sewed a 15cm wide taffeta facing on them. On the straight middle part I hemmed the edge by hand. I had hemmed a 17cm wide strip of organza, which narrowed towards the ends to 8,5cm. On the straight middle part I pinned it by the stripes width, but the curved fronts were a bit more tricky.

Measuring by the stripes the pleat centers were spaced 2,25cm apart. I had calculated the pleated strip to be twice as long as the edge, and measured the shaped ends accordingly. The problems began when I began to pin the organza with a measure tape. My usual pleating method is to pin box pleats at the center and between the pleats, and then turn the sides under, but now I discovered that this leaves a gap between the pleats in the middle where the pin is, which shows through in a tranparent material. The pleats also opened in the middle, which I tried to fix by adding an additional row of stitching in the middle. Despite these problems I pinned and stitched down almost all of the first front edge, but when I looked at it again the next morning I had to admit it looked awful. I decided to try a different method on the other front edge and see if it would turn out any better.
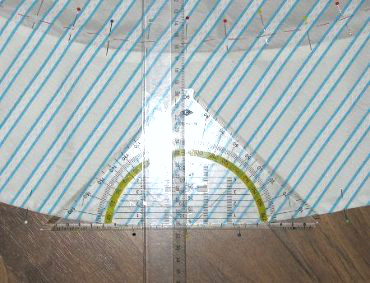
This time I placed my pins between the pleats and then formed the box pleats evenly between them. I also pinned the middle and not just the edges at once, which helped greatly to get the pleats straight. This time I also used a ruler to determine the placement of pins on the upper edge instead of calculating, which gave a little different but definitely more balanced layout for the curved pleating.
Having finally finished this front edge I found it much better than the first one, so I ripped the pleating off, ironed the needle marks away and remade it. Now I was fairly satisfied with the result, although the pleats still look a bit narrower than the ones measured by the stripe in the middle. Like I mentioned, my previous technique leaves a gap inside the box pleats which makes them wider, and of course the thickness of the material also plays a part on the pleat width.

Next I began to work on the sleeves. I lined them with off white taffeta and basted vertical guideline threads for the organza on the center front and back. I also basted the curving line of the second stitching at the elbow, and of course the pleating marks on the sleevehead. Then I closed the fashion fabric sleeve seam on machine and the lining seam by hand.
Pleating the organza on the curves sleeve was a bit tricky, in fact even more tricky than I had anticipated. Even pleating would probably have been impossible to make as the transparent material betrays any irregularity inside the pleats even if the top looks even. I decided to pleat the top edge and the elbow and leave the organza puff freely between them.
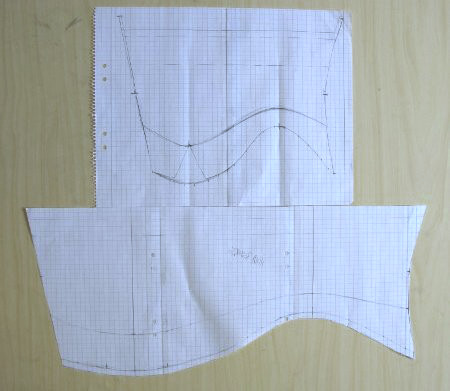
As the organza would have to be hemmed beforehand I couldn't just begin experimenting with pins. At last I ended up drafting a pattern for it by scaling the sleeve twice as wide, leaving out the elbow dart and straightening the curves seam (the last thing doesn't show in the picture yet). I closed the seam by machine into a french seam and hemmed the edges by hand. Ironing the hem of the curved lower edge was quite tricky and it ended up much more irregular than the other organza hems.
I basted guideline threads on the organza at the center front and center back, and began pinning at them. I made the top edge first, which was easy to pin at regular height by the vertical stripe. The outer arm went easily with the by now familiar 4,5cm to 2,25cm ratio, but on the inside of the arm the organza was for some reason too short for this, so I had to make the pleats narrower. Thinking back I had probably made some mistake on either scaling or altering the seam. On the other hand, as the sleeve narrowed quite a bit it was probably better in the end that there wasn't so much bagginess on the inside. Like I said, on transparent material the unevenness of the pleats on the inner arm are visible, but then again it's a place where they won't get much attention when the dress is on.
I attached the top edge with two row of stitching as in the petticoat and then began pleating the elbow. First I tried to calculate the pleat placement evenly, but it didn't really work on the curved piece so at last I ended up pleating them by ocular estimate through a lot unpinning and readjusting. I attached them with two rows of stitching, the first 1cm from the edge and the second following the previously basted curved line. For some reason, which I couldn't anticipate when drafting the pattern the organza is just the right length at the center front and back but is bagging at the sides, and I'm still quite not sure what is causing this effect.
I basted the finished sleeves on the bodice by the pleating- and balance marks based on the mock up, but of course I still had to adjust it further. The sleeves seemed to go too far out, so I moved the shoulder line in for about 0,7cm which made them look much better. Like I had anticipated I had a long battle with the front sleevehead, but at last I got a tolerable result. Okay, one shoulder still has a few tiny puckers that I just couldn't make disappear, but luckily it shows less when its on than in the hanger.
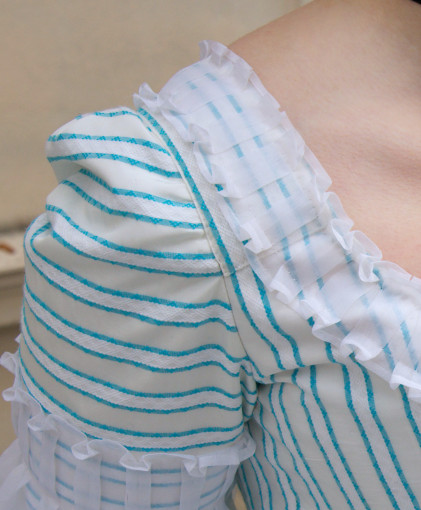
I sewed the sleeves on by machine on the underarm and also fastened the pleats by two rows of machine stitch on the shoulder. I trimmed away the extra seam allowance and covered the shoulder piece with the fashion fabric, naturally by hand though it would get mostly covered by the organza.
I own several garments with un-neatened seam allowances on the underarm (in most cases due to advancing deadline), so I'm really proud to report that in this case I turned in the seam allowances on the fashion fabric and the lining and sewed them together by hand.
I finished the bodice with the organza trimming on the neckline and front edges. As the 2/1 ratio in the pleats had looked a bit skimpy on the front edges I tried a few options to get a nicer look. 5,5cm of organza instead of 4,5cm pleated to the 2,25cm looked a bit too heavy, but 5cm looked perfect.
When I had tried the dress on it had seemed a bit too tight, perhaps I had laced myself tighter when trying on the lining or then the lining had had some little stretch that had dissappeared when I added the fashion fabric. Anyway, I pleated the organza strip to go a few millimetres over the edge, which disguises the gapping a bit. On the narrow point I turned the outer edges of the organza strip under. The pleated strip turned out very pretty and gives a nice finish to the bodice.
The last thing to do was to pleat the skirt to the bodice. Period dresses frequently have two options for finishing this seam: Either turning the seam allowances up between the bodice lining and top, or turning them back down with the skirt. The first option gives a nice neat finish, but in this case the seam allowances would show through the thin fashion fabric (as they already do at the back seams), so I went for the second one.
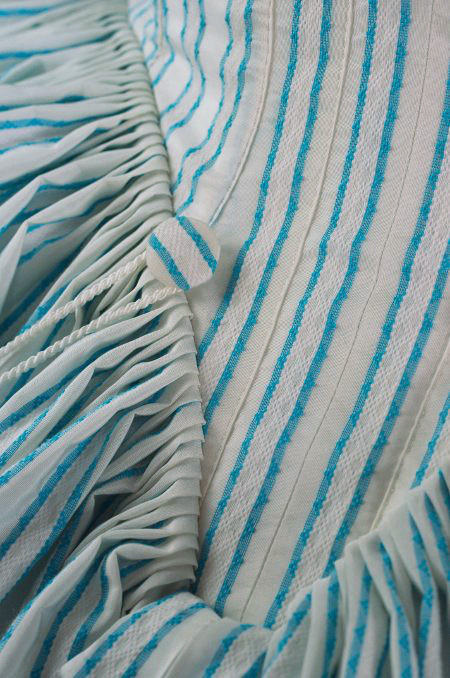
In period dresses the extra length at the center back is very often just turned downwards, not cut. This however felt rather difficult for me so I just lowered the center back of the skirt by 10cm beginning at the side seam. At the tip of the point I made two bigger box pleats (like in the green polonaise at Kyoto Costume Institute's book) which create an "en fourreau"-effect, especially as the stripes match.
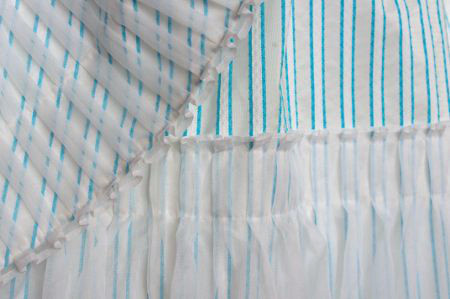
On the front edge of the skirt I made turned about 3cm deep pleat under the organza pleating and then began to pleat the rest of the skirt width. I wanted to pleat by the stripes which resulted in 0,45cm wide knife pleats. They are quite small, but I've seen as small pleats in period dresses, no wonder really with generous hem widths.
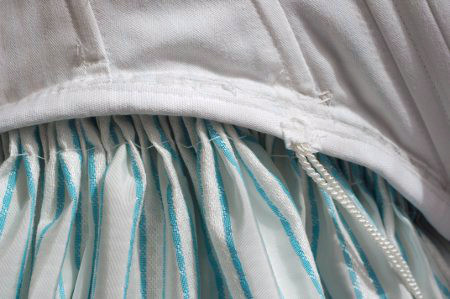
I pinned and basted the heavy pleating before machine sewing it, a few times just to be sure. I finished the seam allowances with a tape binding. Then I wanted to try the period technique of threading the pleats together on the underside. It was surprisingly easy (at least in this case when I could use the stripes as guideline) and really helped to keep the pleats in order. I suppose with a non-patterned material this would be best done before sewing the skirt to the bodice.
Now I was finally able to try the polonaise on in it's almost finished state. I still remained undecided whether I wanted more support for the skirts. The petticoat was fine with my old bumroll but the dress skirt looked just a bit oversized. Sadly my schedule was beginning to get kinda rushed, so I decided to balance the petticoat front to fit my old bumroll and see if I would have any time for making a new one after attending to several more urgent things.

When I got back to polonaise, happily still some time before the deadline I ended up trying it over my bumroll and my quilted petticoat. The result was delightfully puffy, but I was a bit worried that a quilted petticoat would be kinda warm for a ball. Then I remembered a short quilted skirt support piece I had seen at Demode Couture (scroll down), found it and decided to steal the idea. My quickly made bumroll cover turned out great, as it gives the skirt some added fullness without being hot or cumbersome.
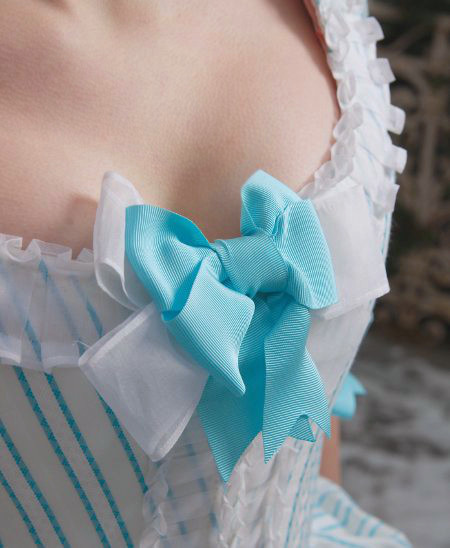
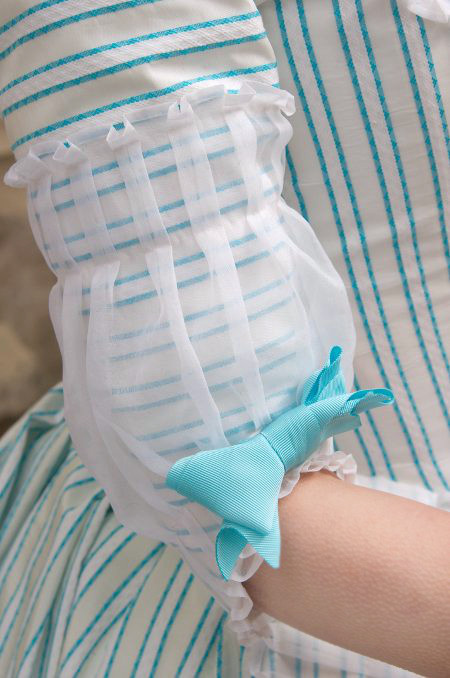
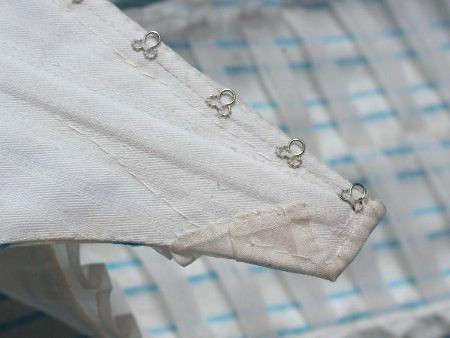
Then there were just a few little things left. I sewed loops for gathering the skirt at the waist on the inside and fabric-covered buttons on the outside. I added bows on the sleeves and the neckline. They are, rather boringly, light turquoise. I tried some more bold color combinations including red but in the end the turquoise seemed best. I had bought the ribbon from a holiday trip, and there was barely enough of it for three double looped bows, hence the ones in the sleeves being a bit skimpy.
On the neckline I added a few loops of the remaining already hemmed organza to accompany the ribbon bow. The bow is sewed on at the right side and has hooks to fasten it to the thread loops on the left side.
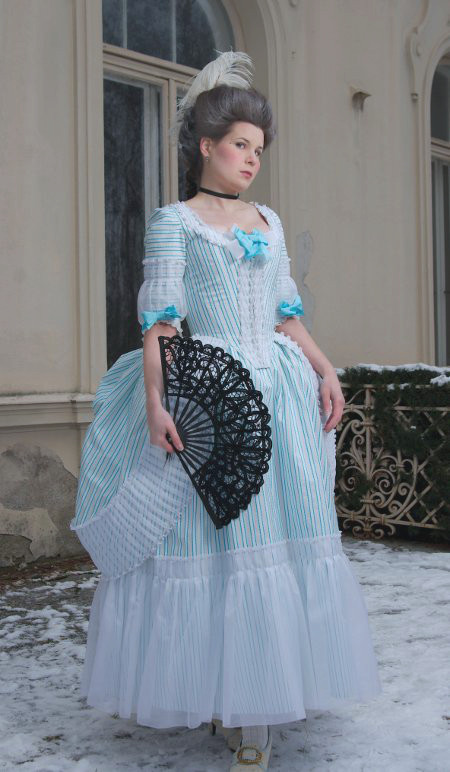
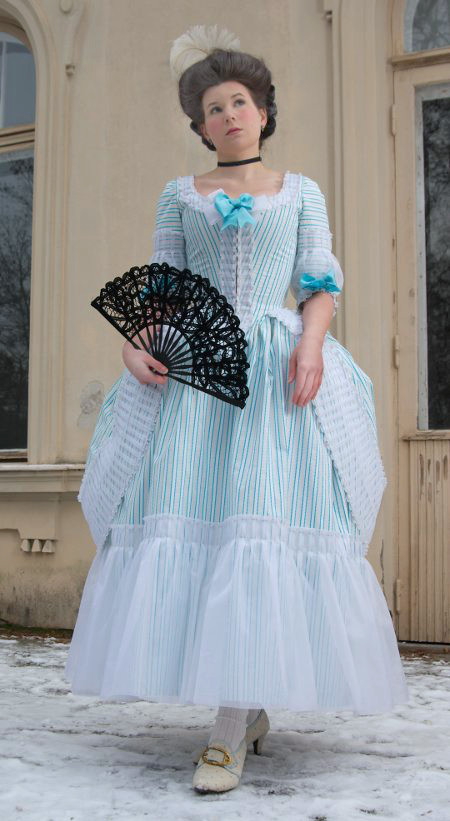
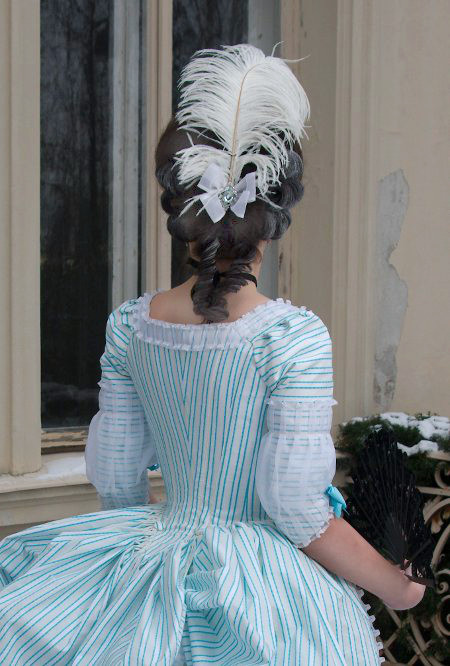
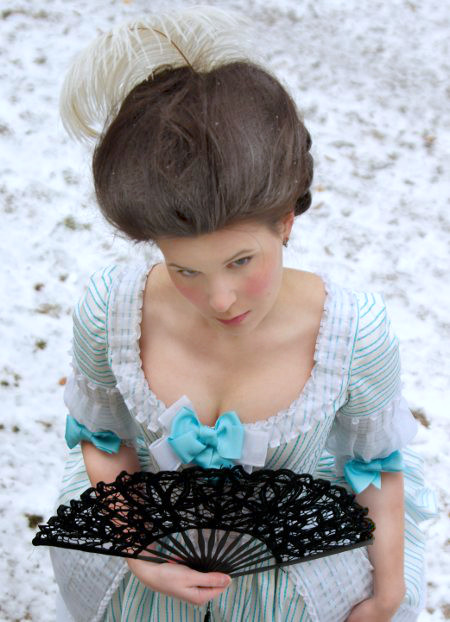
Conclusion
I'm very happy about the finished polonaise. It has the adorable, poofy look of the period fashion plates, and the white and turqoise coloring looks very fresh (At some point I nicknamed it "the toothpaste dress"). The organza trimming, at first thrown in just because I didn't have enough of the striped taffeta is in the end one of my favorite things about this dress. Sure it was arduous to hem and pleat but the final result makes up for all the work.
The bodice is quite tight, even gapping a bit at the front. It requires tightly laced stays, and to be honest is not among my most comfortable period clothes. Eating is the difficult thing as I'm prone to indigestion. But then again it looks great, and one can surely suffer for beauty occasionally.

The second time I wore the polonaise I managed to get a few stains on the hem, but luckily they were easy to remove and didn't leave water marks. The organza hem ruffle has so far survived two balls and also being caught under a bench leg. Not counting the tight bodice the polonaise turned out in the end more practical garment than I had feared.
So, the pretty ball dress I have wished for so long has finally materialized. It took quite much time and work, but I'm also quite proud of it.