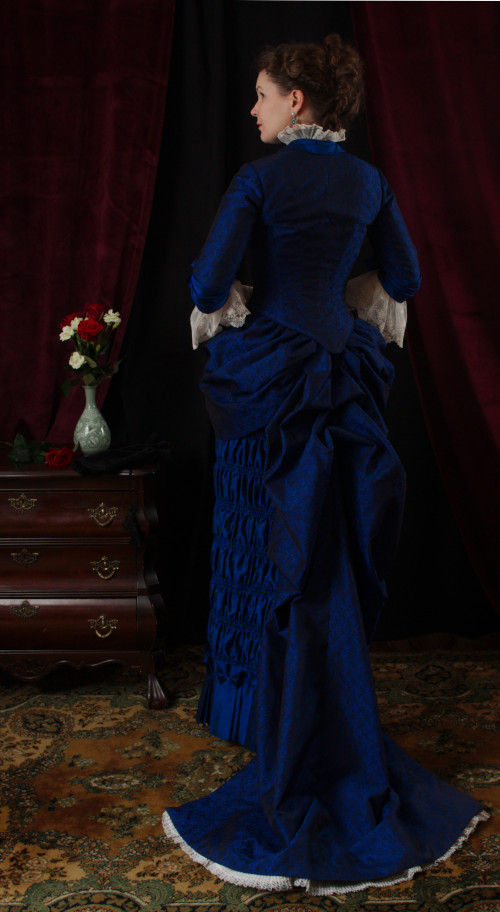
Dinner
dress, 2019
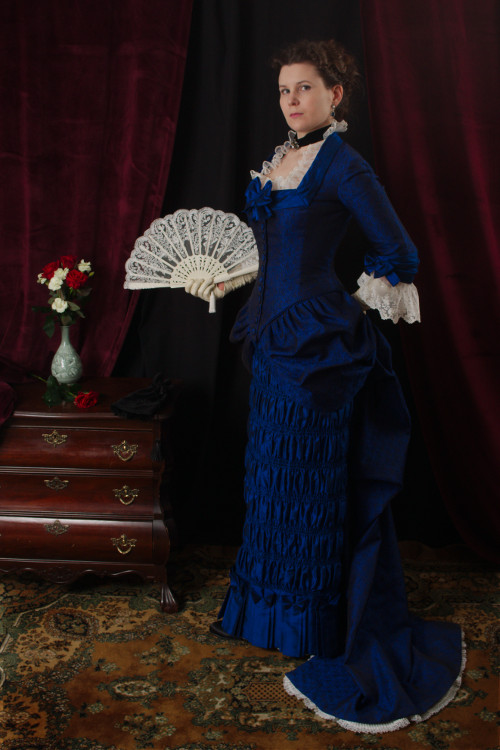
One of my long time dreams when it comes to Natural Form era has been an elegant jewel-toned dinner dress. I have been especially drawn towards rather 18th century inspired models with low a neckline and elbow-length sleeves with lace and an overskirt with panier-draping. They remind me in a way of not terribly authentic, faintly rococo-ish or old-timey movie costumes one sees especially in older films, with curved bodice silhouette and a sort of mismash of different fashion eras. It's a pretty look in a way, and the victorians recycling elements of a style from ca hundred years ago and adding them to their contemporary dress cut and construction produced a bit similar effects.
Materials
My first color choice was a bright rasberry pink because someone had ages ago given me a pair of velvet curtains in it, which I had still had somewhere, and I had this charming idea of hopefully finding a silk or suitable satin in matching shade to combine with it. Unfortunately my enthusiasm was significantly dampened when I at last located them and saw that they were not in a very good condition for the most part so I would only get some some small pieces out of them.
So, I set out on a quest for something else, and also changed my preferred colors a bit. After the soft pastel toned pieces like my ball gown and the Tissot-inspired polonaise dress I decided I wanted something darker for change, maybe with a slightly gothic vibe even, so I began looking for something in dark blue or burgundy.
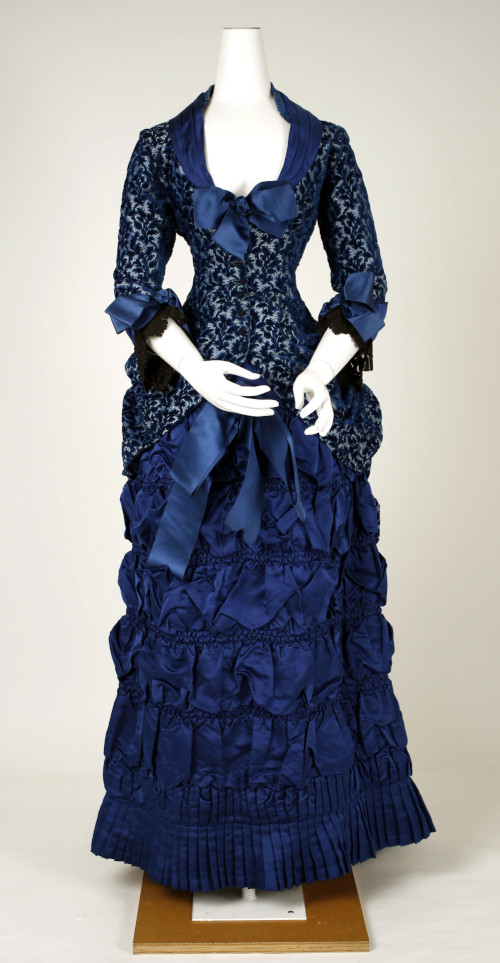
Meanwhile, my vision of the dress also became clearer. One of my favorite styles became this one from The Metropolitan Museum with it's lovely combination of brocade and royal blue satin. I also found a few very similar fashion plates.
At
last I found a somewhat suitable material while shopping in
London after the Victorian Ball in Bath. After roaming the
shops for a few hours, having purchased stuff for more
distant projects while this was one of the topmost in my
mind and getting slightly frustrated, exhausted and hungry I
picked this blue-black brocade, mainly because it was cheap
and I had already spent so much money on other things. It
actually looks rather pretty from some distance, but close
up the quality is not terribly great - it's loosely woven
with thick threads that may easily get caught on anything
sharp and pull out, frays easily and the weave is uneven and
missing threads at places.
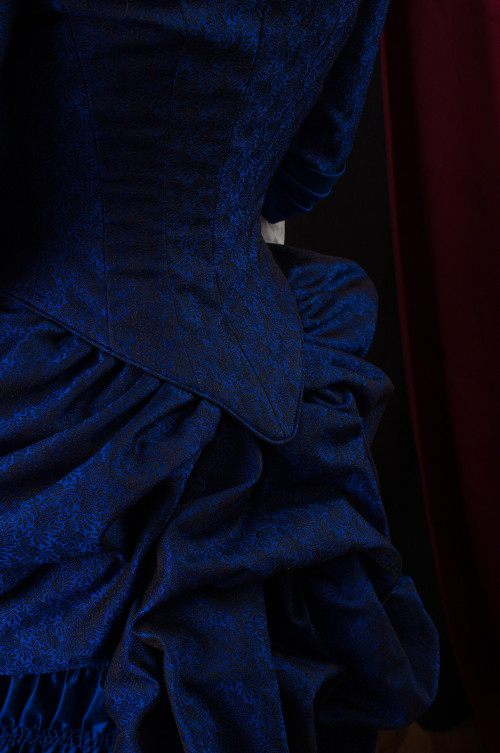
The repeated small paisley motif is in itself suitable for the period but seen from any distance it just becomes blue-black blur. It would not form the clear contrast between a patterned fabric and a solid colored one like in the Metropolitan Museum dress.
I did, however, make the lucky find of an end of a bolt of royal blue and black shot machine woven dupioni silk a few shops later. It seemed to match the brocade blue rather well, and I got a nice discount, so that sort of sealed my fabric choice for this dress. After all, as I was still a newbie finding my way with this era it would not be a bad idea to continue with another relatively low-cost project instead of putting a lot of money into the perfect dream fabric.
After finishing the Tissot-inspired day dress I had at least vague plans and some materials for several project options to do next, but I ended up with this one. I had already thought about it quite a bit and had the materials ready. A small dinner would also be easy to organize, so I might have an occasion to wear this rather sooner than later.
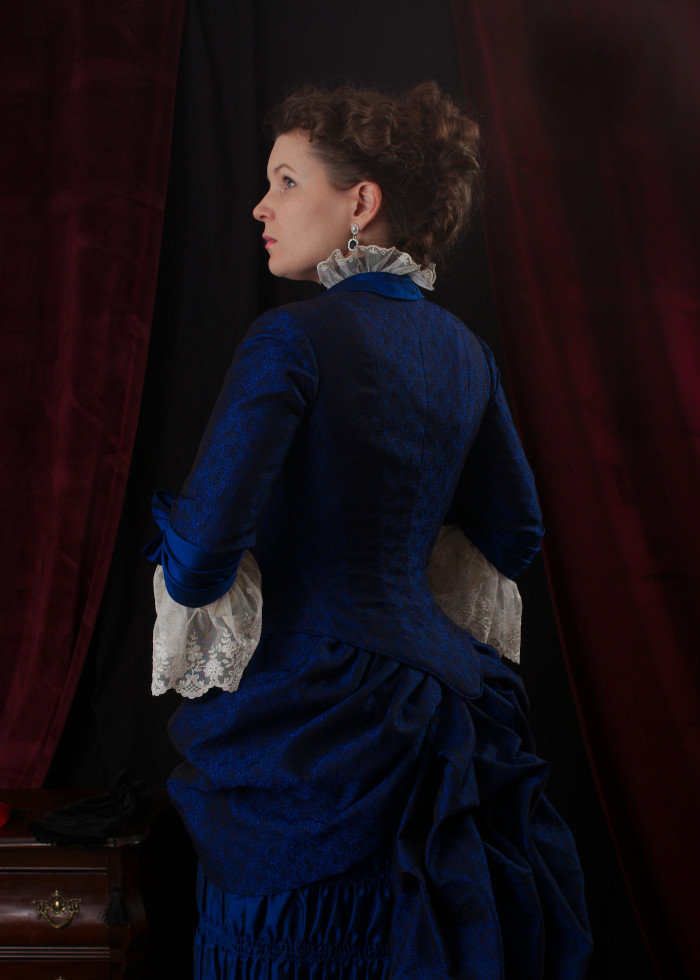
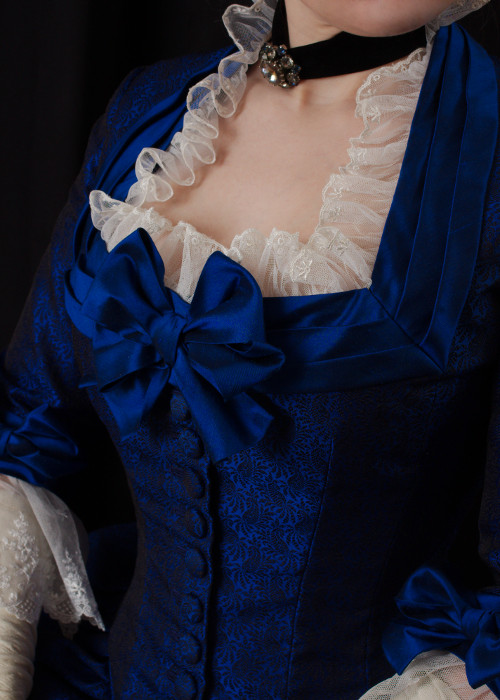
When I really set upon this my plans grew still sharper defined. From the Metropolitan Museum dress I absolutely wanted to recreate the shirred skirt and the draped folds of the same material on the neckline and sleeves. However I wanted the neckline to be square in keeping with the 18th century vibe, because I like the shape and also because the draped folds would probably be much easier to shape to straight angles rather than curves.
I also decided that instead of a polonaise dress in one piece I wanted a separate bodice and overskirt. Not only would that help to create a flattering hourglass-shape, but it would also allow the possibility of making several different bodices for the dress, an economical method favored by the victorians. I had bought a generous amount of the very affordable brocade so I would easily get a ballgown bodice out of it at least if I should wish to sometime in the future. Besides, after making two princess cut dresses, one of which was very lightly constructed, I also wanted to learn to make a proper victorian bodice.
Patterns
My trusted Natural Form Bible, "Fashions of the Gilded Age" had a few patterns which might work for my dress plan. I chose the "Velvet and brocaded gauze evening dress" from volume two, originally from Harper's Bazaar 1882. The dress in the illustration had an elegant, very tall and narrow line with smallish side paniers. It had a ballgown bodice, but that could be easily substituted with a dinner dress bodice with similarly shaped lower edge. If I ever got to making that ballgown bodice I could use this pattern.
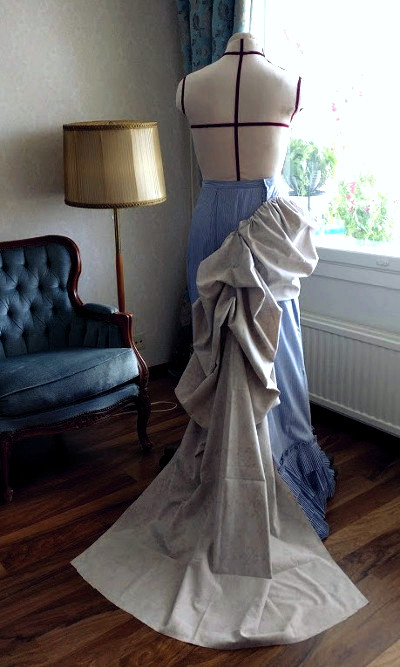
I began by scaling up the patterns for the back drapery and panier and making a hasty mock up. The panier looked a bit weird, so I ended up cutting it wider at the lower edge (maybe my ass was just too big for it!) and adjusting the overall shape a bit. The original model is meant to be cut from velvet, which I take to mean soft silk velvet, so it would drape very differently from my intended crisp brocade. For one thing, "gather the top edge of the paniers"-bit in the instructions would totally not work for my chosen material, so I decided to pleat it instead. I was a bit lazy and did not try to refine the panier pattern to its final form at this point, I just tried to get in roughly the right size and shape and decided to fit the final size and placement of the pleats when I had the panier pieces cut in the real material and added lining.
The back drapery, a rather simple looking piece with a few pleats and a few points tacked together was simply brilliant, and looked gorgeous even in the old bedsheet I used for the mock-up. It was so beautifully easy to use a ready pattern rather than experiment with the draping myself. I was a bit baffled, though, by the fact that in the illustration the train seemed much longer, while I was more likely to be taller rather than shorter than the average late victorian lady. Oh, well, artistic license?
The next question was, though, how to join together the different parts of the dress, the bodice, panier and back draping and the skirt and how different options would work in practice. The pattern instructions simply tell you to "Join the panniers and back drapery to the bottom of the bodice and to the foundation skirt." Um, okay.
I was a bit confused at first by the idea of joining the back drapery and panier part to the bodice, as I had always imagined overskirts were mostly made separate with a waistband of their own. But then again, this was a fashion era when ladies were obsessed with getting a tiny waist, which led to all kind of ways of discarding extra fabric layers from the waistline area, from shaped-to-figure combinations to even petticoats attached to the corset edge. With that in mind it did make a lot of sense not to leave gathered velvet under the bodice more than absolutely necessary.
When I took a closer look on fashion plates with all kinds of side paniers I also realized that even given artistic license most of them seemed carefully and evenly pleated with a very structured look, perfectly aligning with the deeply pointed bodice center fronts, and they would be more likely to stay that way in wear if they were indeed attached just inside the bodice edge rather than in a waistband or foundation skirt.
This would of course make changing the bodice on a whim more laborious but not impossible, if I made up the bodice and overskirt part entirely separate and only tacked the latter to the former when finished.
Joining the back drapery to the foundation skirt also made sense if it was supposed to stay as a rather narrow, draped up piece covering the back of the skirt. In the illustration it looked like it was attached to the skirt side-back seams all the way down. But how firmly it should be secured there? All the way down or only at some point? Should the foundation skirt also be trained? And most of all, how one was supposed to get in and out of this thing, and what would be the best way to store it?
In some fashion plates picturing rather similar dresses the trained back drapery seemed to fall over a similarly shaped skirt train, and would probably be attached to it at some points to stay in place. This option looked very nice, but unfortunately my fabric supplies were very limited when it came to the silk skirt, so it was out of the question. I would have also preferred to have the train entirely made of the brocade which would be easier to clean than the silk.
After trying on my mock up version over the old polonaise skirt I at last was confirmed that if only the back edge of the paniers reaches low enough it will cover the skirt opening on the side, and the back drapery can be attached on the side seam from this point downwards. It is still possible, if not a very elegant feat to get in and out of this combination. I was still convinced, though, that for packing, storing and cleaning it would be preferable to get the back drapery & panier combo easily removed from the skirt. Janet Arnold mentions a train attached to foundation skirt by "patent hooks" in one gown, where they are hidden by an edging of frilled lace. Would these patent hooks be something like fur hooks, maybe?
In the end I decided to make back drapery wholly separate from the skirt, bind the edges with tape and then figure out how to attach it in place - basting was always a possibility. It should cover the back of the skirt anyway, as I didn't really have any extra silk and had planned to make the back piece from some other material in order to get the lovely ruffled front.

The most essential thing about the bodice pattern would be to get a good fit rather than following the period patterns religiously. Volume 1 of the "Fashions of the Gilded Age" had a few basic low necked and elbow-sleeved bodice patterns for guidance, though. My plan was to adapt my basic bodice pattern to the form of these. The pattern named "Basque Bodice with round neck" (page 263) had the perfectly pointed waistline, and I combined the neckline shape from "Basque with a square neck" (page 257) with it.
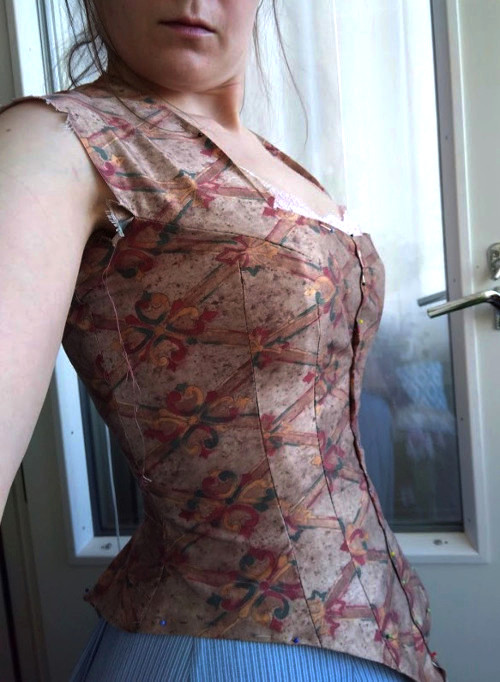
I made the mock up from a bit heavier material than the usual bedsheet cotton, so that it would not stretch while fitting. At this point I had to make the hard choice between vanity and enjoying culinary delights to the fullest, in other words how tight to fit the waist. I ended up with a compromise. Luckily the panier drapery would help to create an illusion of small waist without very tight lacing.
The neckline I had drafted was for once perfect without any need for alterations. I did some adjustments in waist darts and the shape of the bodice edge. The front armhole still gapped, however, so I tried forming a modern breast dart and turning it into the waist darts in the pattern. I did pause to wonder if this would turn the side seam way too much out of grain, but as it seemed to work fairly well I decided to go with it.
Tweaking the armhole shape of course led to some alterations on the sleeve, but in the end it too settled in quite well.
Skirt
I had decided to make the skirt round without a train as it was the most practical and economical option, and also the dress in the pattern illustration looked to me most likely to have a short skirt. I wanted it to be quite narrow, so I drafted a pattern combining the front and side gores like in my ballgown. The straight back gore has more volume, which might even support the back drapery a bit. I also added a bit of extra length in the back gore, set in large pleats in the side seam, in hopes of giving a bit of extra volume to the back drapery. Actually I have not seen this used in foundation skirts, only in overskirts, but I was sort of carried away with the idea and decided to try it anyway.
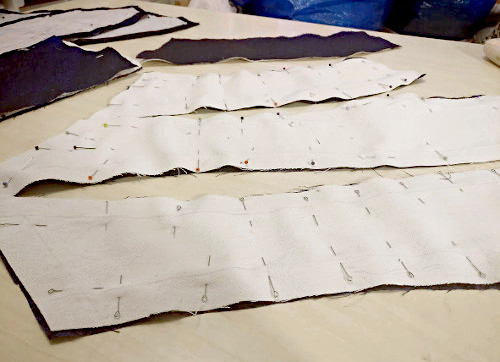
I began sewing from the skirt. I cut the base for the skirt front piece from bedsheet cotton, as I thought it would a firm but not too heavy and stiff foundation for the shirred silk.
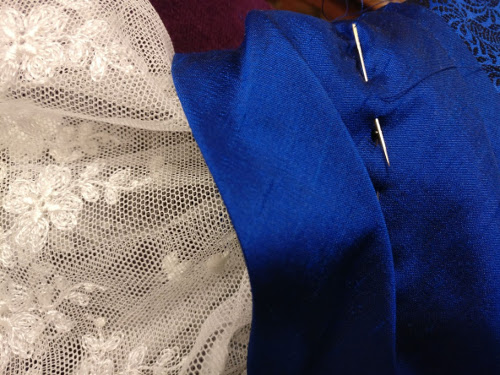
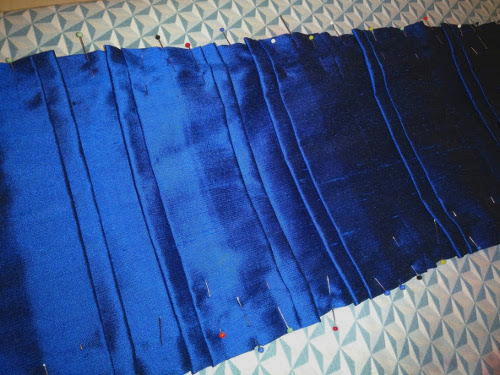
I had estimated that the shirred lines would look nice when set 10cm apart, which would also be easy to calculate. I cut the silk two times as wide as the foundation and added 0,5cm extra length between the shirred lines. I did test the shirring on a spare piece of different dupioni, but it was still bit of a mystery how it would really turn out in the end.
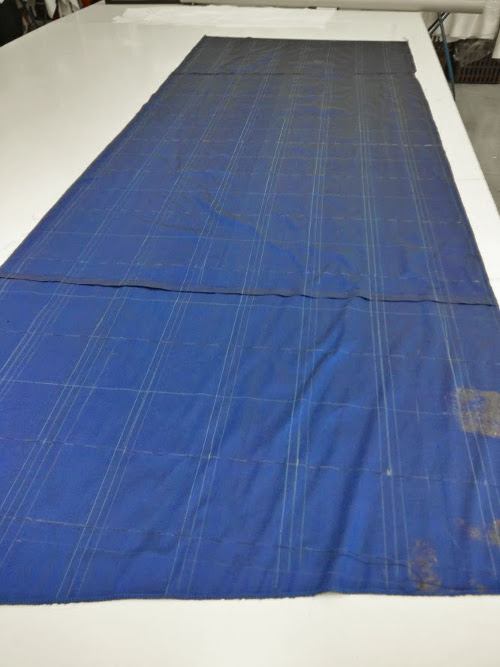
I marked the lines for gathering on the wrong side of the silk (3 lines of gathering set 1cm apart) and also vertical lines for keeping the gathering straight. I basted the vertical lines so that they would be visible on the right side.
As you can see from the picture, one reason why I got that end of the bolt so cheap was that the very end was badly stained and wrinkled. The stains look worse on the wrong side but also show through a bit on the right side. Happily I was able to place them at the top part of the skirt front and on the side where they will be covered by the brocade paniers.
I marked the corresponding horizontal and vertical lines on the cotton foundation with a pencil. Then I sewed the darts, as their bottom edge would lie under the shirring.
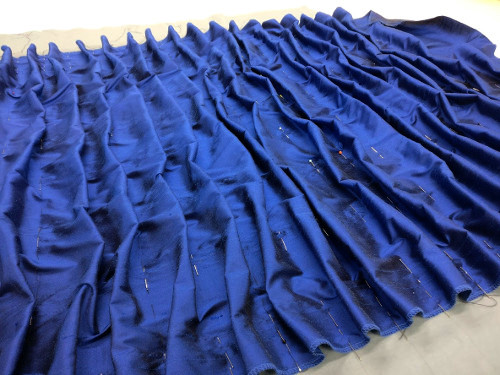
After running the gathering lines (which took a while, even with sewing machine!) I pinned the silk on the foundation following the lines I had marked. This also took a while, but somehow looking at the light playing in the silk waves created was weirdly fascinating.
After pinning the vertical lines 10cm apart I added further pins still in the middle of each fold. Then I began to pull the gathering threads in the shape, working very carefully. I managed to break a thread a few times but was mostly able to fix it by quickly tying the ends and replacing the missing bit with short running stitch.

Gathering a large piece like this was a bit tricky, and required a bit patience to get it even and not pulling the foundation layer with it. I gathered a few rows at a time and sewed them down on the foundation before moving on to the next ones. For the last thing I gathered the top- and bottom edge.
I had cut the foundation with wide seam allowances in case the shirring would pull it smaller. After finishing the shirring I compared the finished piece to the pattern and trimmed it to the right shape. I stitched the silk ruching to the foundation near the side seams and finished the seam allowances with overlock. For the last thing I cut the scraps I had trimmed into bias strips, joined them and used them to cover the top and bottom edge of the shirring. The foundation had shrunk a little lengthwise, so the bottom edge need a few more crucial centimetres to prevent the foundation material peeking from under the hem pleating. In case the pleating would get pulled aside I further covered the bottom part under the pleating with thin black cotton satin - it would after all be less conspicuous than the blue-grey cotton.
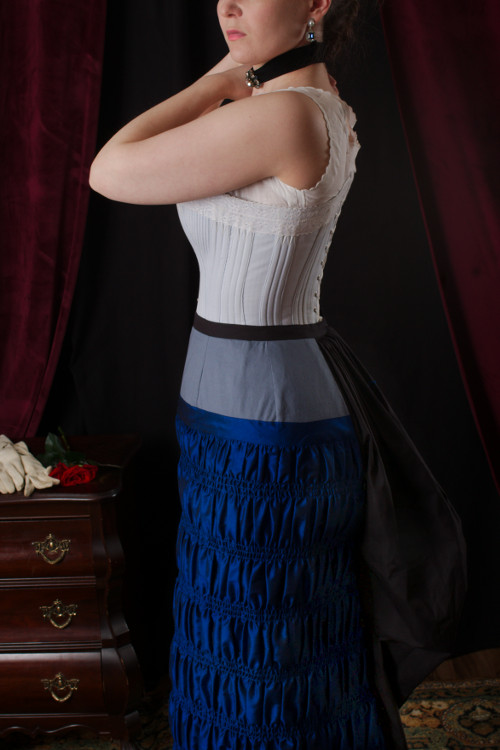
I cut the straight 90cm wide back gore from black cotton poplin. I joined it to the front piece and made an opening with hook closure on one side seam. Then I pleated it into small pleats to about 14cm length and put a waistband into the skirt.
At the fitting I checked the skirt fit and hem length. I hemmed the front and back separately with a sturdy tape. Then I sewed elastic tapes with buttonholes into one side seam, finished the seams with bias tape and sewed buttons on the other seam. I have learned to love elastic band with close set buttonholes for tying back Natural Form skirts, I'm not sure if they are period correct but so damn handy.
At this point I realized a bit belatedly that my smart idea to add vertical pleats on the back gore for volume made the hemline fall lower at center back, which I of course might have guessed but had somehow thought the ties would at least partly prevent. With the train covering the back of the skirt the real problem was not that it looked silly (which it did), but that it would get caught in my heels. I did not want to gather all the extra width, so I just added a row of small tape loops on the same level with the lowest elastic band, which could be then threaded through them.
I had calculated how to cut the remaining silk to get the most of it, but when it came the time for trimming the bottom of the skirt front I chickened out and decided it would be safest to draft some kind of patterns for the bodice trimmings before cutting the more fabric-consuming hem trimming. So I left the skirt unfinished at this point and turned instead to the brocade.
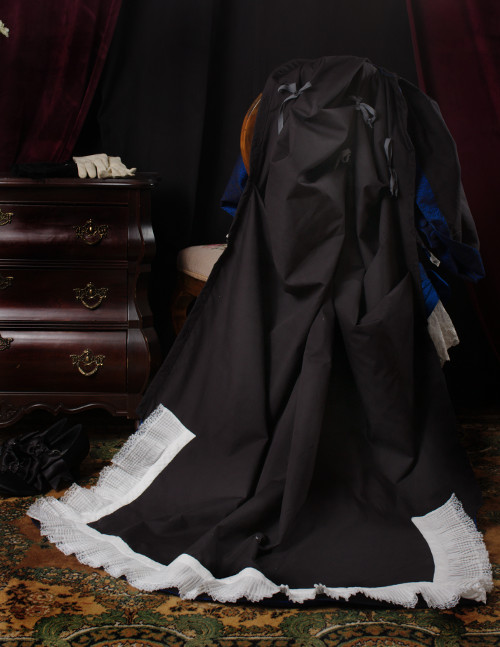
The train and paniers
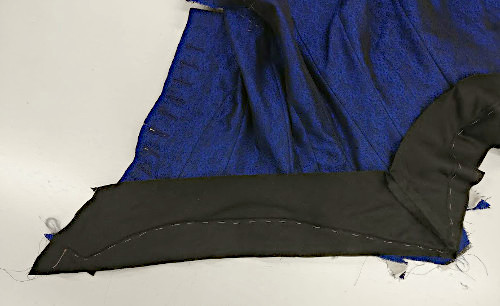
After the laborous, if very rewarding skirt the back drapery / train part was really quick and smooth sewing. I lined it with the same cotton poplin I had used for the skirt, it was lightweight but had some body and stiffness to support the brocade folds, and protect in the train. I quick ad dirty bag lined the train part, and about 5cm above the skirt hemline I turned both seam allowances out and treated the two layers as one. As the brocade was quick to fray I neatened the edges with overlock at once.
I sewed tape ties on the wrong side for the draping, their fastening stitches disguising perfectly in the dark fabric. Then I sewed the pleats in the sides and top of the piece and finished the sides with a 2cm wide tape of lining poplin.
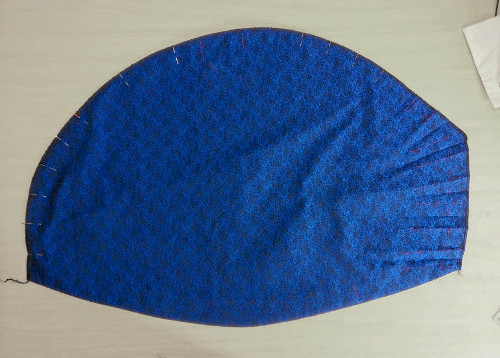
As mentioned earlier, I had not quite finished the panier pattern into its final shape yet, but chosen to drape the pleating etc into the real thing so I could see how the fabric behaved. They should be roughly sufficient width, but I cut a generous allowance at the back and top just to be sure.
I also lined the paniers with cotton poplin with a narrow facing of brocade at the bottom edge. At the top and back edges I sewed the brocade and lining together and neatened the edge with overlock for fitting.
I basted the back pleats which I had tentatively drafted in the pattern already and experimented with pleating the top edge into smaller pleats. I tried one panier on pinned to the skirt and my mock up bodice, and while it looked fairly ok I still decided to postpone pleating them to the final shape until I could try them on with the real bodice and see how the different parts would work together. I did, of course, try the bodice mock up on over the back drapery and paniers as they now were to make sure the bodice was wide enough at the hips to settle smoothly over them.
Bodice
The bodice was the most time-consuming part of the dress, but also the one I enjoyed most. The mock up had already seemed promising, so I did not have a huge stress about cutting it. Also with bodices I feel myself to be on a more secure and familiar ground than with the draped and trained skirts, which can behave wholly unexpectedly to a beginner. A fitted bodice is a fitted bodice, after all. On the other hand it is of course true that problems with the bodice fit tend to be more noticeable than problems lower down, and both my previous attempts at the era had had their share of them.
I lined the bodice with sturdy cotton twill. I began by drawing the bodice pieces on it with pencil. I marked the pattern edges, seamlines, darts and balance points.
In the ballgown I had cut extra length in the lining at the waist level, but I think there was too much of it after all because it showed through the outer material as a wrinkle. At this time I cut only 0,5cm extra length, which seemed to settle more smoothly at least on the basting stage.
I had fitted the mock up very tight, so when cutting the real bodice I added a few millimetres extra on the center back seam and front edges. I also reasoned that the seam allowances and especially the boning would in theory take up some space, so I added a tiny bit of extra on the other seams and darts as well.
Next I cut the brocade. The weave was not quite even so I had some trouble matching the pattern. It would not show that much on the finished piece, but I tried to cut at least the center back pieces mirroring each other, and at other pieces the pattern continuing at roughly the same level at waistline.
I pinned the brocade into the lining pieces and smoothed the extra length at about 15cm distance at the waist. At the front shoulder I pinned the lining just slightly shorter to follow the shoulder curve better.
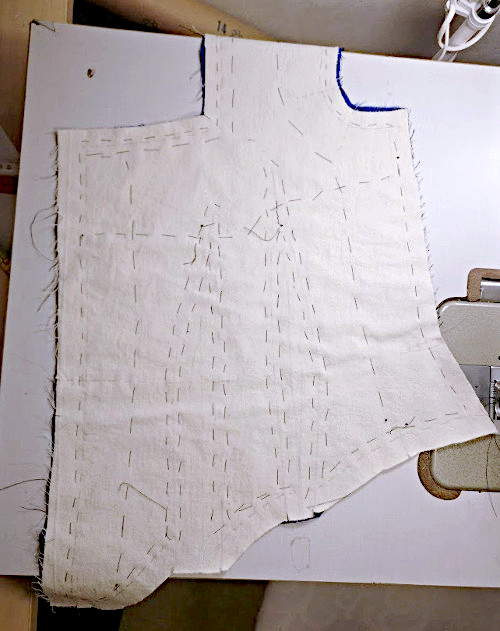
I basted the seamlines, around the darts and their center lines, a vertical line in the middle of each back piece and a horizontal line in the front at the bust level. The amount of basting may seam a bit excessive, but it went rather fast and is always relaxing. It also made joining the pieces so much nice and easy. I further basted balance marks, armhole and neckline, lower edge and front edges with a different color.
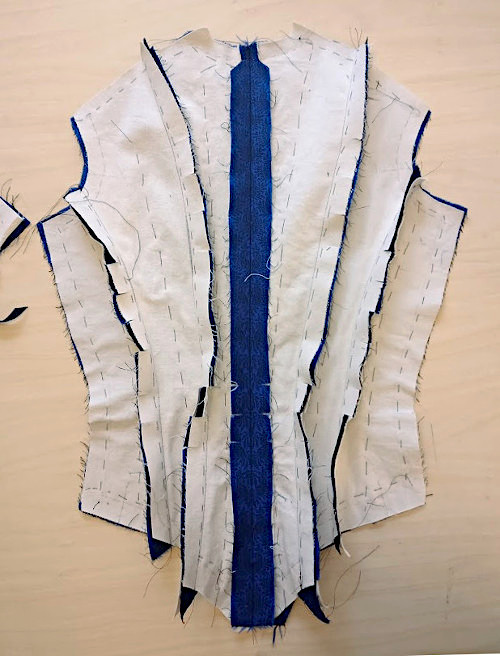
I began the actual sewing from the back seams and front darts. I trimmed and clipped the seam allowances and cut them rounded. I had given some thought to whether I should finish them with bias tape like I had on the Tissot-dress, as the brocade liked to fray a lot. Finally laziness won over and I decided that whip stitch would do. I would not wear the dinner dress that often, after all.
I made boning channels from cotton tape for the narrow plastic bone I used. I sewed them on the seam allowances by hand. When I had most of the boning channels on I decided it was the time for a fitting.
I still wanted to keep the front and back separate, as it would be so much more convenient, so I just closed the side- and shoulder seams with a long machine stitch. It turned out, that I had been over-cautious in adding so much allowance for the boning etc, and the bodice fit too loose.
So, I took of the boning channels and sewed most of the seams again. At the center back seam I took out all the allowance I had added all the way, and on the other pieces at the waist and downwards. At the front I deepened the darts slightly and left the front edges overlap a bit more. These alterations of course broke the line of the bodice edge, so I bastened it anew.
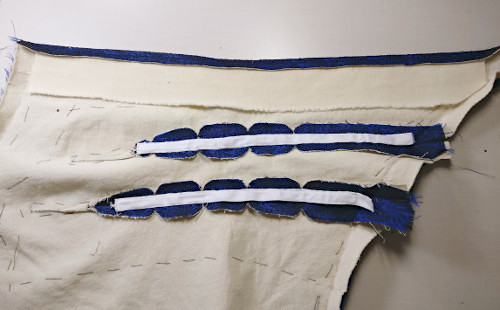
After getting the fit more or less right I took the side- and shoulder seams apart again and continued working on the front pieces. I began to wonder if they would need a bit of extra stiffening after all to lay smooth and added a strip of cotton twill. Then I covered the wrong side of the front edges with a facing in black cotton satin.
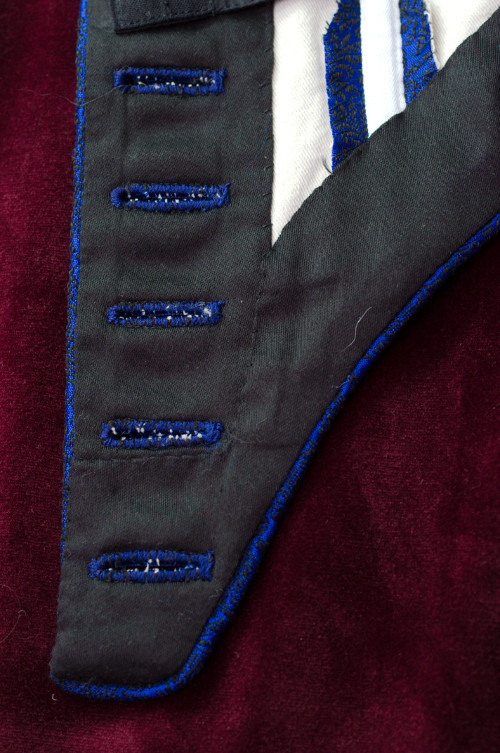
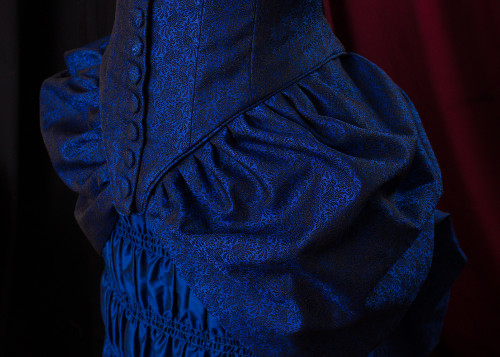
For the buttons I chose the easy and period correct option of just covering them with the dress material. I chose 19mm shank buttons and spaced the buttonholes 3cm apart.
I first sewed around the buttonholes with short machine stitch, and cut them open one at a time when working them. I actually like making buttonholes, but this time the combination of a blue-black thread on a dark brocade was a bit frustrating, especially as both had a high shine which tricked my eyes when I took a light close to them. Then with the light at some distance I couldn't make out much of what I was doing. I left the top buttonhole undone at this point, as I realized it might get covered by the silk draping at the neckline. The bottom one would also get done after finishing the pointed bodice edge.
I could of course have left all the buttonholes to be made when the bodice would be finished, but I always try to make most of the buttonholes or lacing eyelets while the pieces are still separate if only possible. I actually found a small note sanctioning this method in the period manual quotes at "Fashions of the Gilded Age", too.
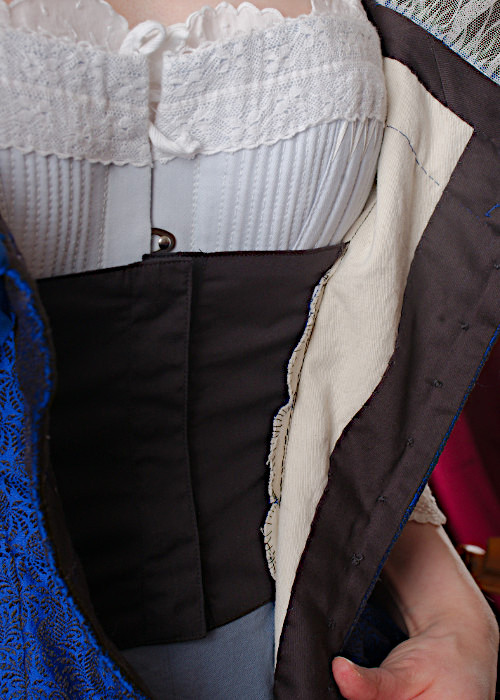
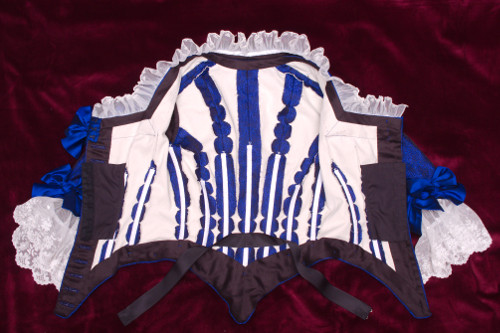
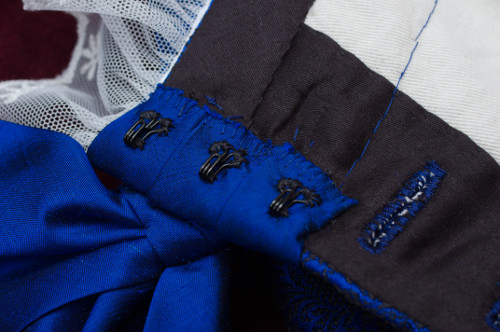
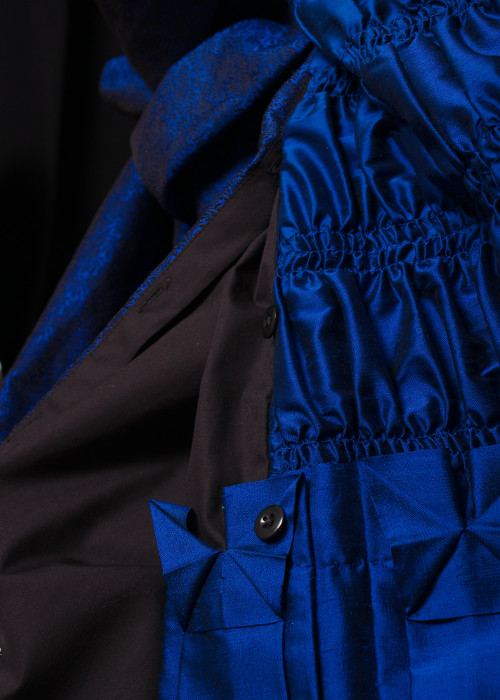
I sewed buttons on the other front edge, again leaving the top and bottom ones out. As the bodice should have a tight fit, especially at the waistline, but a gapping, strained buttoning was not desirable either, the crafty victorians had a trick for this too: extra panels under the buttoning closed with hooks and eyes.
I made these panels based on some I had seen in museum pieces, they are 16cm high and begin at waist level. I made them in double layered cotton poplin, and sewed them on the opened allowances of the first front dart. I was feeling a bit lazy so I used ready-made hook and eye tape, which gave a very even and secure closure.
As the front fastenings were now mostly finished it was time for a fitting again. As usual I had left the last opportunity to check the fit to the side seams, which could still be altered slightly. I had pinned the top of the paniers into some sort of pleats, pinned the paniers to the back drapery and it in turn to the skirt.
I was slightly surprised to find that I had to take out a bit at the shoulder seams after all, but that was easily fixed. The real surprise was that somehow mysteriously the deepest point at the waistline curve was suddenly several centimetres higher than it was supposed to be. I had no idea what the heck had happened, but in the end I just shrugged and readjusted the seam. I finished the shoulder- and side seam allowances and added boning channels to the latter. I also added the waistband, stitched on to the center back seam boning channel and closing at front with hooks and eyes.

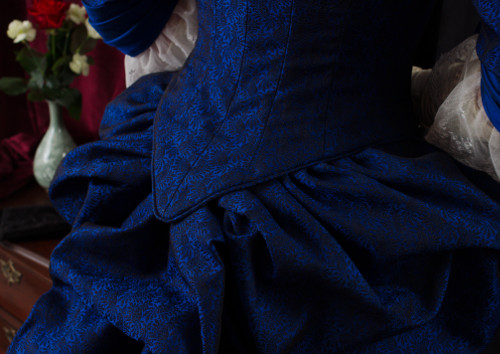
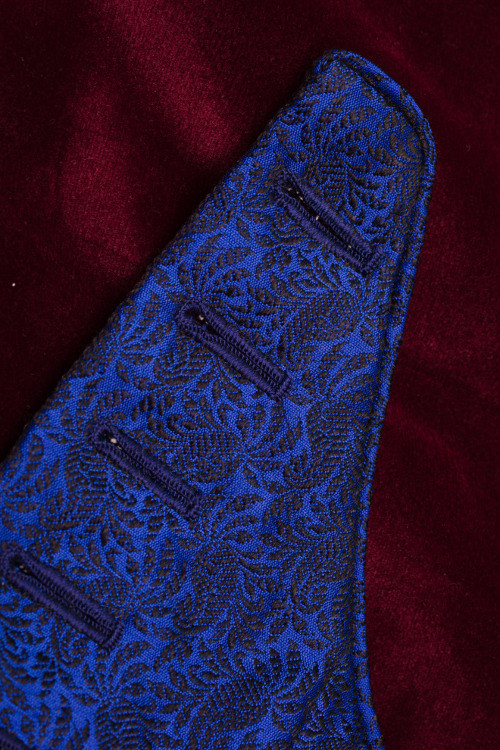
I was a bit anxious beforehand how I would manage finishing the deeply pointed bodice edge. I had never done piping on a bodice before, or that many times on anything else either, but as it was such an essential finishing technique for the period it would be high time to learn how to do it properly.
First I made the piping from a bias tape cut from the brocade, filled with doubled cotton yarn. I basted it on place following the basted bodice edge line and then stitched it on as close to the filled edge as I could manage. I carefully tried to turn the edge at few places to see how it would look, and then basted a wide strip of black cotton satin on top for a facing.
I had cut the facing to widen towards the back so that I could baste the panier top edge into it. I pulled it rather tight over the pointed back when basting and sewing so it would turn neatly on the wrong side. I trimmed the seam allowances and clipped them where needed, and then turned the facing on the wrong side, pinned it and sewed the top edge into the lining by hand. On the front edges I turned the piping ends under it. While I had left the last buttonhole unmade, I now realized that I should rather have left the second last one as well. With a bit of tweaking I did manage to sew down the facing on around it, and then add the final buttonhole.
Finishing the bodice edge turned out to go much more smoothly and stress-free than I had anticipated - probably thanks largely to that I took time to baste things at several crucial stages. Of course the dark, patterned material was also very merciful in hiding small irregularities.
As the draped silk would cover the neckline it did not need any fancy finish, so I just turned it on the wrong side with bias tape.
As usual I also finished the sleeves before sewing them on the bodice. I run the seams with machine and bag lined the sleeves with the same lightweight cotton satin I had used in the facings. I sewed gathering threads at the top of the sleeve through both layers and pinned it on the armhole to see that it still looked roughly right, and then turned to trimming.
So, now it was finally time to take scissors to what was left of the silk.
I began by draping mock up fabric over the bodice to get some sort of patters for the bodice drapery. The sleeve folds turned out to be really easy, basically just a straight bias cut strip sewed into a circle, but the neckline drapery was a bit more tricky. I wanted it to taper narrower towards the back and rise a little at the back of the neck. I formed the folds into the mock up piece and decided that the simplest way to deal with the corner of the neckline would be to simply fold the whole piece under itself and tack it on.
When I had copied the draped shape on paper I laid the silk on the table and tried to figure out the most economical way of cutting the bias draping pieces and bows. The rest would go into the skirt hem trimming and if only possible I might save a little piece for the ballgown bodice-to-be.
I lined all the draping pieces with cotton satin, both to save the silk and to give it some body. Then I formed the folds and I ironed them very lightly, steaming them more than actually pressing them to leave them softly folding. In the neckline draping I had basted lines for the folds but on the sleeves I just formed the folds free hand and checked with measure tape that they were roughly symmetrical.
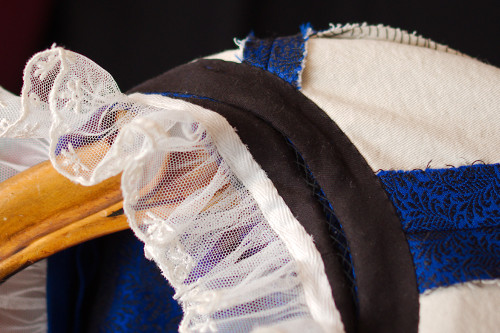
I tacked the draped pieces on the bodice and sleeves by hand, both between the pleats and at the edge. At the back of the neckline where the folds rose above the bodice neckline I tacked them loosely together. On afterthought I maybe should have cut the bodice neckline higher at the back to support and protect the draping, but somehow I hadn't thought about it at the time.
The other side of the neckline turned out alright, but the other pulls annloyingly. The problem lies probably at the lining, and I noticed it too late, and was too lazy to try to take everything apart and try to fix it. I think that at this point I was also a bit in a hurry to finish it, so I just moved on to the lace bits.
Lace trimming
As we all know, good quality lace fitting for period costumes can be hard to find, especially if you are on a budget. I had actually ordered a very beautiful white lace with this dress in mind, but then began to wonder if it would be an ideal option after all.
The lace in question was 5cm wide, and I had somehow fancied the sleeves could have wider lace while the neckline would look best with either a very dainty lace or a very soft and wide one falling down over the draping. Another qualm I had about the lace was that it was almost pure white, and might look too harsh against the strong blue of the dress. Also, the Victorians favored cream and ecru shades. Besides this lace would also go very well for 18th century, where finding a suitable lace is much harder than late victorian when machine laces were already a thing.
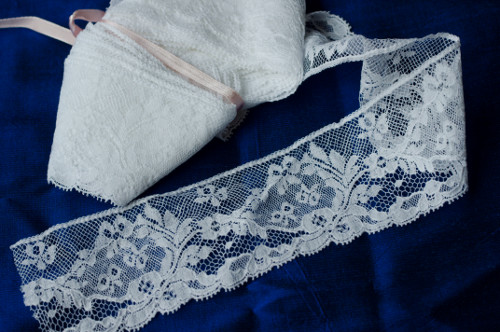
My stash inventory revealed a wide cream colored machine embroidered tulle, that I had bought years ago with 18th century engeantes in mind, but then went down the bobbin lace rabbin hole instead and decided to make my own. Machine embroidered tulle lace was totally correct for 1880s, it would make beautiful sleeve ruffles, but what about the neckline then? Should one have only matching lace in one bodice?

There was just one possible candidate for this in my stash, a slightly whiter strip of tulle with a narrowly embroidered edge. It was very light and airy and would not make the neckline look heavy, but on the other hand I wondered if it would look too plain and too different from the sleeve lace.

I was by now totally in love with the sleeve ruffle lace, so I searched a few shops in vain to find something narrower to go with it. It was clear that it belonged to late victorian period and this project needed it, so in the end I decided that it would be only sensible to use these two pieces from my stash now, even if they didn't match perfectly. As the rest of the dress didn't have any lace that needed to match I could also use something else again if I ever made the ballgown bodice.
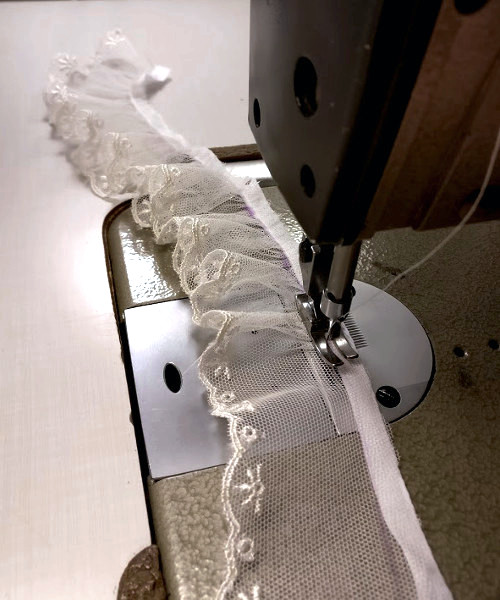
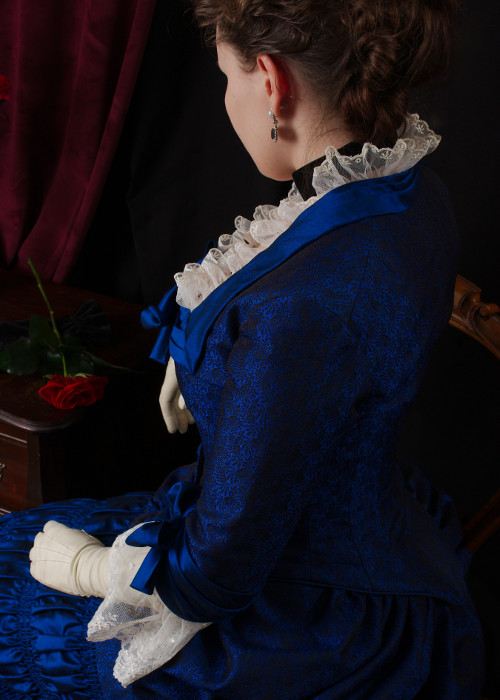
I pleated both laces into cotton tapes which I then whip stitched on the bodice. My original thought was that this way they could be removed rather easily for either cleaning or to be used with another dress, which worked in the sleeves, but at the neckline I realized that the neatest way to attach the lace strips was to sew them between the draping and bodice.
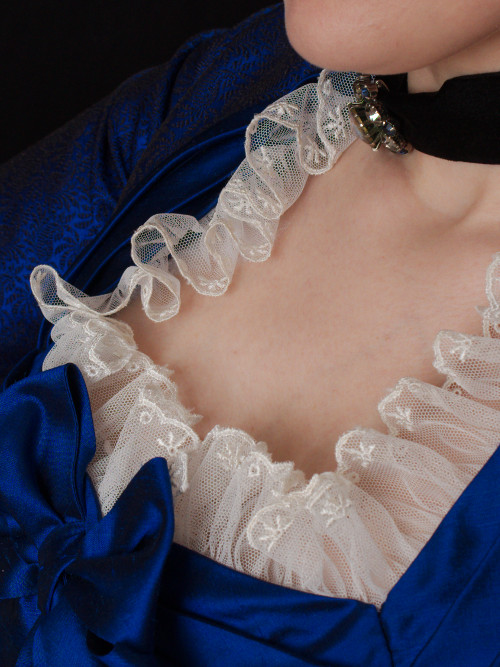
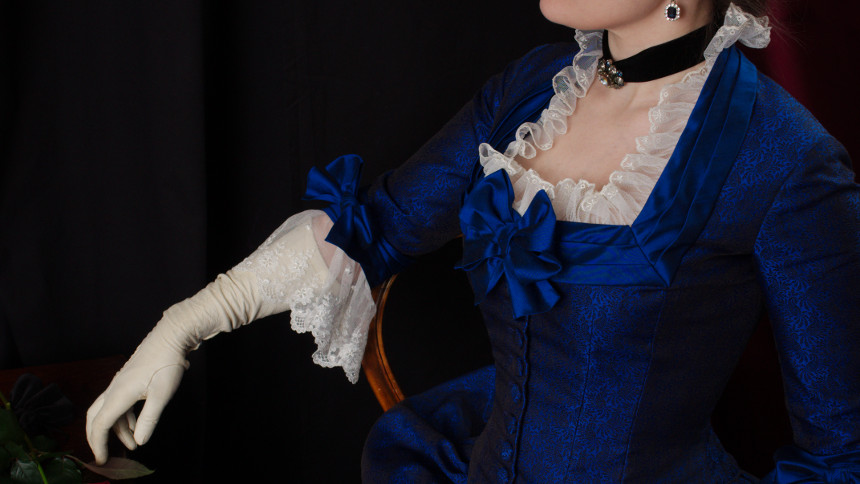
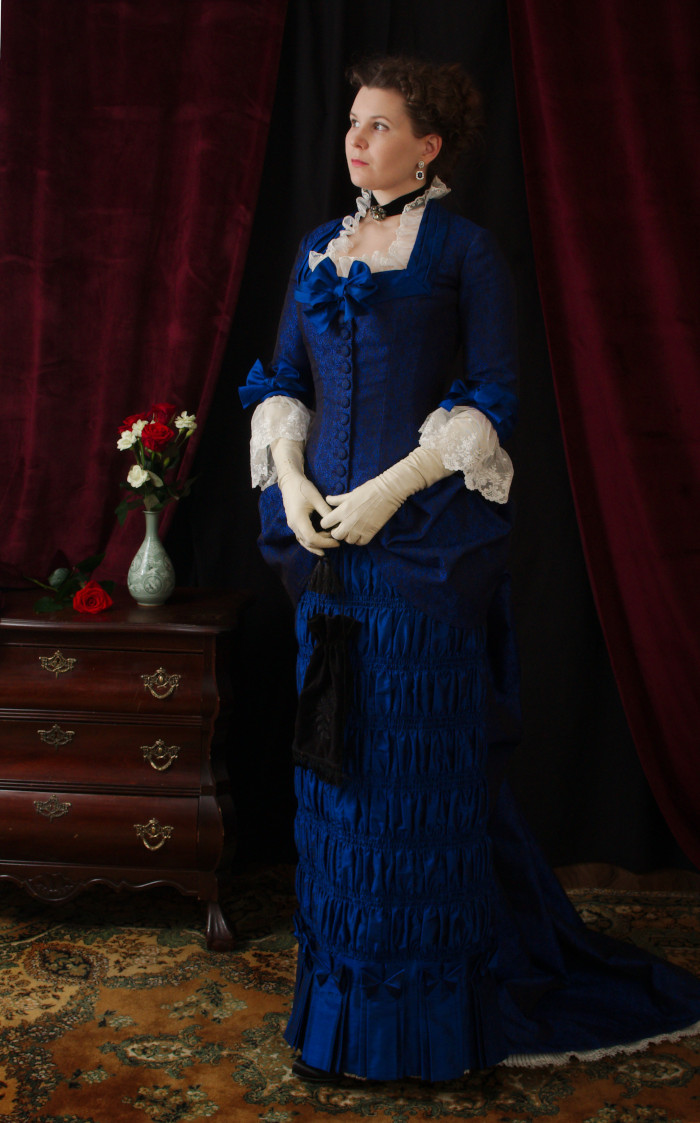
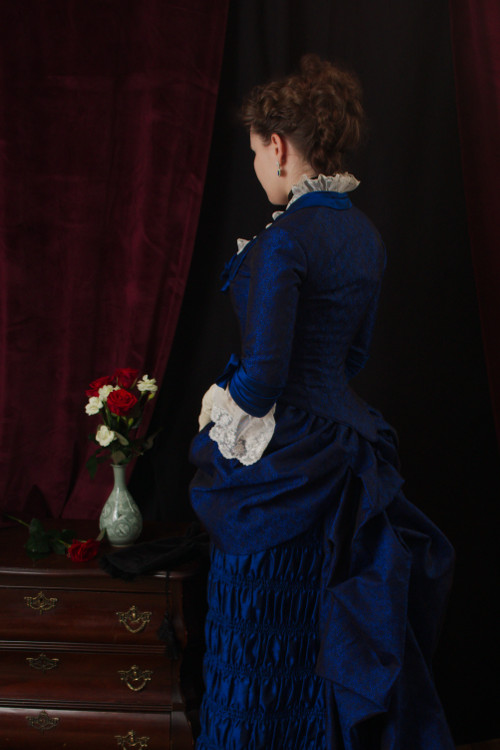
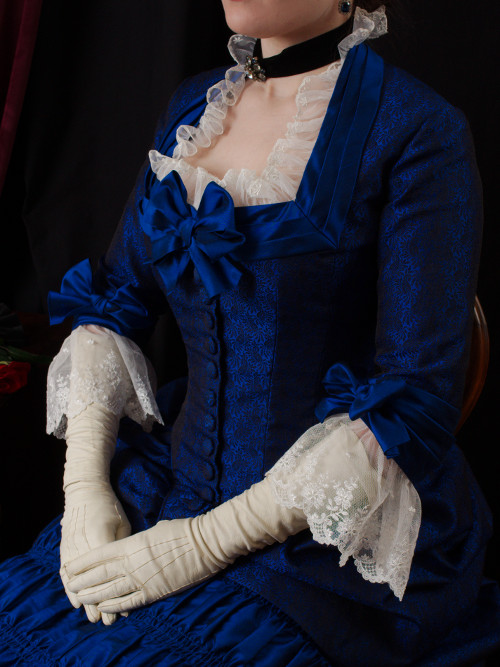
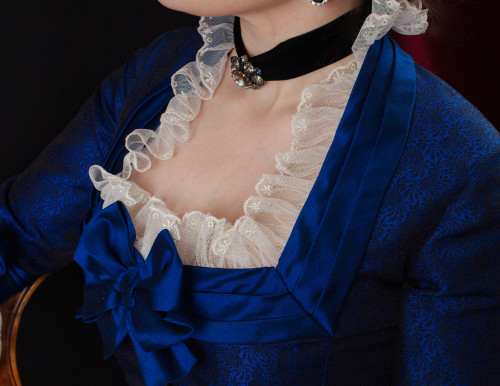
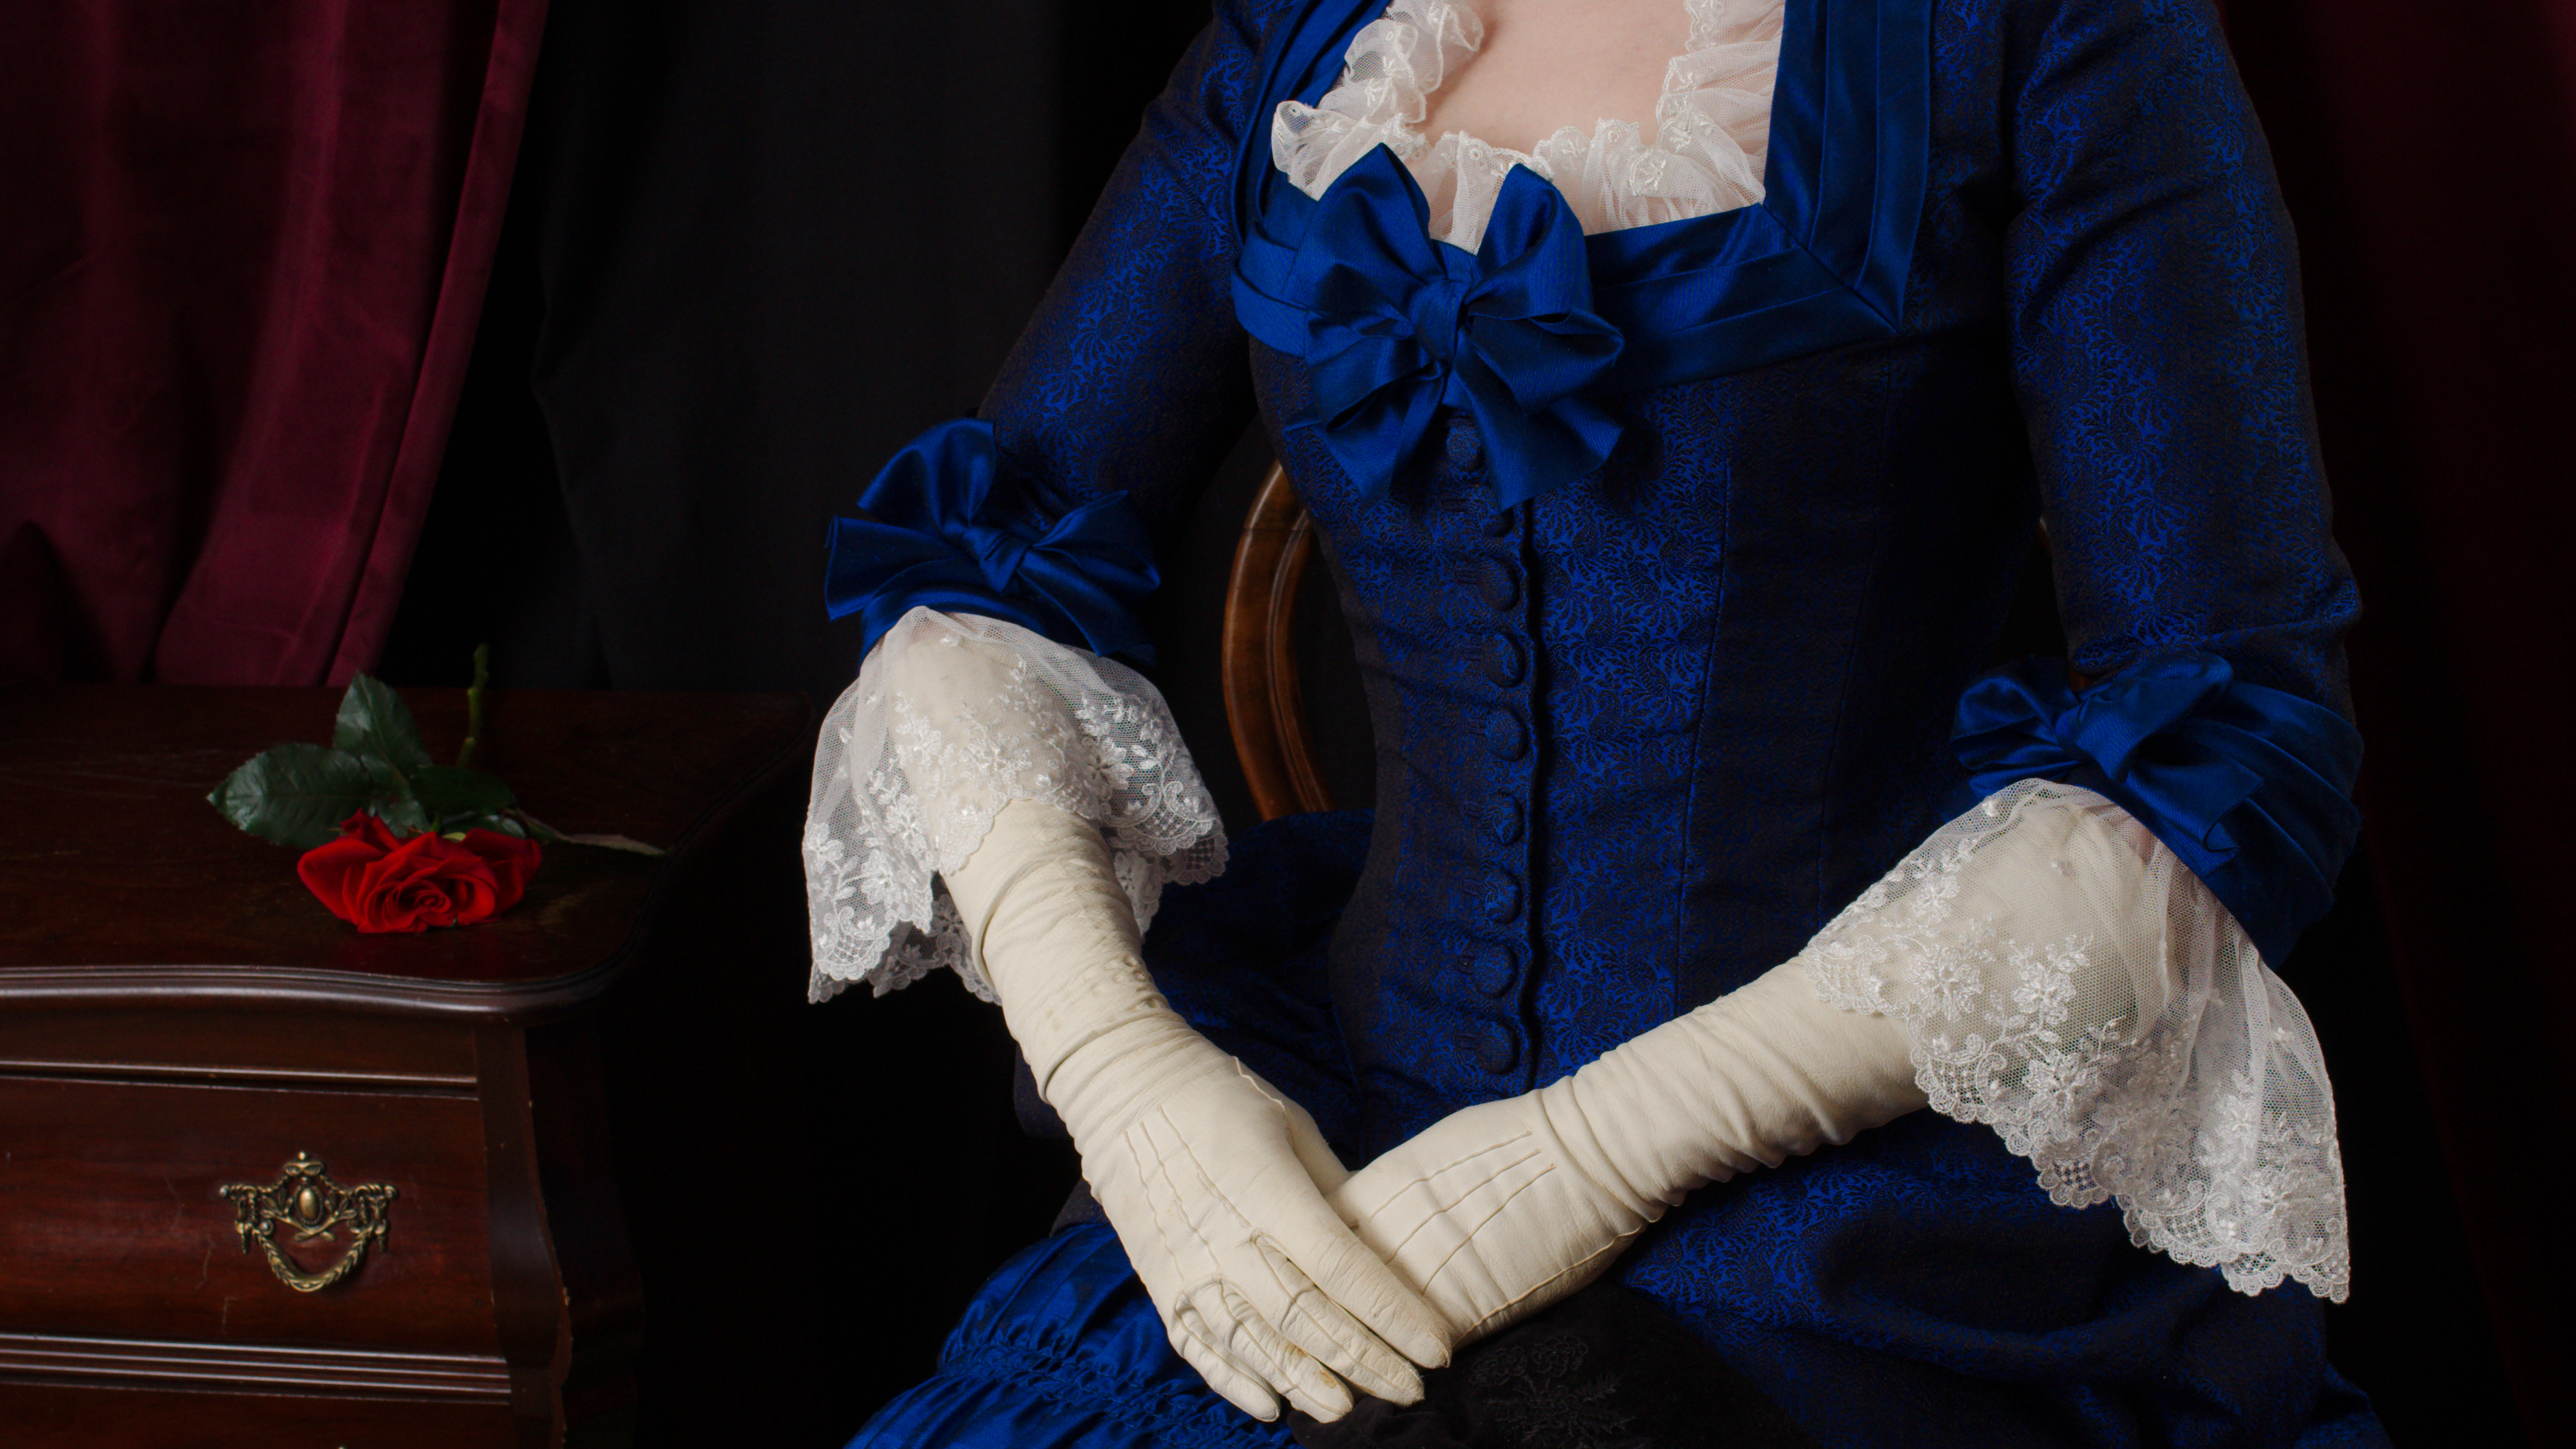
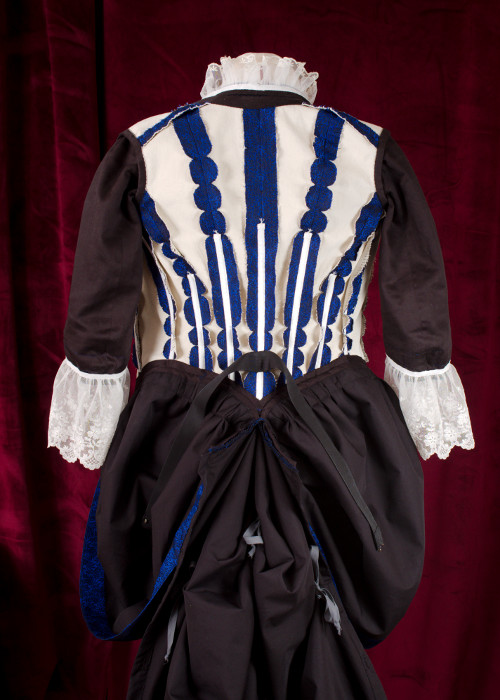
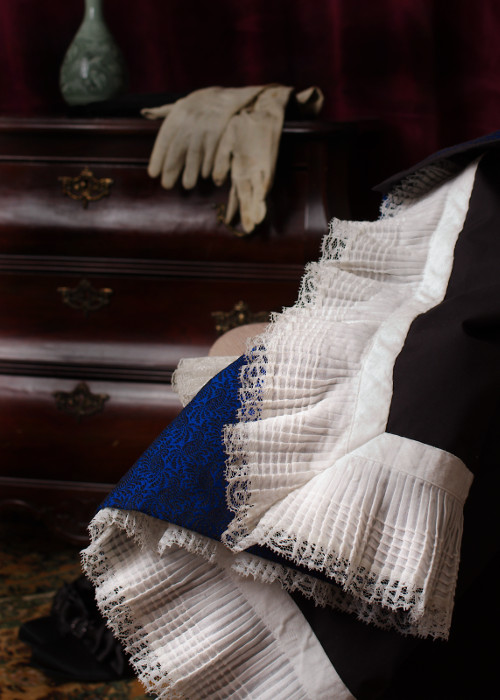
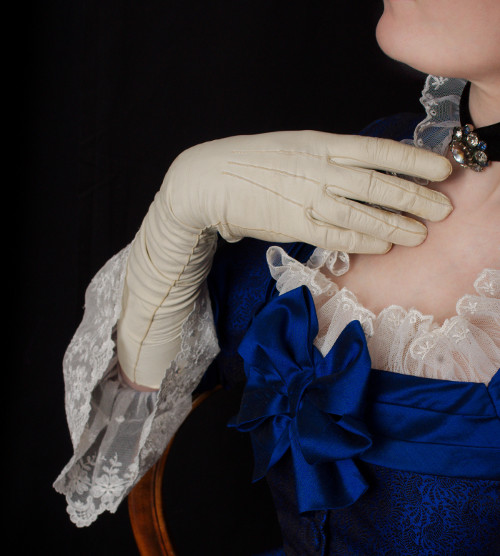
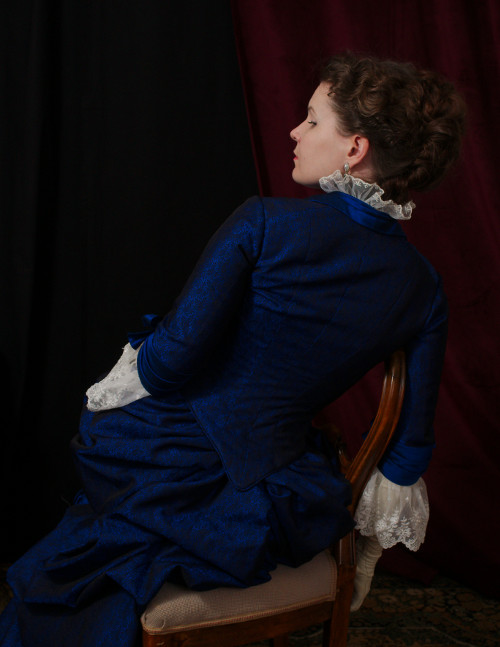
In the end my choice of lace looked rather good to my own eye at least. The wide, softly falling lace at the sleeves is just charming, and channels the 18th century flair I sought. The airy, transparent neckline lace fills the open neckline beautifully without making it look stuffy. The creamy color also works definitely better than the whiter one would have, even now it looks very bright against the royal blue of the dress. My gloves have also seen better days and a bright white lace would make them look even more yellowed and worn than they already are.
This type of dress sometimes seems to have lace trimming in the lower edge of paniers as well as in the neck and sleeves. I left this option off at early stage for various reasons, though. One was of course ecomony, and then I also liked the idea of a narrow, dark silhouette uninterrupted by such a strongly contrasting element.
Now that I had both the draping and lace on I finally sewed the sleeves on, and happily they set in without any problems. Then I made the bows and tacked them on the front of the neckline and sleeves. I also added hooks on the top of the bodice front edge and worked thread loops on the other front.
Finishing
the skirt and drapery
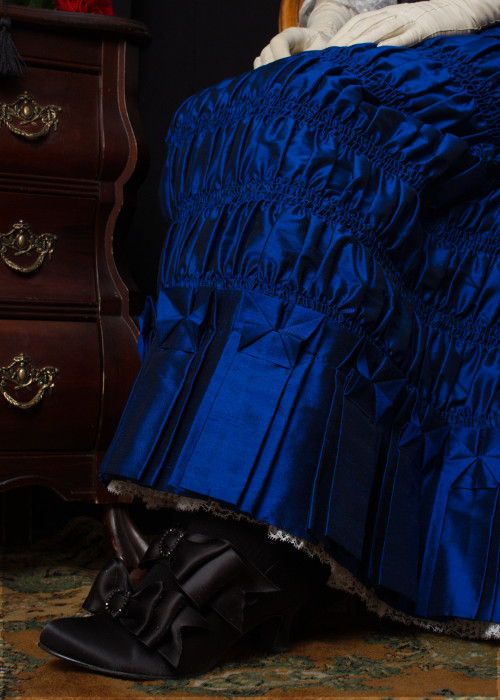
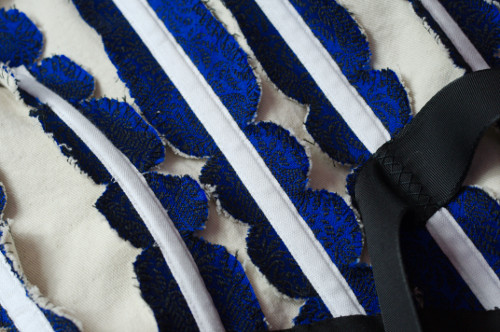
And then I finally took up the skirt hem trimming. I had originally thought a narrow kilting would look nice, but that takes up quite much fabric so it was sadly out of the question now. I did not despair, though, as I had managed to get a passable hem trimming to my ballgown too from rather small scraps of material. Similar widely spaced double box pleats might work on this one too, although it might be a bit unimaginative to use the same decorative element twice.
I cut most of the remaining silk and pieced it into a strip a bit over two times longer than the skirt front piece hem width. Like in the ballgown I lined it with cotton satin so that on the wrong side the the silk ended about 4cm downwards from the top edge. I experimented with folding and pinning different options and calculated which of those would be possible until I decided on a plan. It was basically the same double box pleats as in the ballgown, but this time I would manage to get the pleats deeper and more closely spaced. Actually, a lot of existing period costumes also have rather sparse hem trimmings, no wonder considering how much material they can consume.
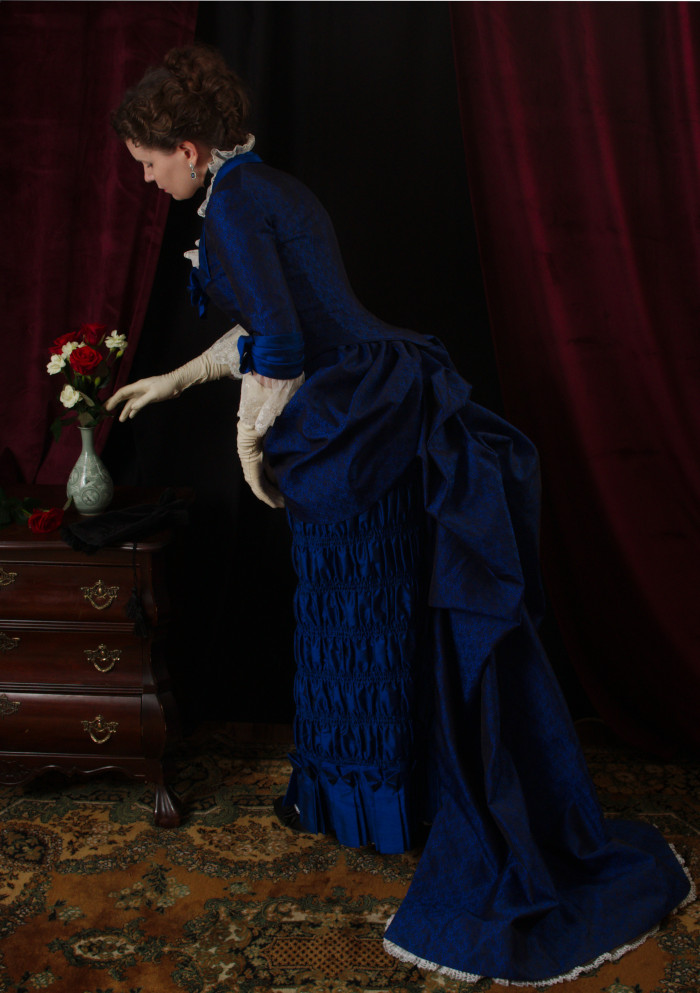
I measured and ironed the pleats and sewed the pleating into the skirt hem by hand with a single row of stitches 3,5cm from the top edge. Then I turned the edges of the top pleats downwards and tacked them down. With this very simple trick the hem trimming got a much more decorative look, which works especially well in the blue and black shot fabric which catches the light beautifully, accentuating the details. The finished pleating is not totally even, but looks nice from some distance, and hem trimmings are mostly viewed anyway.
With the bodice and skirt how finished it was the time to finally finish up the paniers too and join everything together. I pinned and basted the panier pleating, deciding on small inverted box pleats at last. I found out they settled better when I left the very top part aligning with the bodice side seam are straight without pleating for about 7cm. The paniers of course change their shape in wear and with movement, so maybe too much perfectionism in their shaping would be misplaced, but still I confess that I could have put more effort into them from the beginning.
I finished the top edge of the paniers with bias tape. Then I sewed them on the pleated top edge of the back drapery and pinned both on the bodice for fitting.
I had already at and earlier stage marked the place up to where the back drapery would get attached to skirt. Now I checked that it still looked right, leaving enough space for the top of the back draping and paniers to settle in their place without either pulling or bagging.
I had pinned the back drapery on with pins set roughly 9cm apart, and after swirling around a bit, carefully sitting down etc I decided that a similarly placed buttoning would keep the back drapery on securely and neatly enough. As the edge of the back drapery was quite stiff I should not gap too much between the buttons and this would be hands down the most practical way of attaching the back drapery for easy removal. So, I proceeded to made buttonholes into the back drapery edges and sewed corresponding buttons in the skirt. The last button is 8cm from the hem, which allows the back drapery edge some movement. I managed to get the skirt pleating reach a bit over the side seams, so the back piece slightly peeking from under the drapery is not a huge problem. Besides, this makes lifting the train easier.
I guess in theory I could have manouvered some kind of buttoning for the paniers and bodice too, but I decided that basting with a heavy thread would be the most secure mode of joining them, while still not too permanent. As mentioned earlier I had made the edge facing quite wide so the paniers could be tacked into that and the boning channels, minimizing the risk of the stiches pulling the bodice or showing outwards.
The bodice, paniers and back drapery / train are now practically one piece, but as the brocade does not wrinkle easily they can still be packed and stored fairly conveniently. The brocade is also lightweight, even with the cotton lining, so the paniers and train won't put too much weight on the bodice.
As mentioned above, I also tried lifting the train, which is a necessity even in a dress worn mainly indoors. I noticed the back hem of the skirt does peek out a little when the train is carried on loop, happily it's very dark, but I may still have to see if I can piece some silk to cover it, at least if I make the ballgown version.
And then there was the issue of the balayeuse. At first I had thought to make one covering the whole underside of the train like in my ballgown, attached underside the skirt hem, but had since them realized that with the separate, if partly joined skirt and train piece it might not work very well, and either pull the train or get baggy underneath it and peek out. Besides the durable black cotton poplin did not really urgently need protection, a light balayese might actually be more fragile.
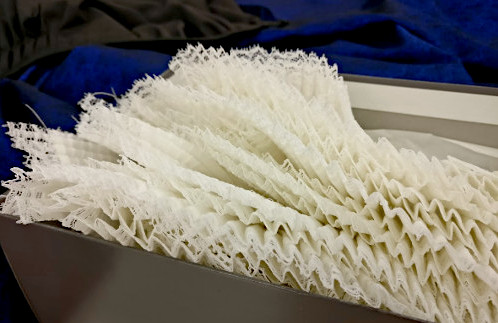
So, in the end I chose the easiest solution available, simply a 10cm deep pleated strip set on a tape for both the skirt and train edge. I used sheer cotton voile, which was quite soft and flimsy but would hopefully gain some body with pleating and starch. Many period dust ruffles from finer dresses are very delicate even though they are mostly hidden under the hem, so I tried to make a bit nicer one too this time. I decorated the ruffle with both lace and tiny pintucks, which also serve the purpose of stiffening the soft material and helping it to keep its shape.
I pleated and pressed the strip with the 0,5cm wallpaper pleater I had made for the Tissot dress trimming. The pleating did not turn out quite even (the pintucks weren't either), but I left them be like that - they would never be even again after the first wash anyway. I starched the finished pieces, hung them to dry so that the pleats would fall straight and ironed them. Then I tacked them on the skirt and back drapery edge.
Accessorizing
As for the accessories, I already had a pair of antique gloves and a modern bridal lace fan. For the jewellery I got a vintage brooch Jarno had brought me as a souvenir from somewhere, which I put in a velvet choker. I paired it with very cheap earrings which matched the dress color, which was probably some sort of travesty. Later I found new, nicer ones, which are modern make but at least have real czech crystals.
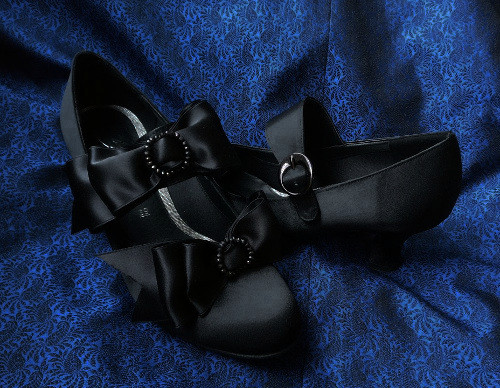
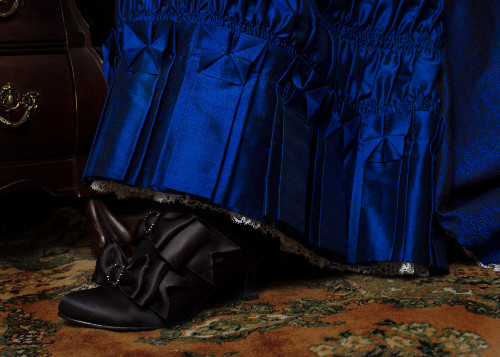
I had even before beginning the dress found modern satin pumps with a low pompadour heel. They had a too modern-looking wide strap with a buckle, but when I added large satin bows that conveniently hid them the shoes got a charming period-esque look. The bows are decorated with sort of decorative but totally not functional buckles I made from metal wire and some beads I happened to have.
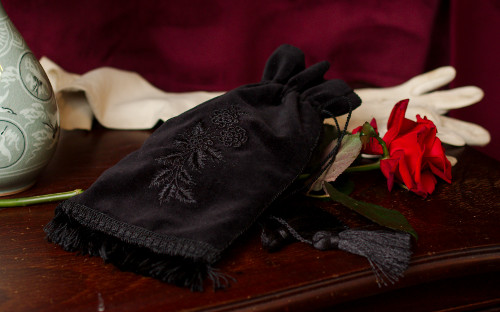
I also got obsessed about needing a reticule, so I had to make one just in time before the dinner where I would wear the dress for the first time. It's made of a spare piece of velvet and embroidered with shiny viscose thread I had plenty of left from the buttonholes of Jarno's first 18th century suit.
Final thoughts
The finished dress has some small issues which could have been avoided with more careful planning, pattern drafting and testing. I freely admit that I made some parts of this project in a hurry, especially in the beginning when I was anxious to get started and then towards the end when I suddenly had a deadline. Still, it has a lot of things that I like too, and the overall look is pretty.
At some point I did wonder whether a brocade with a more visible pattern would have looked better after all and worried that the materials combined blended together instead of accentuating each other. Even though bold fabric and color combinations were popular in the period in the end I rather like the more subdued effect here.
I don't think I will get inspired to make the ballgown bodice any time soon, as I already have a only twice worn ballgown I like very, very much. But it's a useful option to keep in mind, especially if I should participate in an event with a dress code excluding pre-1880. While this dress is dated only a few years later than my ballgown it's already beginning to display the signature look of the 1880s, with the very fitted, pointed bodice and the first hint of the huge bustle that would return soon.