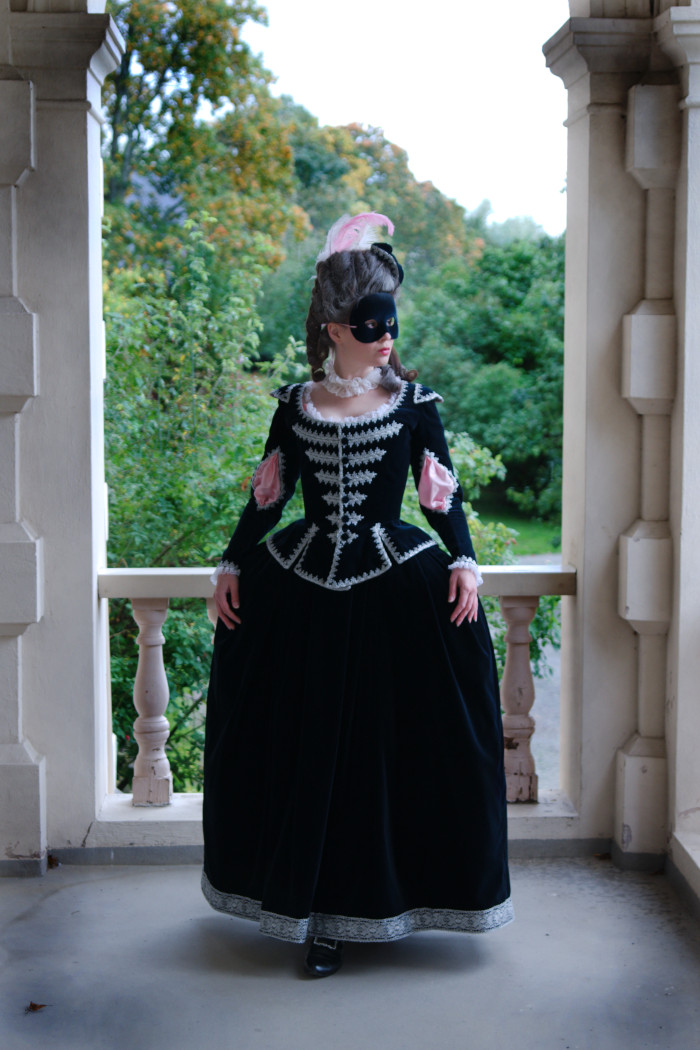
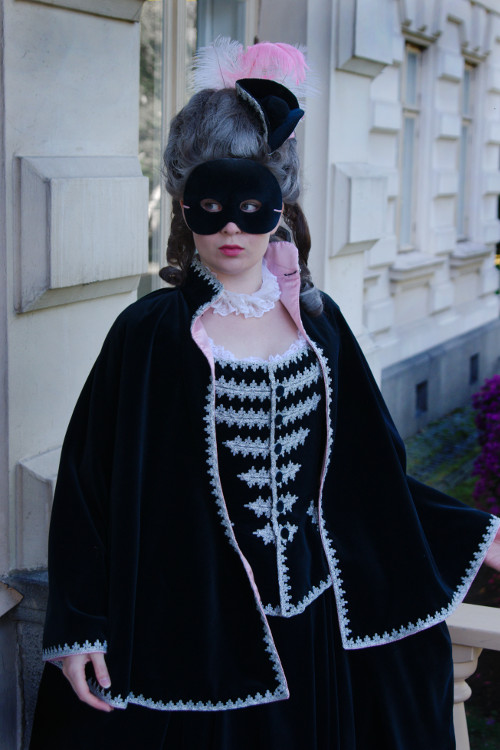
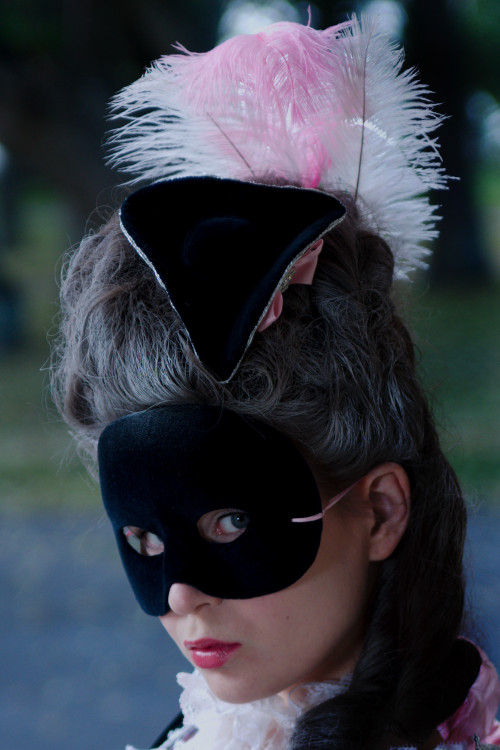
Masquerade dress, 2015
The Masquerade ball of April seems to have been established as
a L'amusette tradition during the past few years. After
attending a few times in a vaguely allegorical "Spring"
costume (which means this
with a mask and a wreath), I was inspired to make a specific
18th century masquerade dress. This was largely caused by
some interesting blog posts on Isis Wardrobe
on the subject. I was especially charmed by this portrait of
a young woman in a masquerade dress by Dmitry Levitsky.
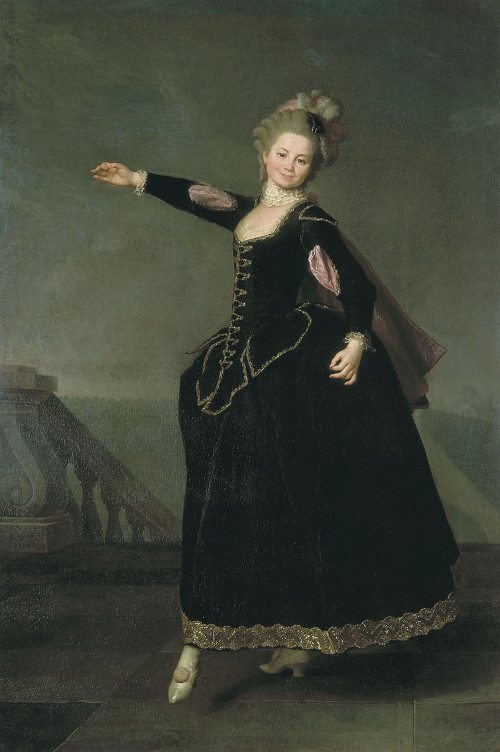
Levitsky painted several young ladies of the Smolna Institute. Natalia Semyonovna, painted in 1776 wears a version of a traditional 18th century masquerade dress: I's black with slashes of pink and some elements reminiscent of theatrical costume. This one is also trimmed with metal lace, which gives nice extra bling on the dark outfit. I also liked the idea of a blingy masquerade costume because while on the period the filthy rich aristocrats often favored pastoral simplicity in masquerade dress, the modern idea of an 18th century masquerade is more decadently opulent in the style of Sofia Coppola's Marie Antoinette's masquerade ball scene.
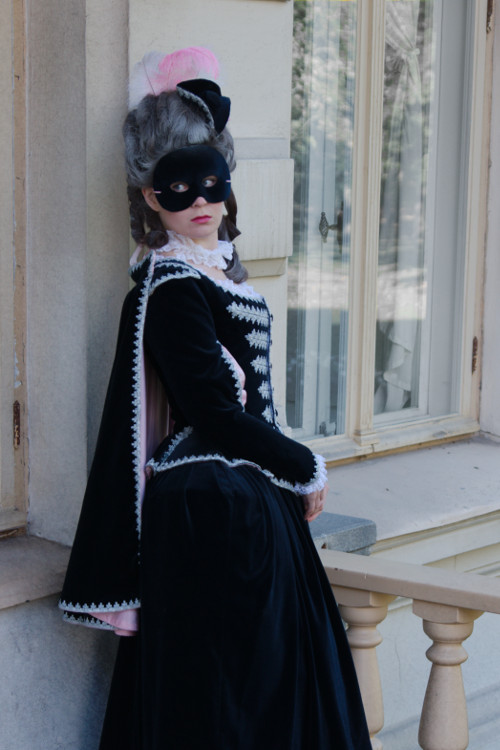
This type of masquerade dress has other fascinating features. The tricorn and the cape with a standing collar rather than a feminine hood bring a nice masculine touch, mixing the gender roles was a thing of the masquerade culture in the period and also added to the risque element. The masculine tricorn is reduced to a small, feminine ornament in an elaborate hairdo, though. The jacket with long sleeves and decorated buttonholes also looks very much like a riding habit coat, which in turn were always heavily influenced by men's fashions.
The silk lining peeking out from the slashed sleeves looked quite weird to me at first, but obviously it comes from theater costume which still carried strong renaissance influences on 18th century. To be quite frank, especially in pink satin those decorations bring on some quite Freudian thoughts, but considering the erotic undertones of period masquerade I would be surprised if they had done it on purpose. Okay, men's theater costumes have similar slashed sleeves too.
The materials
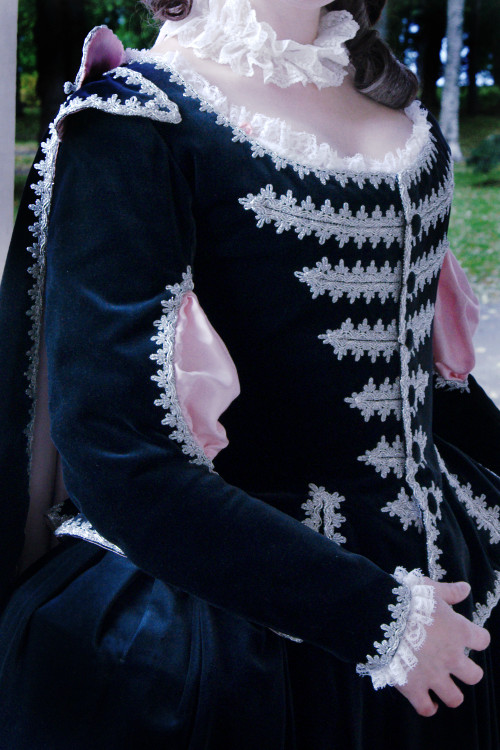
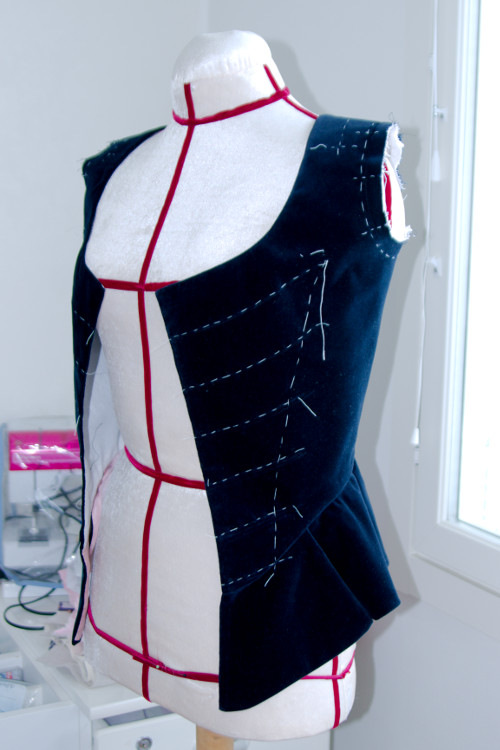
The dress in
the painting looked velvet to me, so I decided to make a
velvet dress for change. Dark colored velvet also has a
luxurious and mysterious feeling. The downside was that in the
period they would have worn real silk velvet, while I could
afford only considerably less shiny cotton velvet. I decided
to go for the cotton velvet knowing that it was wrong,
however, as I can happily wear polyester taffeta too. Cotton
velvet is also not totally painful to work with.
So, my vision
for the materials was originally black velvet paired with
light pink dupioni silk. I had calculated that I could spend
the amount needed for a silk lined cape. We also happened to
go for a weekend trip to Tallinn, so I spent most of Saturday
fabric shopping.
To my great shock the dupioni, which I had thought easy to find, seemed to have gone extinct on the town. They have dupioni in my local fabric store, but it's of the very uneven and lumpy kind, not really suitable for period wear, and it's expensive too. Finally, tired and hungry and with sore feet I succumbed to a thin lining satin, with looked every bit a lining satin but at least it was in the right color - and dirt cheap.
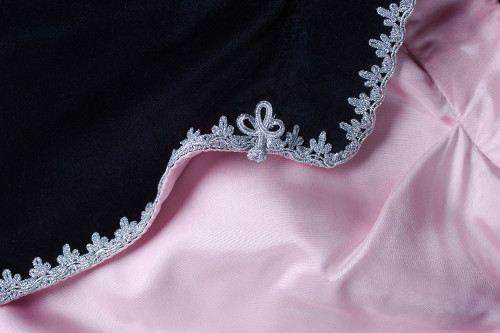
In case you ever visit Tallinn, a place called Karnaluks (they also have a webshop) is wonderful place to find cheap haberdashery. It was there that the metal lace in my shopping list changed for a trim with pretty looped edge, which I thought would look nice especially in the buttonholes. The skirt hem in the painting has a really heavy looking wide metal braid, which I replaced with a wide silver lace instead.
By the way, it's not quite easy to tell from the painting whether the trimming is in silver or gold. As I personally prefer silver I thought it could well be silver. Later I found a better version of the image, where the trimming looks golden, and then it began to look gold to me in every version. Anyway, for myself I'll stick to silver.
The portrait is from 1776, and the lady's hair follows the current fashion. The jacket cut looks curiously old fashioned with 1770's hair, it looks more like something from the first half of the century. For drafting the pattern I looked at Arnold's patterns of jackets from 1720-1740 and Watteau's paintings, where people are often clad in theater costume.
In the painting the jacket bodice if very long at the front, and so the front skirts also dip very low. In my opinion this cut looked slightly unbalanced on the slender girl, so I decided to tweak the proportions slightly for a more flattering look.
The jacket pattern is based in my old, trustworthy riding habit pattern. I had already drafted it a bit tighter for the brunswick waistcoat. The neckline shape came from my polonaise pattern. The jacket skirts were so wide that after my experience with the brunswick waistcoat skirts I thought they would have to be cut shaped and separate from the jacket bodice. For the first mock up I copied the riding habit skirts, just left them a bit shorter. The sleeve came from the brunswick waistcoat.
As the jacket would be tight fitting and non-adjustable in size I had to decide early how tight I would want to be laced for this outfit. This time I settled for a smooth but comfortable lacing tightness - I've grown old and lazy and I'm ready to admit that my lovely striped polonaise looks divine but is rather uncomfortable to wear for longer than a few hours.
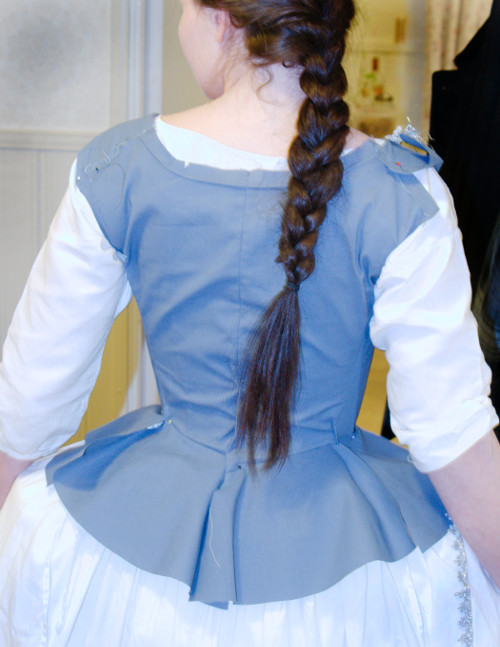
I had great trust in my old patterns, and expected the mock up be just a quick check just to be sure, but somehow it happened that it had many problems. I had been careful not to draft the pattern too tight, and so had ended up with too much extra width. This was of course easy to fix, as correcting the neckline shape was too, but the real problems lay in the shoulder area. I fail to understand why the shoulder worked satisfyingly in the brunswick but was a total mess now - perhaps the wide neckline had something to do with it. I had to change the shoulder angle at the back quite a bit.
The sleeve was problematic as well. With the wide neckline it kept sliding off the shoulder all the time. In the end I raised the low sleevehead by a few centimetres, adding some much needed room especially on the front of the shoulder, the place were period sleeves always fit ill on me. This of course added volume on the sleevehead, with the possibility of puckering in the thick material, but then again the epaulette would neatly disguise that.
Shaping the sleevehead anew fixed part of the problem, but it was only completely solved when I realized that the back neckline was too wide. I took the center back seam in a bit at the top, which made the top part of the back fit snugly and kept the shoulder line where it ought to be.
The sleeve fit in the painting looked a bit awkward to me at first, but when I opened the slit at the front seam of my mock up sleeve it began to look pretty much the same - that's what you get when you randomly open a seam in a fitted, curved sleeve. I had to adjust the arm curve too, as it worked okay when the sleeve was tight but looked too tight at the lower arm when I opened the front seam, so I added some room on the top seam on the lower arm.
Like I mentioned above, in the original the jacket skirts dip very low at the front. While I had already changed the waist curve the front skirts were still too long to my eye. I cut the skirts shorter at the front and sides for a more balanced look. Then I pencilled the line for the slit in the front skirt, forming two tabs, and cut it open.
The riding habit skirts overlap especially at the back, but I thought I'd rather like them meet edge to edge here, so I sliced off some extra at the side-back and back edges. I drafted a mock up epaulette, pinned it on my shoulder, thought it looked too small and drafted a larger version. It looked okay, so I marked balance points for it on the mock up shoulder.
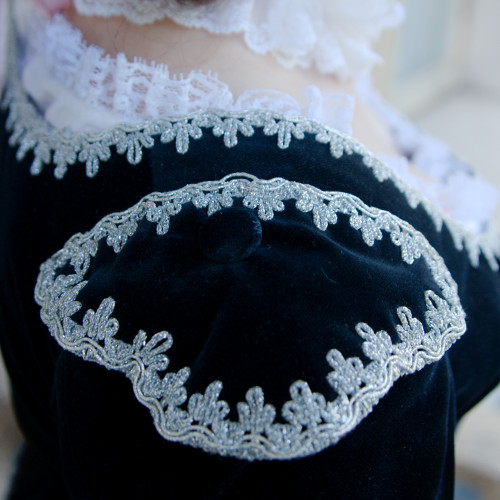
To conclude the mock up fitting I pinned some braid on the bodice to see how it looked. In the painting the buttonholes were edges with the braid with mirror image false buttonholes worked on the other side. They seemed to be off even length all the way, but I had began to vision a triangular buttonhole decoration wider at the top to create a more feminine look. I was inspired for this among other sources by the painting below, which shows Queen Elisabeth Christine of Prussia in an earlier dark blue velvet dress with massive silver trimming. I experimented with pinning the braid on a slightly downward narrowing shape, and it looked so pretty I wanted absolutely to have it. I decided at this point to make up the jacket and then plan the trimming for real.
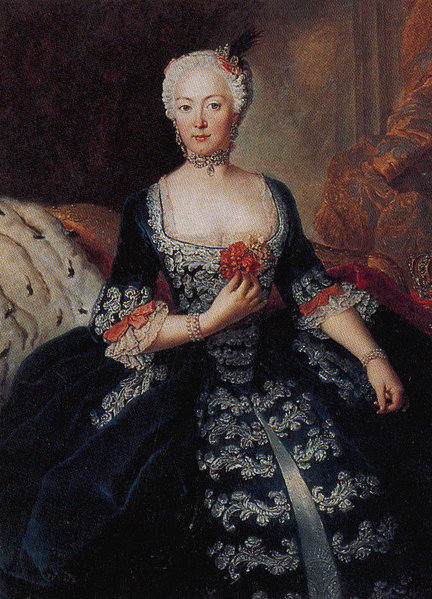
Queen of Prussia from 1740 to 1786, consort of Frederick the Great
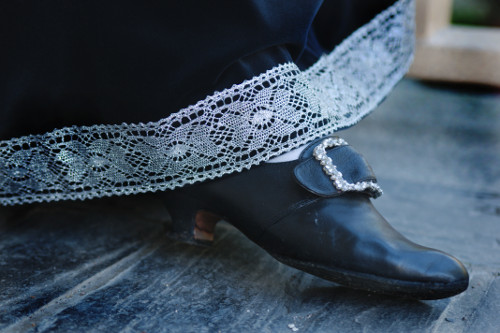
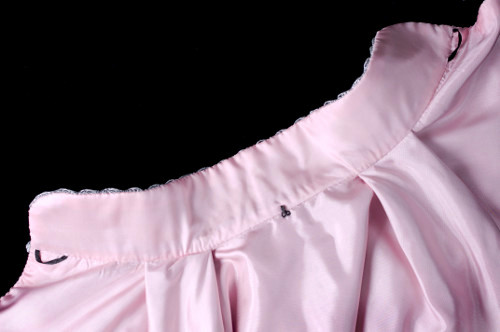
The petticoat
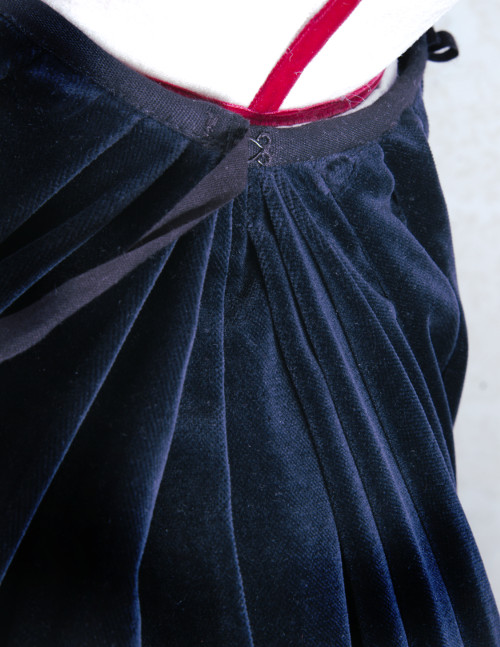
The waist pleats are formed on a dummy and meant to be more or less symmetrical, though they may have slight variation due to being done free hand. Another thing I have learned from my earlier projects is that a heavy skirt fastened in the period way of tying the side slit ties round your waist may pinch uncomfortably even through (half boned) stays, and it's also difficult to tie the strings tight enough when dressing up by yourself. So, here (like in the riding habit before) I used the alternative, if period-wise questionable fastening method of heavy hooks on the side slits. This fastening of course takes away the size adjustment possibility usually so cleverly incorporated into 18th century skirts, but as the buttoned jacket has no room for adjusting the size either it won't be a problem. I did put ribbon ties on the back side, though, to cross the front through the loops at the front waist and tie at the back to keep the front from sliding downwards - a trick I've used in all my recent petticoats. The mostly machine sewed petticoat was quickly done.
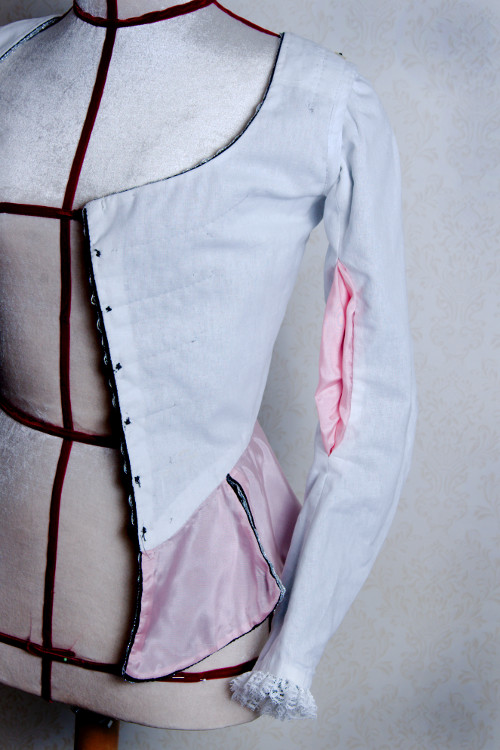
I had thought the jacket could also be largely put together by machine. So, I began by promptly bag lining the jacket skirt pieces, or more like attempting to. I had not worked with velvet for some time, and had happily forgotten what it was like, and soon found out that the napped velvet and the ultra thin satin didn't want to stay right sides together were I pinned them. In spite of adding several more pins I had to unpick and sew again so many times that with hindsight I'm pretty sure I would have lined the damn pieces faster and certainly much neater by hand.
I closed the
bodice seams and sewed the lined skirt pieces on the waist.
Then I made up the lining of thin linen. It had just a bit of
stretch, like the velvet, and would breathe on wear. On the
shoulder where the cape would be fastened I added a coutil
interlining for strength. Then I joined the velvet and the
lining at the neckline by machine. I basted the lining on at
the armholes and front edges and put it on for a quick fitting
just to be sure.
It was
fortunate that I did. For the first thing I had, after all,
fallen into the trap of fitting my muslin mock up too tight
considering the real thing would be velvet lined with linen.
The velvet does have some stretch, and might have looked just
fine with a different closing like closely set hooks and eyes,
but gapping buttons never look very good. I had to let out a
just a tiny bit on the side seams (happily the velvet hadn't
been much damaged by the seam yet) and get more room on the
front edges (which had ample allowance), about 0,5cm at top
and 1cm at the waist on both sides. Letting out the side seam
of course resulted in a gap between the skirts at the waist,
but happily that could be hidden under the trimming.
I also had to
adjust the neckline shape at the front. At the back it was
still prone to stretching out of shape, so I added a tape all
round the neckline hidden under the lining. For the last thing
I sewed the lining on the waist seam by hand.

I lined the sleeves with the same thin linen as bodice.
First I closed the seams on the velvet and lining,
leaving the front seam slit open. I cut a 20cm wide
piece of the pink satin the length of the slit with
ample allowance at the ends. I gathered the ends and
pinned it on the sleeve. The width looked sufficient for
the poofy effect, so I cut an identical piece for the
other sleeve. I sewed the edges on the sleeve seam
allowance, pinned the gathered ends on the ends of the
slits and secured the extra with short vertical lines of
stitching on the seam allowances.
Then
I joined the velvet and lining at the sleeve ends and
sewed the velvet and lining seam allowances together at
the slit edges, not right to the ends of the slit however
to leave room for the satin which was in part gathered to
the seam allowances. I also sewed the seam allowances
together at the back seam for a few centimetres at the
elbow to keep the lining from twisting out of place.

Then I could for the first time lay my hands on the
trimming for real. I sewed it by hand on the sleeve end
and slit edges, first the lower edge and then the top edge
and the loops on a second round of stitching. For the last
thing I gathered a narrow lace and sewed it on the sleeve
ends.
I
tried the lined bodice on and pinned the sleeves on too to
see how they looked. Then the sleeves went back to the
project box to wait for the jacket to get forward.
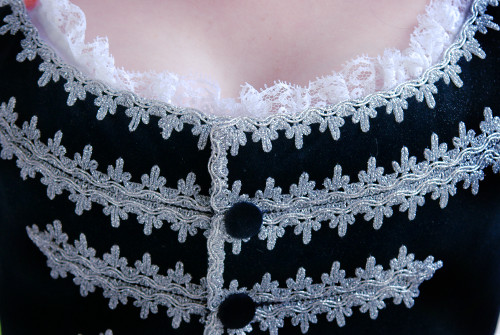
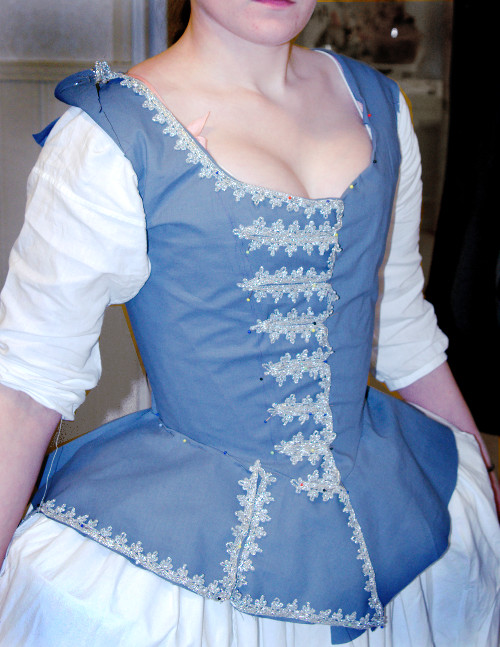
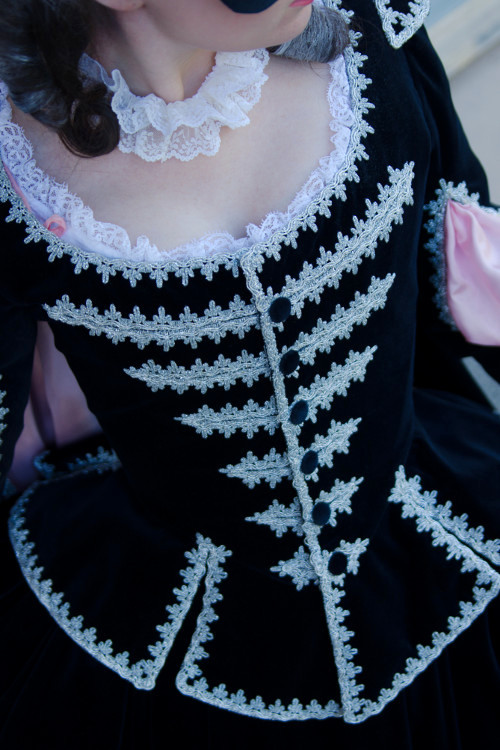
I
pinned the braid on the front again, and settled on six
buttons, which gave the buttonholes a pleasing spacing.
The original has more buttons, but my wider, looped braid
would have made denser buttoning look way too heavy. I
also pinned the braid even wider at the top this time and
found that I really liked the flattering stomacher-like
effect it gave.
It was not easy at all to get the buttonholes narrowing down
in a smooth line and at the same time get the braid loops to
match. At last I gave up with the pinning, and when I had them
halfway okay I took some pictures to support my memory, took
the jacket off and marked the ends of the buttonholes as I had
pinned them. Then I unpinned the braid, checked the buttonhole
spacing with a liner, then chalked and basted the markings for
buttonhole and braid placement.
Then it was
time to make the actual buttonholes. As they would get covered
by the braid I made them by machine, though I made them
halfway right at least by stitching a straight line around the
buttonhole first, then opening them, and only then covering
the raw edges with zig-zag. The buttoning is, by the way, on
the left side like on men's clothing, following the riding
habit tradition again.
I began sewing the braid on the bodice at the back slit. I
found pretty soon that my attempt at lining the skirts so
that the velvet turned on the underside rather than
meeting the satin at the very edge looked okay only
without the trim, as soon as I added the braid on the edge
the underside looked just confusingly uneven - I could
just as well have brought the lining right up to the edge,
saved myself so much trouble in the lining and had a
neater result. Also getting the braid loops symmetrical in
the corners and slit tops was quite tricky, as I had not
been smart enough to plan the pieces to match the braid
loop spacing at the pattern drafting space. Not that it
would have probably matched in the end if I had, either,
and fabric tends to shape in the process.
When
pinned the braid was easily left too short for the edge,
so I had to do some unpicking along the way and pinning it
on only on short pieces. On the corners I turned loops
under the braid to hide them for a prettier finish.
As
the braid was easier to sew on from left to right I had
the button side of the front to make first. It was easy to
trim because I could always cheat a bit on the front edge,
which would get covered by the left edge in order to get
the loops symmetrical at the buttonholes. The problems
began, however, when I had happily went round the neckline
and arrived at the left side. Now the edge showed and I
had real trouble getting the buttonholes neat and
symmetrical to the already finished right side.
On hindsight I really should have sewed the buttonhole
trim as separate pieces and cover the ends and the edge
with braid afterwards, and I really don't know how I
didn't come to think of this at the time. I just somehow
optimistically assumed that the braid would be easier to
manipulate than it was in the end, and that the buttons
would cover it a bit too. Unfortunately my buttons weren't
large enough to really hide any unevenness in the trim
placement.
In
the end I sewed the braid on the left side as evenly as I
could get it even though it remained asymmetrical to the
right side. On the edge I used the same trick as in the
skirt corners of tucking the loops under the braid.
I
continued sewing the braid round the left side skirts,
desperately trying to get them match the right side. For
the last thing I unpicked the braid on the right side of
the bodice and pinned it on anew to match the left side.
Again, I cheated at the edge quite a lot. It was
surprisingly difficult to get the front decoration
symmetrical with the buttoning allowances complicating
things further. I also re-placed the buttons once, as when
the fitted jacket is on they settle a crucial 0.5cm
differently than with the jacket buttoned up alone without
the strain.
The
sleeves happily settled on fit no fuss. As I had
anticipated, there was a bit too much gathering on
the shoulder, but it would be hidden anyway. I had
originally planned to turn the sleeve lining over
the armhole seam but had forgot to cut it high
enough at the underarm, so I had to abandon that
idea and cover the seam allowances with a bias tape
instead. It makes the seam a bit heavy, but I didn't
want to leave any velvet seam allowances visible to
bleed endless amounts of extra pile.
Having learned my lesson with the jacket skirts I
lined the epaulettes by hand. First I ironed the
seam allowances to turn under with the help of a
cardboard pattern and then pinned the lining on. I
sewed it on the edged by hand and then sewed the
braid on top. Then I pinned them on the shoulders
according to the balance marks I had made in the
mock up fitting. Now they seemed to settle too far
back, though, so I mowed them a few centimetres
forward. Then I sewed them on by hand.
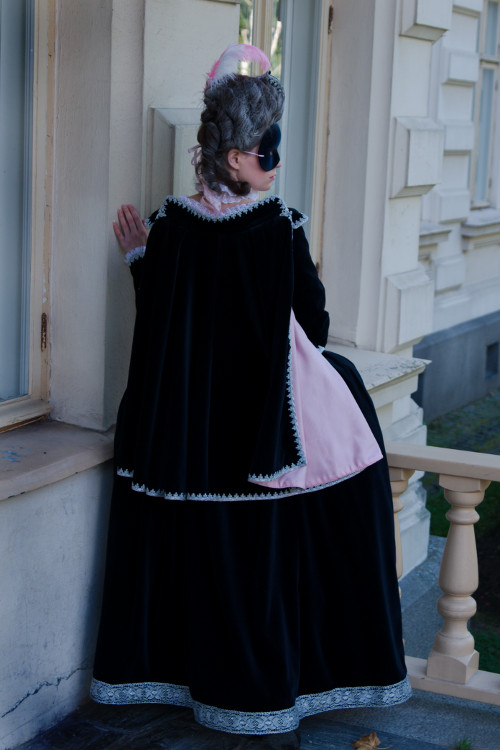
The cape
Then
there was the cape. I have been told that masquerade
costume capes like this could be just narrow fake pieces
not even meant to be used as a real cape. As I would have
to sacrifice some amount of material on it anyway I
thought I could just as well make it wide enough to use as
a cape as well. On the other hand a really wide circle cut
cape would be very heavy. In the end I cut it as a
half-circle with a back seam to get the pile direction
symmetrical. I estimated that 70cm would be a good length,
so I cut a 180cm wide half circle to get a larger
neckline. I thought it safer to line the cape first and
cut the neckline later for a neater result.
I reasoned that it would be easier to sew on the braid
before the lining, as the other way round the stitched
would all too easily caught the lining. At least on the
straight grain front edges I could even sew the braid with
machine. I also got in my head to try and machine sew the
braid on the curved hem too, and to my surprise it looked
quite neat enough. I turned the seam allowances under and
stitched the other edge of the braid on machine as well.
Then I caught down the loops by hand.
I cut the lining on two layers of satin, as it was so thin
that the dark velvet would show through too much with just
one layer and darken the light pink. I was a bit worried
about how the two slippery layers would stick together,
but happily they created a field of static electricity
which made them cling firmly to each other. I cut the
satin with large allowances at the hem, smoothed it
carefully over the velvet and basted it on 5cm from the
edges. Then I began sewing it on, beginning at the front
edges. Again I faced the same problem as with the jacket
skirts: even though I had tried to turn the velvet under
tightly from the braid edge, the pile shot out. To get the
lining start right next to the braid I actually had to
turn it a bit on the front side to hide the velvet
allowance. This of course made the lining look baggy at
the edges, so I had to add a further line of hand
stitching through the edge to stabilize it.
The
circle cut cloak was of course tricky to line at the hem
without the lining being either baggy or too tight
anywhere. I had already let it settle on it's shape in the
hanger over a few nights. In the end the velvet kept
it's shape better that I had anticipated, but I still had
to unpick, pin and sew again the center part of the hem.
Sewing the lining to turn over the edge was much more
tricky than sewing it under the edge the usual way.
Finally I got it done and basted the layers together at
the neckline, sewed a supporting machine stitch line and
cut the neckline open.

The capes for theater costume and masquerade seemed to have a masculine collar rather than a feminine hood. From a few images I gathered to be a small standing collar, so I cut a 5cm wide collar rounded at the ends. I interlined it with heavy jute, turned the velvet seam allowances over the interlining and sewed the braid on the edge.
I
tried the collar on by itself and marked the shoulder
line. Then I pinned and sewed the lined cape on the
collar, turning the extra width on the neck to two large
inverted pleats on the shoulders. I have no idea if this
is a period correct solution, but the thing is that
without extra width and pleating at the neck a half circle
cloak will not be wide enough at the shoulders to close at
the front, and a full circle cape would be way too full
and heavy to drag at the back of my dress.
I
added ribbon loops on the seam for fastening the cape and
finished the collar with lining. Then I added a silver
braid button- and loop closure at the neck.
I had thought about fastening the cape to the jacket quite a lot, and happily my friend Riikka stepped in once again to enlighten me about the cape fastening in the national Swedish court costume designed by Gustavus III. In that there was, as I had already suspected buttons covered with the suit fabric on the shoulders and corresponding loops on the cape collar. But added to that there was also a hook in the center back of the cape collar, and a corresponding tiny loop for it in the bodice.
I put the jacket on, estimated the button placement and the height of the loop for the center back hook. First I sewed on the center hook and loop, tried the thing on and fixed the button placement for real. The hook, which I wouldn't have thought by myself adds greatly to the stability of the cape, and it really stays on very securely. It's also easy to take off the cape by oneself when it gets too heavy. On the other hand it's very hard to get on by oneself, but that's what the servants (or friends) are for.
Then the only thing left was to get the accessories. Like I already mentioned above, I sewed the lace peeking from the sleeve ends at the wrists straight to the sleeve, as I didn't want to bother to make a long sleeved shift. I added the same lace on the neckline of my old shift, as it would go with other outfits as well.
The tiny tricorn in the painting is just adorable, and of course a nice way to use some of the leftovers of the dress materials. I have to admit, though, that I had not previously known that mini tricorns even existed in the period, but thought them to be a modern rococo-esque carnivale invention. In masquerade costume paintings there were several tiny tricorns on top of elegant coiffures, however.
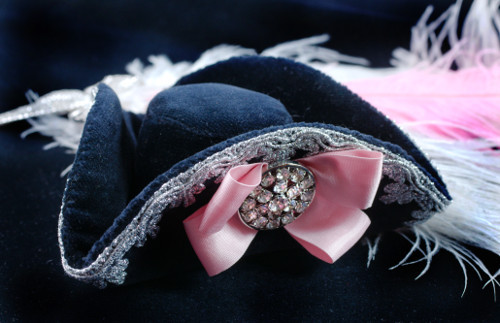
I downloaded a pattern from www.fleecefun.com, but when I took a closer look on the pattern pieces as printed out they did not quite match, so I had to draft them anew for a large part. The downloaded pattern gave a good idea of how the pieces should be shaped, however, even though it wouldn't really have been that hard to figure it out by myself. A little tweaking on the pattern and some more while making it up resulted in a very cute little tricorn.
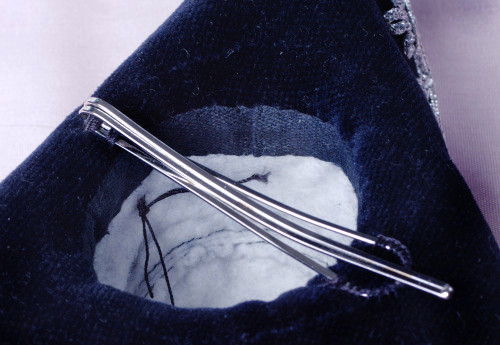
I made up the tricorn very fast, experimenting a little, so unfortunately there are no pictures of the process. I used felt for the base and covered it with velvet. I made it largely by machine with some finishing by hand. I decorated the edge with the silver braid and put together a little cockade from the pink satin and a random blingy button. The tricorn is fixed on the coiffure by a hairclip attacthed on the underside.
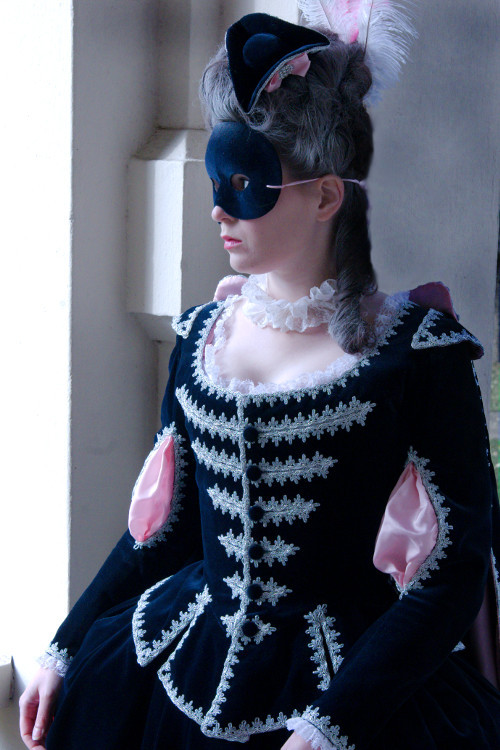
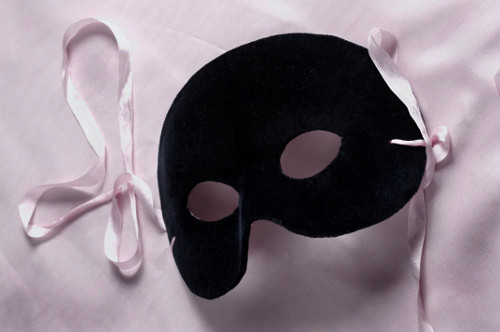
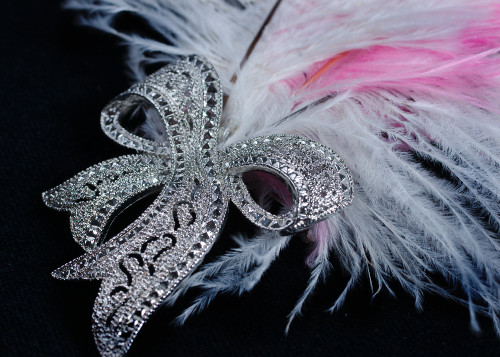
I was of course seriously tempted to make or buy a fancy silvery decorated carnival mask, but I knew that 18th century masks were generally very simple. So, I restrained myself from extra bling and instead covered a basic half mask base with the dark blue velvet and adding pink silk ribbon ties. In the end the simple mask works well with the blingy dress and gives a dark, mysterious look.
The lady in the painting has quite a pile of feathers on her head, but I settled for just the three suitable ones which I found on my stash. The pink one is actually too bright to be entirely suitable, being a bit brash and artificial tone for the period, but it will do. I glued the feathers on an old brooch I had, and also glued the lock shut so that the brooch can be pinned on the back of the hair.
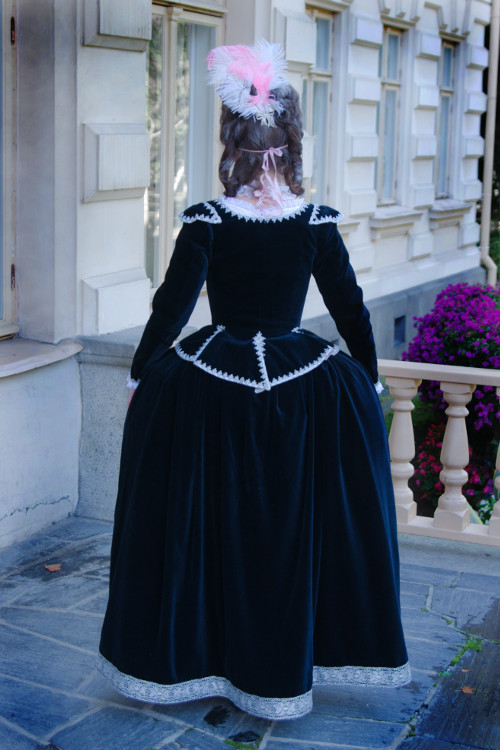
The masquerade dress ended up very showy. At some point I felt it was perhaps even too full of bling, taking away some of the dark mysterious feeling of the more simple period masquerade costumes, but at least it nails the opulent vision I had. It's also surprisingly practical on wear: The cape fastening is secure, the petticoat length is very easy for dancing and the jacket fit is comfortable. I was initially anxious that the weight of the cape would pull the jacket backwards at the neck, but when I got the neckline fit right at last there is no problem at all.
The only downside of the costume is that it's very warm, and having worn it for the first time I felt great sympathy foor the poor gentlemen (especially the military ones) in their woollen coats. Happily getting rid of the cape helps with ventilation quite much. On the other hand the cape is a great addition to wear outside, and with the long sleeved jacket one doesn't necessarily need an extra cloak for outdoors unless it's really cold or rainy.
The untidy lining and at some places too tight trimming on the jacket skirts still bugs me, but happily the dark velvet is very efficient in hiding imperfections, and the blingy braid also helps to blind the critical eye. On the other hand I'm very much in love with the buttonhole decoration, which creates a wonderful optical illusion of curved, slender torso even though the jacket waist is not really that small at all. And of course the color - while I initially wanted it black, by now I could not imagine it anything else than the lovely dark blue.
