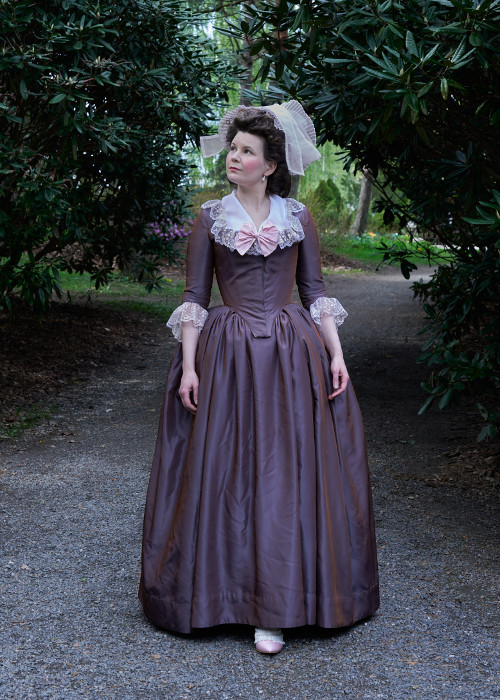
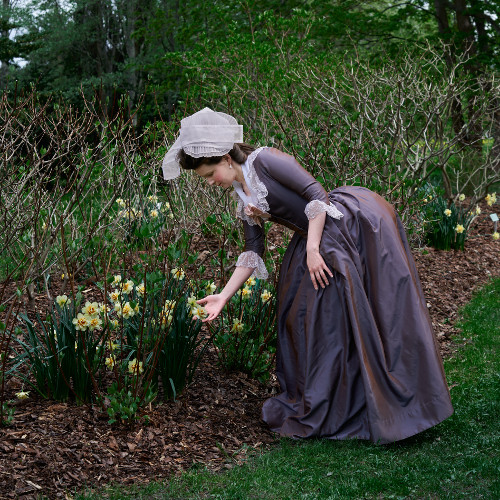
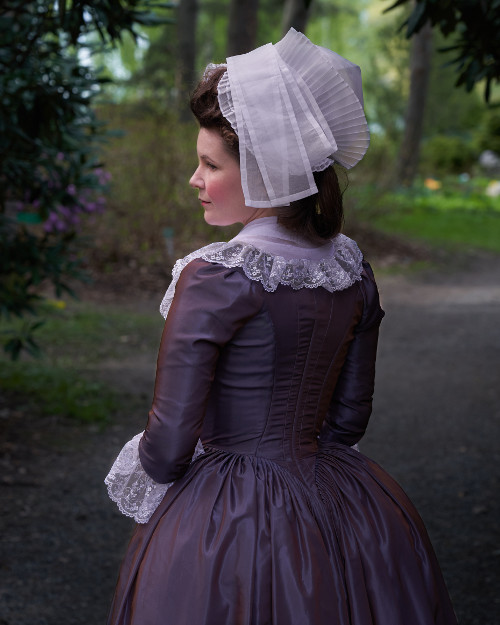
1780s Roundgown, 2020
Know the feeling when you secretly want your sister’s dress? Well, some years ago I made this gown for my sister, with the aim of making something rather simple that would work for many different kind of occasions. It was inspired by the gown in Janet Arnolds’ “Patterns of Fashion I” with a front fall opening, front lacing and a vandyked collar (which I changed into a wide lace at the neckline), dated 1780-1790. It turned out so pretty that I began to think I might some day make something similar for myself.
I had actually even bought a fabric for this, but didn’t really ever get to beginning it and finally ended up using the fabric for my 1870s ballgown instead. It worked well on that one, so I didn’t regret the decision at all, but when I stumbled into another end of the bolt in almost the same color I suddenly remembered my old fancy about a simple 1780’s gown.
This time it was a lightweight taffeta instead of the previous heavy satin, and I thought it would work even better for 1780s. It was probably in acetate, shot with blue and brown creating an interesting effect of dusty violet. It was dirt cheap so I would have bought more if they had had any, but now I had to do with a rather scanty yardage. I thought, however, that with very careful cutting I just might be able to get that economical gown with front fall opening skirt out of it. Some day.
I also found a lot of period images with gowns in somewhat similar style and color, see them here.
Spring 2020 suddenly brought me some extra leisure time, and I had time to revisit my stash and figure out what I could begin working on with preferably no immediate cost. This taffeta came out among other things, and I decided it was the time for it. I’d make a very simple dress and then figure out how to trim and accessorize it.
I was not sure at first whether I would make this as a quick machine sewn project like my sister’s dress or put some more effort and hand sewing into it. I was intrigued by late 18th century sewing techniques, especially after finally getting the wonderful “American Duchess guide to 18th century dressmaking”-book, but on the other hand I hesitated on whether I should put all that work into this rather cheap material. But then again, maybe a cheap material would be a good thing for practice, so I could, in theory, make the perfect silk dress later based on all the experience I had gained from this one. Whether I ever get to the silk dress or not (I tend to be afraid of not so much sewing but wearing more valuable materials), with hindsight I can say that I really had more struggles with this than I expected and thus I probably also learned something along the way.
The pattern was based on the Arnold pattern mentioned above. I had drafted a version of this pattern already when making the Kyoto Costume Institute jacket, and saved the basic fitted bodice version before moving on to make a jacket pattern. I pulled out the preliminary version now and made a mock up to fine-tune it. I had also looked at many pictures of museum gowns of the period to get the right look with the narrow back pieces and sleeves set far back.
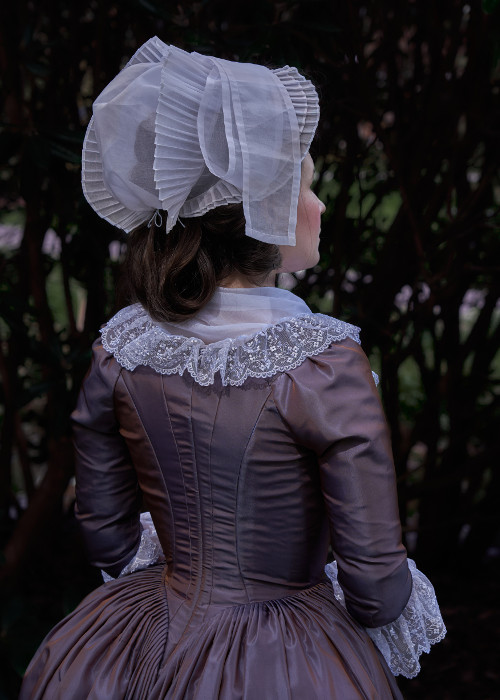
The jacket had had a long two-part sleeve so I drafted a new elbow-length one based on my earlier patterns. I had narrowed the neckline from my earlier bodice patterns and tried to get the sleeves farther back, but they are still far from the most extreme examples of this type of cut. Of course, my stays are far from the narrow-backed shape of the period too, and I’m not trained to the required posture, so one must compromise.
This era combines the narrow back with very low and wide necklines, which is a challenging look for my body type. I have a long back and a relatively small bust, raised even higher with stays, so the bodice proportions tend to be off from the ideal to begin with. Also my stays, made far back in time, tend to be cut rather high and narrow at the neckline for later 18th century. As I am very much occupied with 1870s to 1880s nowadays I’m reluctant to take the time for another pair of stays and try to wear what I’ve already got, so I decided to cut the neckline to go with my current stays, even if they are not quite right.
I wanted to use the same construction method I had used in the KCI jacket, now expanded with what I had gathered from the wonderfully detailed American Duchess guidebook. I have previously furnished my front opening bodices with hooks and eyes, but now I wanted to try the hidden lacing under the pinned overlapping edges. The lacing would hopefully provide the ultra-snug fit while the overlapping edges would give way for minor adjustments in the size.
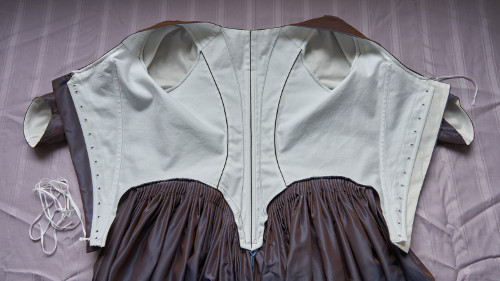
For the bodice lining I used a stiff cotton twill - not a period correct choice but one I had in the stash and that would, to my thinking, support the rather flimsy taffeta. The sleeves were lined with thin cotton sateen.
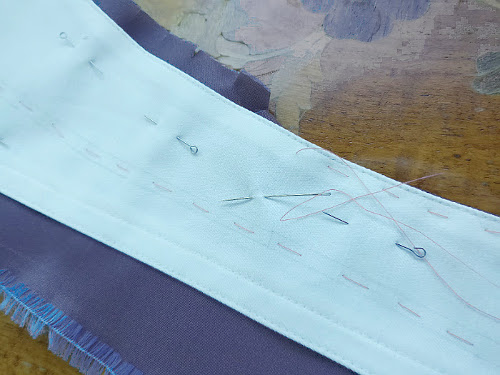
I did not set out to sew it all by hand, but used a machine where I felt it was practical and did not alter the look of the dress too radically. First I prepared the lining pieces, turning the edges under and running them with a machine stitch close to the edge at the bodice seams. At the front edges I folded the material back and sewed boning channels on the edge to support the lacing. I also sewed boning channels on the center back seam allowances and on the front pieces from the corner of the neckline down to the pointed waist.
As the cotton twill was quite sturdy I did not have to finish the lacing holes very heavily, I just whip stitched quite fast. I also made small holes in the lining for the ends of the gathering strings that would go in the neckline. Then I sewed a strip of the cotton sateen I also used for the sleeves under the lacing to line the front edges of the taffeta.
Then I pinned and basted the taffeta on the lining pieces. At this point I found out just how irritating the taffeta was to work with - not only did it fray a lot, but pins and even basting tended to leave prick marks in the shot weave. Anyway, I toiled on, and continued to sew the lining on the taffeta on the neckline on the still separate back and front parts, though at the front I still left the layers separate near the front edge. My idea was to sew the bodice together, preferably also sew the skirt on and then see how the bodice closed before finally finishing the front edges. We all know that in spite of all the mock ups weird things sometimes happen along the way when it comes to fit and size.
I also turned the seam allowances in the lower edges under and whip stitched them together to get a neat edge and not worry about the fraying. I left the narrow bottom edge of the center back pieces open, though, to be able to slip in the boning later.
Following the Arnold pattern I sewed a small fold on the back pieces to imitate a seam, using small machine stitch. It does look a bit different than the handsewn seams next to it, so I guess I could have as well taken the trouble to make real seams, but then again if that’s a period way of doing things I shouldn’t quibble - I do that way too much as it is.
Sewing the other back seams by hand took a time but was rewarding in a geeky way. I’m totally in love with the look this method gives both outside and inside, and it also worked well for putting only minimal pressure on the highly fraying fabric I was working with.
On the sleeve I first joined the extra pieces on the underarm I had resorted to in order to get most out of the limited yardage. I did this by machine, because I’m not good at sewing a straight line of backstitch, and I as the sewing machine was invented precisely for this I don’t feel too bad of making use of it. I also confess to sewing up the elbow dart separately on both taffeta and lining. I pressed the seam allowance at the sleeve end to turn under on both layers, and then sewed the sleeve seam through all the layers. I pretty soon noticed, however, that the taffeta began to fray at the seam in later fittings already on the elbows, so I added a line of stab stitching over the seam. Time will tell if this is of any help.
I sewed the lining on the taffeta on the sleeve end and then pinned and sewed the two small darts on the front side of the elbow by hand from the outside. This was a bit tricky and the result did not look very neat to my eye, but I have kind of gotten used to it. I can definitely see the logic of pinning the darts on the fitting and then sewing them, of course. As I fit my own clothes on myself I tend to take the different approach of making a lot of mock ups and trying to perfect the pattern rather than draping and fixing things on fittings, unless when I have to. That’s why I also like to pleat my 18th century sleeves on the shoulder on a mock up, then copy the size and placement of the sleeves on the pattern, baste them and only adjust them on fitting the gown if needed.
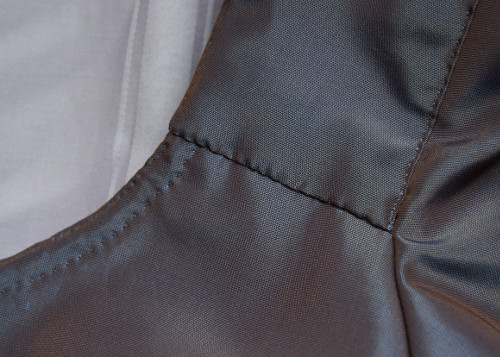
So, back to the bodice. I sewed the lining of the shoulder pieces on the front and back pieces by machine, turning all the sewing allowances up towards it. Then I sewed the sleeves on the bodice armhole and pleated and basted the sleeve head according to my marked lines. They went in quite smoothly this time. I whip stitched the seam allowance on the shoulder piece, and went on to turn the seam allowances under on the lower part of the armhole and whip stitch them together - a bit of unnecessary perfectionism again, but sensible with this madly fraying material. For the last thing I basted the taffeta over the shoulder piece and sewed it on by hand to cover all the seam allowances.

I tried on the bodice, and it looked more or less like it should, even though the front edges looked a bit flabby and seemed to overlap more than I had intended at the bottom. I was not too worried at this point, though, and decided to get back to them when I had the skirts sewn on in case they would prevent the bodice waist from stretching in wear.
So far I had been rather leisurely sewing the gown now and then, and felt rather confident about it. I had not planned any real schedule for it, especially as there were hardly any re-enacting occasions in 2020, but sort of began to feel I could just as well wrap it up and then move on to something else. But it was now that the problems began.
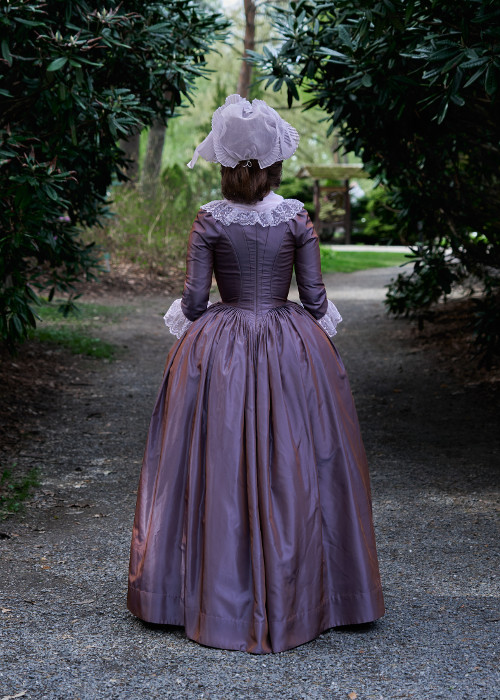
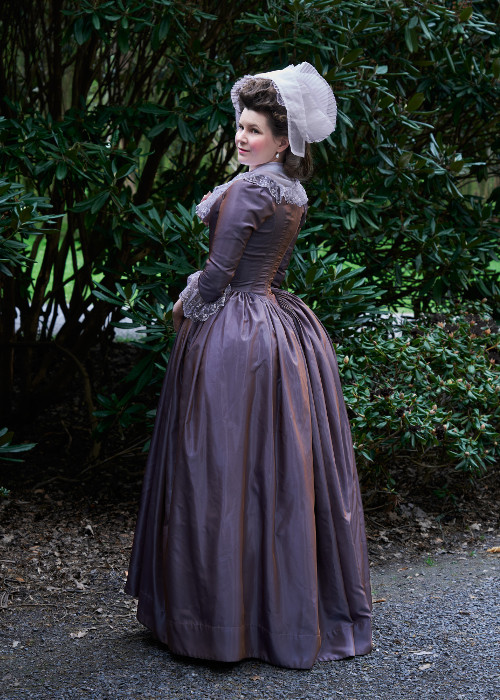
First of all, when I began I had just rushed to cut the bodice pieces of the taffeta and roughly planned how I would cut the skirts out of the rest without actually getting to it. As the gown would require a lot of fabric on the skirts to look right I had planned to use two whole widths for the back, even if that might be a bit excessive compared to the patterns from museum pieces. The front would do with one width or even less, so I had cut the back pieces from the side.
I had originally planned to wear the gown over my trusted old bumroll, though I was by now aware that the ideal supporting structure for this type of dress with a deeply pointed bodice would be a false rump in two parts or even separate rolls sewn under the gown skirt at the waist as I have seen somewhere. I was, however reluctant to make any new stuff (the gown, of course does not count), as I have problems with finding storage space as it is. But then the American Duchess guide book with a pattern and clear instructions made it look so appealingly easy that I began to consider it. And when one of our pillows was torn in laundry, spilling all its filling into our washing machine, it occurred to me while cleaning the mess that it would take very little time to make the pouches from the first suitable stash material I could get my hands on and stuff them with the pillow filling.
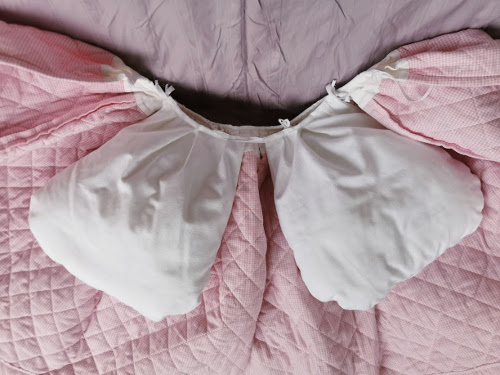
I cut the pouches a bit wider than in the book pattern to be sure and pinned them on my dummy to pleat the upper edge. I deviated from the book instructions a bit by discarding the skirt part and instead setting the pouches on a waistband furnished with ribbon loops. I had made a short quilted skirt piece in the past to boost up my old bumroll and I had an idea it might work with this too, so I sewed a few more ribbon ties to its waistband so I could fix the stuffed pouches on it. I put the pouches under the skirting with the idea that the quilted fabric would soften the bumps and smooth the silhouette, and I think it worked quite well.
So, back to cutting the skirts. Like I said, I had calculated that I had enough fabric left, or maybe I thought I had, and even thought I might have make the skirt trail the ground a bit at the back - anyway, when I got the fabric out and compared it to the measurements I had taken when wearing the bodice, shoes and the magnificent new bum it just didn’t match. My plan for the skirt width had of course been generous, but two whole widths and one slightly narrower don’t really easily transform into just two widths. The best emergency option would have probably been to use the remaining fabric for the gown skirt, skip the front part altogether and just wear it with a different skirt. But I was just so much in love with the idea of the one fabric outfit that it was hard to settle for this. Instead I decided to try to cut the back skirts just long enough, leaving a quite minimal seam allowance on the hem, and then see if I could manage to piece the top edge of the front skirt from the scraps that would be left once the top edge of the back skirt was shaped. If not, I’d go for the contrasting skirt.
I ran the top and bottom edges of the back skirt pieces with overlock to prevent them from fraying and then closed the back seam, leaving it open at the top to accommodate for the pointed bodice. At this point I was too frustrated to forget all notions of period correct mantua maker’s seams, and just used a sewing machine. Then I was left with figuring out how to pleat skirt into the bodice.
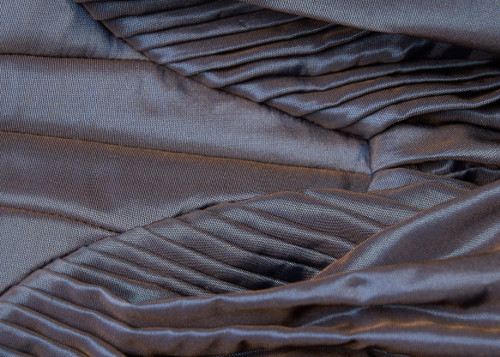
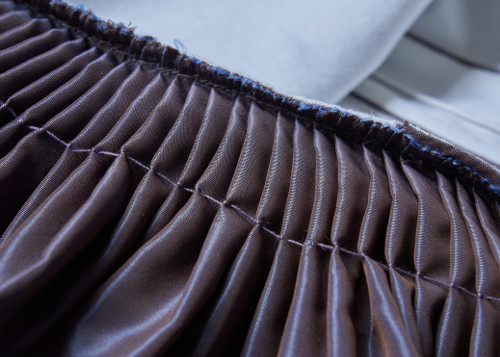
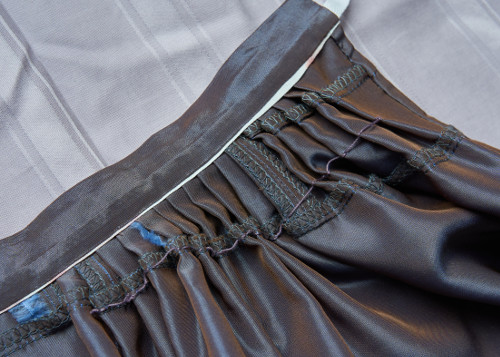
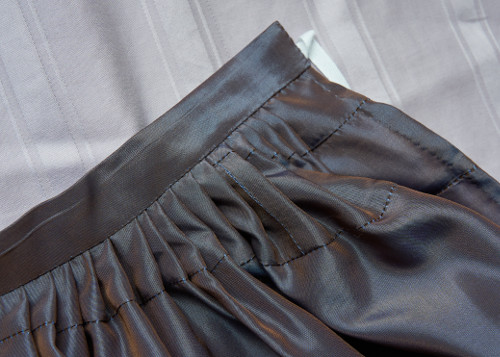
The method I have used before has been to simply shape the top edge of the skirt roughly according to the period patterns, measuring the difference required by the bodice shape of course, and then pleat it into the bodice by dividing the edge measurement in both equally and joining the pinned marks. The period approach to pleating the material before sewing it on and leaving the extra at the back to just fold under is a bit different. While it sounds more simple it was tricky to manage, at least in my experience. To get the pleating the right width and even can be challenging.
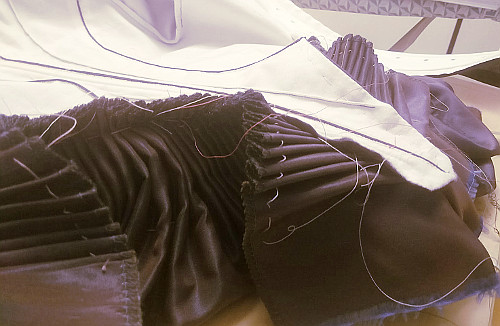
What I came up with was to calculate the desired depth of the pleats, mark them on the wrong side with chalk and then run a basting thread to catch about 0,5cm at each marked line. I basted several lines about 5cm apart as the top edge would be curved. Then I pulled the threads to gather the fabric into a more or less even pleating and pressed it lightly. The method is essentially the same as in cartridge pleating, but spaced less densely. While real cartridge pleating would not be correct for 18th century, I found this method helpful for forming small knife pleats, especially as I wanted to avoid pins for this material.
I still left the gathering threads rather loose to be able to adjust the width to the bodice. I had also basted the roughly estimated line for the top edge for a guideline. Then I pinned the pleated edge on my dressmakers dummy over the new false rump and petticoat, trying to get the hemline to stay at an even distance from the ground. This was a bit tricky as I was not quite sure at what angle the pleats should be set at the sides of the center back point. Then I put the bodice over it and pinned it on the skirt. My dummy is the wrong shape for 18th century garments and tends to be too big for most of my clothes anyway, so I had to check the fit by putting the dress on myself, taking it off, fixing this and that, then trying it on both my dummy and me again several times. At last the skirt looked decent enough, and roughly symmetrical, so I basted it on the bodice edge and then sewed it on with small back stitch.
I noticed only too late that I had maybe left too little width to be pleated at the tip of the bodice, and I really struggled to form any nicely falling pleats. Luckily they almost disappear between my fake butt cheeks when the dress is on.
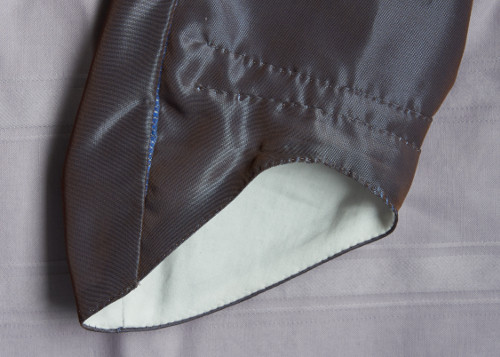
In many period examples the pleated top of the skirt is just left untrimmed on the underside of the dress, so it’s easier to take apart and re-style later. I had to trim it off closely however. I neatened the trimmed edge with blanket stitch, and for the last thing caught the pleats on the underside with a stronger thread to keep them in shape. This little trick made an amazing difference on how the pleating looked on the outside.
Now it was time for the dreaded front skirt. I could in theory cut it a bit narrower still and use the strip from the side to add length, but the lengthwise cut strip show really glaringly in the shot material. Instead I gathered all the pieces trimmed from the back skirt top and all other scraps from the cutting, and pieced together a 6cm wide strip. I joined it to the top edge of the front skirt, and added further sloping pieces on the sides as the top edge would be significantly lower at the center front. I made these joining seams the quick and dirty way of running the edges with overlock and then machine sewing them closely.
I formed the pleats using the same method as with the back skirts, leaving a 10cm part at the center front straight. Then I pinned the front on a tape on dummy, and checked that it fell gratefully on me, then sewed the tape on and trimmed the extra fabric (not that there was much of it!) One thing I had learned from my sister’s dress that the waistband of the front skirt can easily peek from under the bodice edge on the sides, so I sewed a 2cm wide waistband of the taffeta over the tape, and added ties. This valuable strip came from the side of the front skirt piece.
I had calculated that while the piecing would peek a little when the dress was on, most of the seams would disappear between the pleats and get covered by the tip of the bodice and overlapping back skirt edges, and it actually ended up being much less noticeable than I would have even dreamed. And of course, there is nothing wrong with some patchwork in period clothes to begin with.
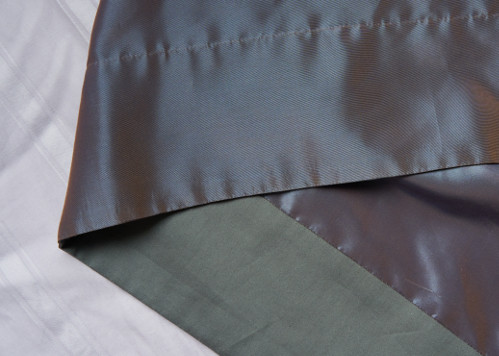
I had calculated the skirt length for the as minimal hem as I could manage, and that would be most effectively achieved by a facing. The original example I had based the pattern on in “Patterns of Fashion” had a tape re-inforcement on the hem, and many dress hems seem to have had some sort of facing, especially if they are in trailing length. A facing would also be practical to protect the flimsy taffeta, as it was more than once caught in my own heels even in fittings. So, I ran an overlock on the edge to get a small seam allowance without fear of fraying, and sewed on a 10cm strip of cotton bedsheet, then turned it under. It might have been neater if sewn by hand, but honestly I was a bit sick of this project at this point. I did, of course, sew the top edge by hand. The finished facing also gave the hem a little more body, and it looks less limp now.
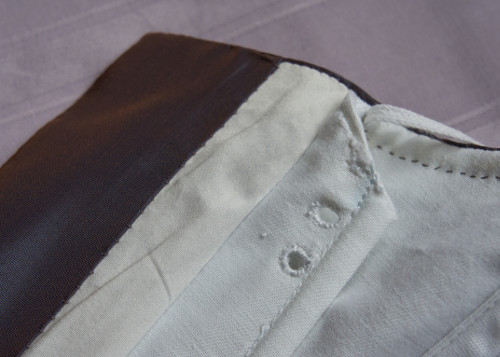
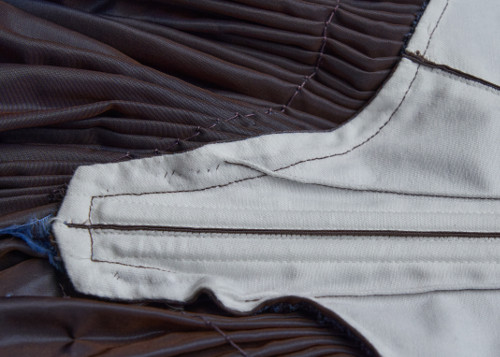
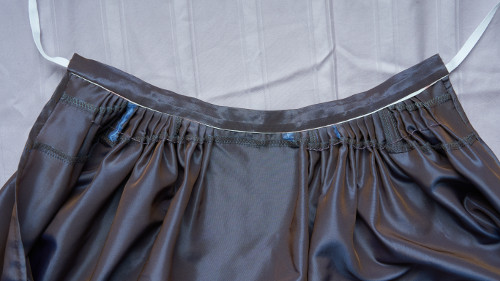
And then, back to that bodice and those flapping front edges. I re-shaped them a bit, pressed the edge, sewed the lining on - and they still looked wonky. Another thing was that the top of the front lacing kept peeping at the neckline. I picked it apart, picked out the topmost lacing holes, shortened the bones and re-shaped the top edges to curve sharply lower. I later had to re-shape the lower edge too, because it too kept peeking under the dress front edges.
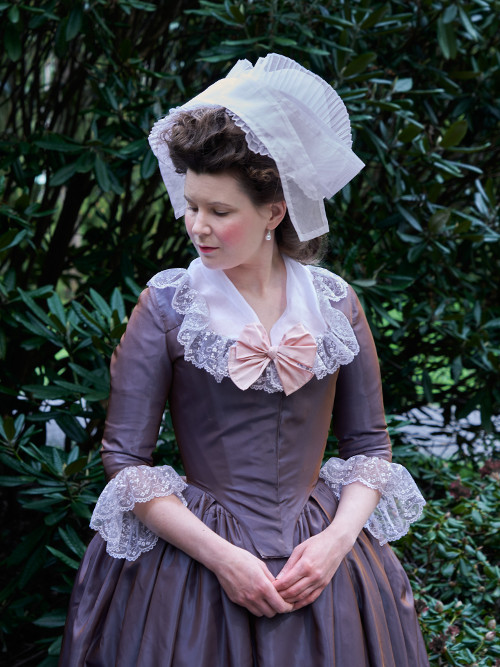
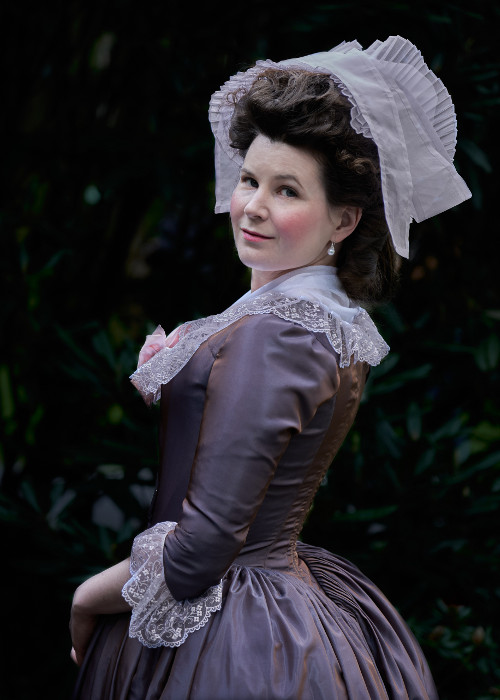
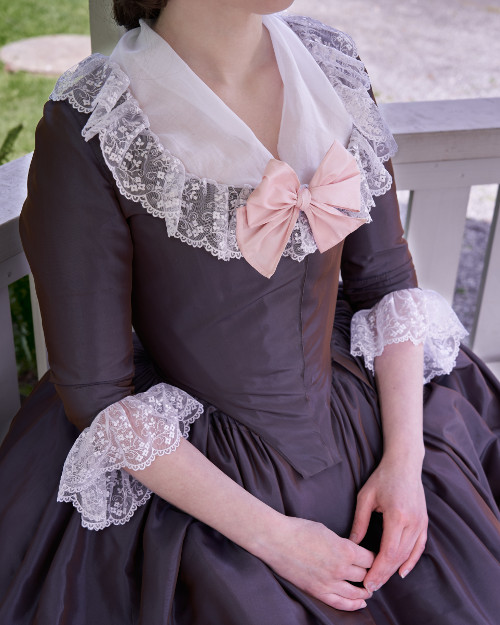
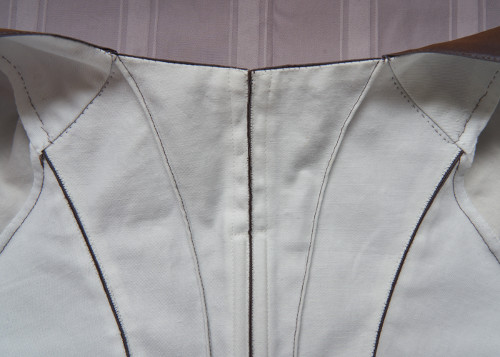
And then it caught my eye that the neckline shape was not right - it really should be wider at the bottom with a sharper corner on the sides. I had shaped it originally to make sure that the shoulder straps of my stays would not peek out, so there was not much to do about it, but it began to bother me so much that I continued to unpick the finished neckline and the seam of the shoulder piece. The good thing about hand sewing is, of course, that you can alter many things without taking the whole dress apart. I put the dress on and fiddled and pinned and carefully slashed and trimmed the seam allowance until I got the neckline pinned something like 1,3cm lower at the sides without my stays showing. This may seem like madness, but it really made a difference - a small one, but still. The large, wide neckline is such a conspicuous detail in this style that I wanted to get it right, or at least as close to right as I could with my current stays.
So, then I shortened the bones and sewed up everything neatly again, tried the dress on again, and guess what - the front edges still flapped horrendously. They had obviously stretched in sewing though I had tried to avoid that, and what's more, no matter how much I pinned this was made quite obvious by the white lining peeking from the underside because I had brought it all the way to the edge. It was clearly time for desperate measures: I got out that one almost last bit of the taffeta, cut from the side of the front skirt and left over from the waist tape, cut a strip of it, measured it to lie flat over the lacing and sewed it on the underside of the topmost front edge. When I tried it on, it of course would not still lay flat, the added strip being cut in straight grain, but at least the wonkiness was less obvious now. Sigh. I still have to practice on pinning it neatly, and hopefully not destroying the taffeta in the process.
Finally, a few words about accessorizing. This is a style that is really built on accessories, and though I chose to go sparingly I still needed some basic items.
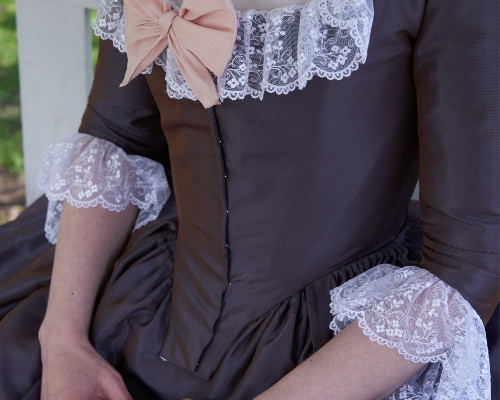
The lace was again something I had bought for quite another project which never came to be. I had planned something else, but it never looked quite right, then went through my stash and tried on everything, but weirdly this one looked the best and there was just enough of it for neckline and sleeves. Nope, embroidery on a tulle foundation is not correct for the period at all, and would have been more suitable for late Victorian instead, but still it had an airy feeling and nice drape which looked pretty from some distance.
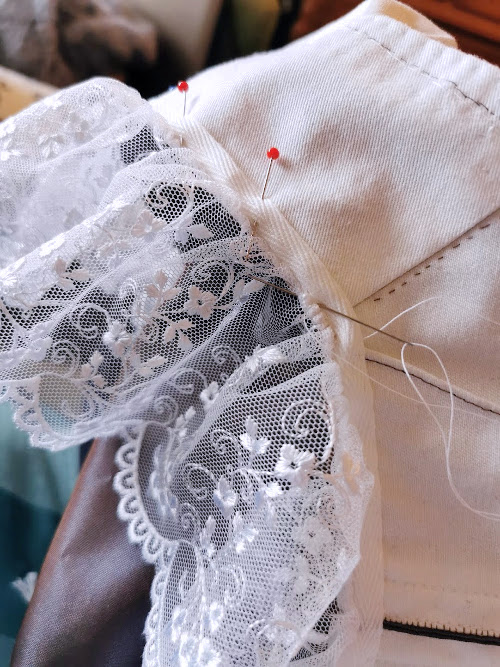
I attached the lace on cotton tapes with whipped gathering and then basted them to neckline and sleeves. Thus the lace can be removed and used for another dress, if only I bother to take the trouble of basting it back on again.
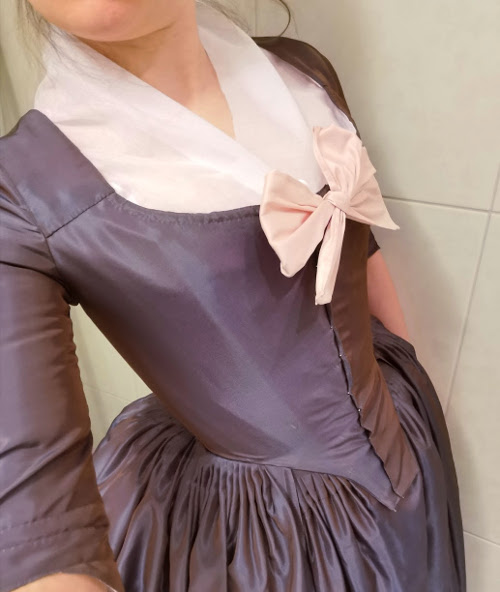
I didn’t have a neckerchief that would be fine and sheer enough, so I hemmed a new one from muslin. I also hemmed a bow from pink silk, leftover from a previous shoe project.
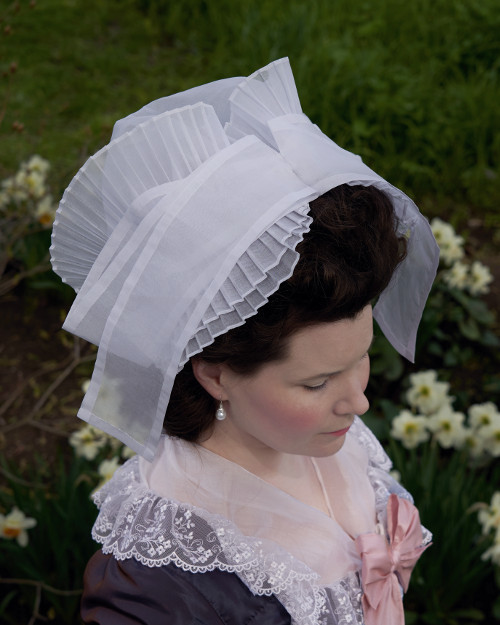
But above all (no pun intended) the outfit needed a fancy headdress. “The American Duchess Guide to 18th Century Beauty”-book gives a pattern and detailed sewing instructions for a classic cap style of the period called “Bonnet á la Jeannot”. I used cotton organdy which I had in the stash and it worked beautifully. All the tiny finely handsewn hems were of course quite a lot of work, but it was so relaxing to have a ready made pattern and clear instructions to follow instead of trying to figure out things by myself as I usually try to do guided by some self-destructive behaviour pattern. The cap turned out very pretty, and the only problem I really had with it was that on the windy outdoor photoshoot day the long lappets kept flipping to and fro and often ended up on the opposite side. Of course you should really wear a hat on top of the cap out of doors which would neatly take care of this, and the lappets will probably hang right indoors.
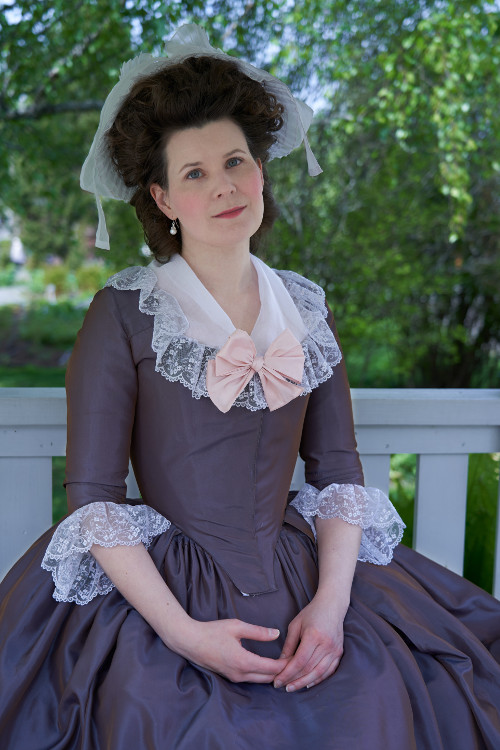
My hair was also styled more or less following the “Coiffure Chenille”-style in the above mentioned book. It was a rather quick and easy style to do, especially if you stick a cap over the top you don’t have to get it super neat there. I should have made a tighter curl on my front hair for it to get the real frizzed look, though. It’s also a style that looks great powdered, but I was a bit lazy and left my hair unpowered for various reasons. I have always used dry shampoo for powdering, but it often leaves a somewhat uneven result that annoys me, and with changing a lot of the products of my haircare routine recently I was not keen to experiment. The dry shampoos have also improved over the years to look less powdery on dark hair, which is of course great for modern use but when powdered look is exactly what you want. The book gives great period recipes for pomade and powders, but I haven’t had the courage to try them out yet. Anyway, I also thought that the dark hair under the cap would highlight its airy transparency. In retrospect I feel that the overall look would have gained a more period look from the powdered hairstyle, the brunette look kind of brings modern period flicks to mind.
In the end I managed to put a lot more work into this side project than I had originally thought. But then I also learned a lot, which will theoretically be priceless if I ever decide to make a similar dress in a more expensive material. Neither was I in any hurry to finish it, though of course the inordinate amount of time spent on it postponed my other sewing projects. To be honest, many times during the sewing process I felt quite ready to throw the damn thing into garbage bin and do something less troublesome instead, but a stubborn fool as I am, I always pushed forward in the end. The final result is not perfect, but it’s not that bad really either.