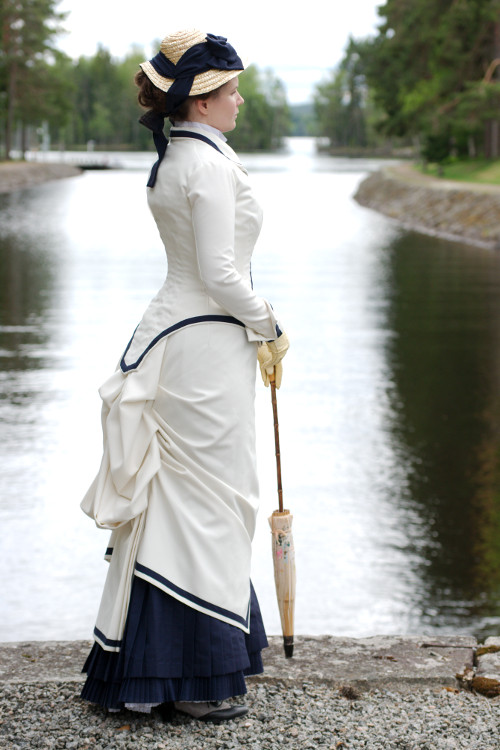
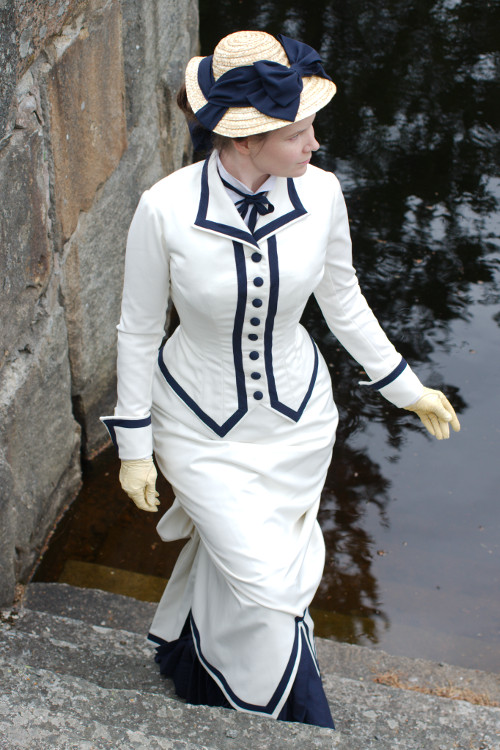
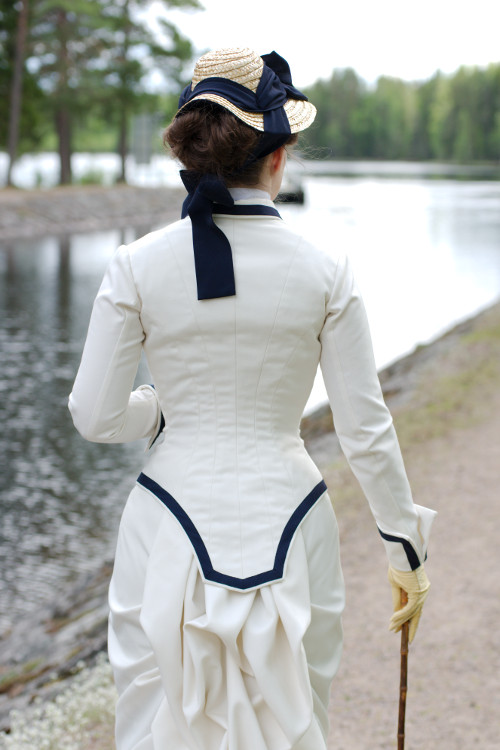
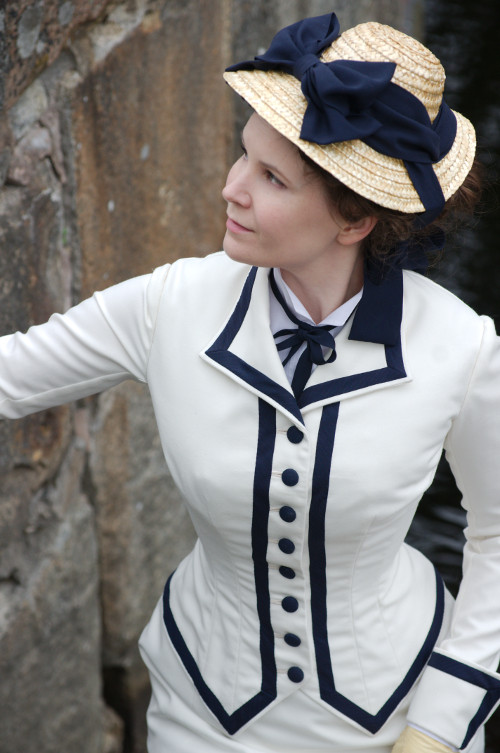
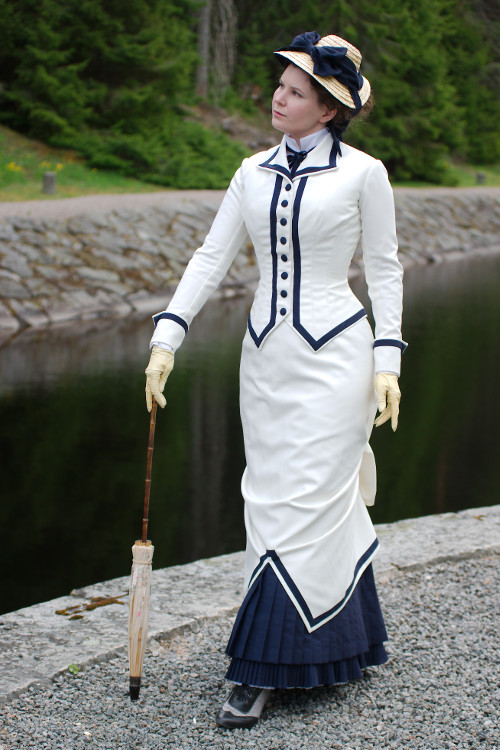
Walking dress, 2020
As I may have mentioned somewhere before, my original plan for getting started in the Natural Form era was to begin with a simple light colored day dress. Well, somehow I got sidetracked and produced three other outfits before finally returning to the planned starting point.
I had never completely abandoned the plan, it just got postponed - one reason being that while I had a vague idea of what I wanted I could not find a fashion plate or a museum piece that matched all the requirements - and whenever I did, I kept changing my mind after a while.
Choosing the style
The color, cream white, was determined by the fact that I got hold of some cream white gabardine that was slightly stained at a few places for practically free. It was a wool-poly blend, and thus not ideal for period garb, but on the other hand its durable and washable - a useful thing in a white garment. Cream white is also always a stylish choice and very popular on the era.
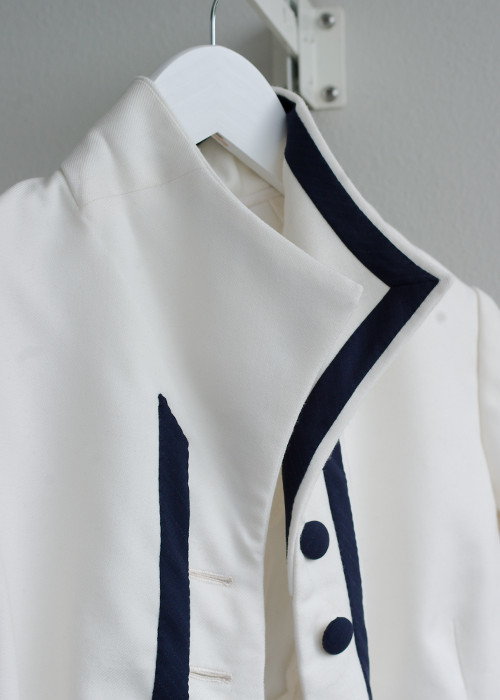
As I already have one summery day dress that is all about ruffles, bows and super feminine aesthetic, I wanted this new one to have a more tailored look. Pairing white with details of a darker color was both popular on the period and a nice way to get a sharper look. That would also give me a possibility to make the skirt, which takes most of the dirt even if its a short one, in a darker color, and save the pristine white on the overdress.
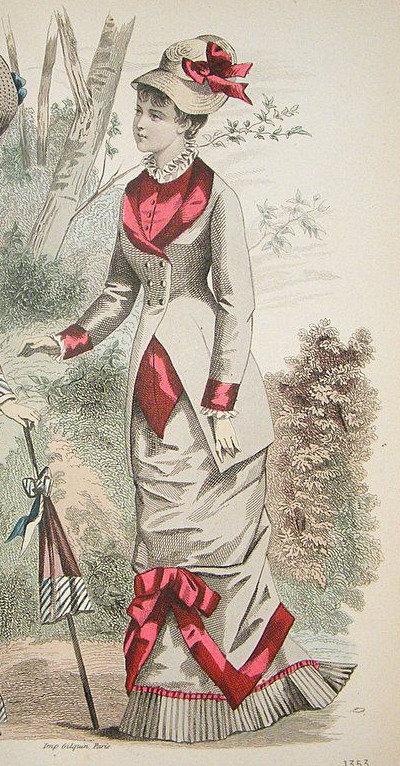
Or so I thought. Infuriatingly, when looking through fashion plates I did not find that many examples of a light colored dress with a darker colored skirt after all. In most dresses combining two contrasting colors the skirt hem seemed to be in the main, lighter color, even while collar, cuffs and other details might be darker.
In earlier 1870s there are many dark colored, often black skirts combined with a lighter polonaise, but they usually had a train, which was a decided no for this project - while one of the things I love about this period are trains, I wanted to have one practical dress without a train. Cute, short walking dresses of early 1880s were in any case closer to what I wanted. At last I found a few examples that proved that a dark skirt would be plausible, and decided to go ahead with that plan.
My initial idea included some cute little jacket, and while I toyed with a few options for a polonaise I always kept coming back to it. There are so many possibilities for trimming a white jacket with darker material - contrasting collar, cuffs, vest, front panel. However, many of the late 1870s to early 1880s jackets with an imitated vest were quite long, a rather heavy look that would not look very good on me, as my torso is small compared to my hips to begin with.
I did find one great source of inspiration, though, a jacket pattern from Fashions of the Gilded Age: "Basque Bodice with Tails", Complete Guide to Ladies' Garment Cutting, 1883 (page 214). As the name implies, its short at the front with cool tails at the back, and also edges trimmed with contrasting material. While I still considered other options I always kept coming back to this, so finally I decided that this it was to be.
Thus my vision of the dress began to take concrete form: A short, round skirt in a darker material, some kind of overskirt and jacket in cream white.
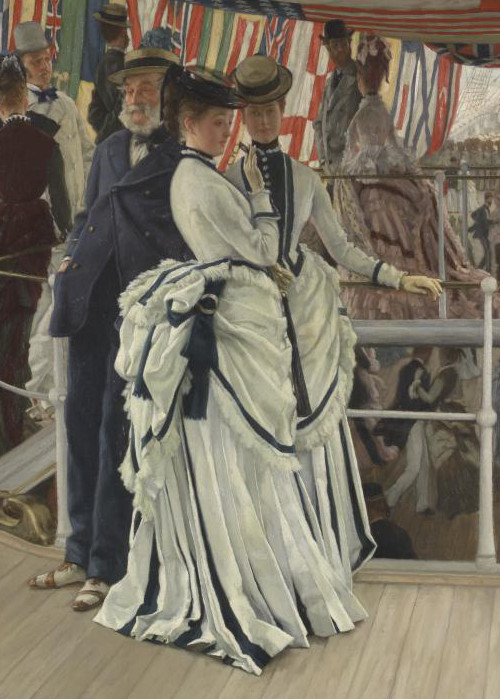
James Tissot: "Ball
on Shipboard" (1874)
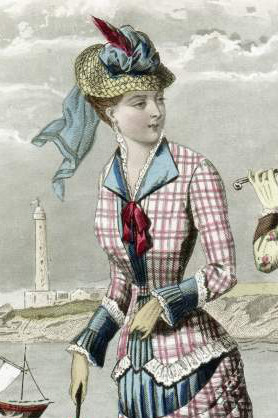
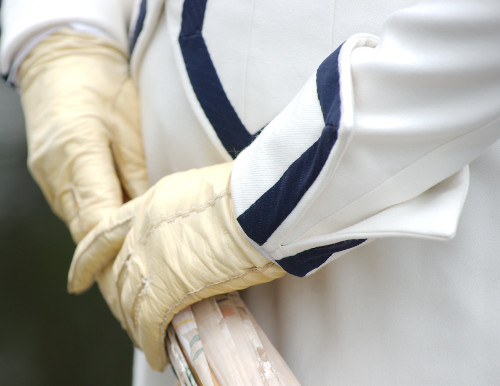
Black and white is of course the classic, eternally stylish combination, but it can also create a quite harsh contrast, so at an early stage I decided to look for navy blue for my contrasting material instead. A dark navy paired with cream creates a quite similar effect to black and white, but its much softer. It's a color combo I like very much in my every day wardrobe too, easy to pair and accessorize. It would also give the outfit a cute maritime touch, like in the Tissot painting above.
The
Skirt
While looking for something totally unrelated in local fabric store one day I made a great find of lightweight wool blend in dark navy with a really faint white pinstripe. The pinstripe is actually hard to see and blends in from any distance, but it might lighten the contrast without being too conspicuous (and thus requiring great attention to stripe matching).
This must be one of the rare occasions where I have actually followed the golden rule of finishing one piece of the outfit at a time and making bodice the last, though I had began working with the bodice pattern while making other pieces. Still, I began the actual sewing with the skirt as one should. The fabric had been in two pieces in the bargain bin, and as I had not been quite sure how much I would need and just generally suck in maths anyway I had bought both. So, I had plenty of material, which is always a relaxing starting point.
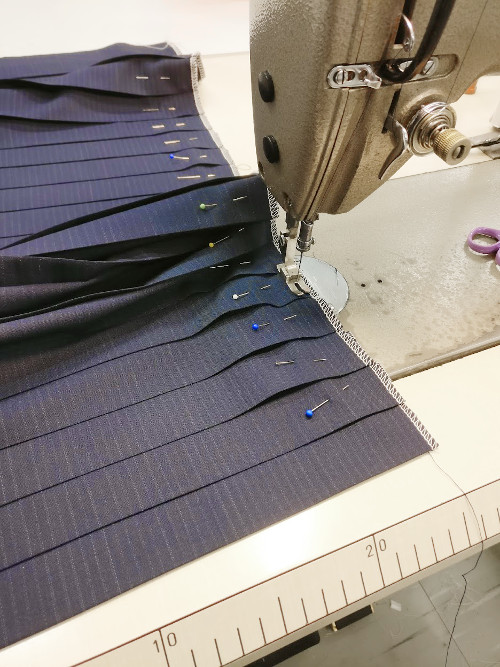
Early 1880s skirt seem to be often covered with wide knife pleats. It's still a mystery to me how the full skirt height pleats stay in form or are attached to the foundation layer, but as this dress would have a long overskirt I would need them to reach up to knee level at most.
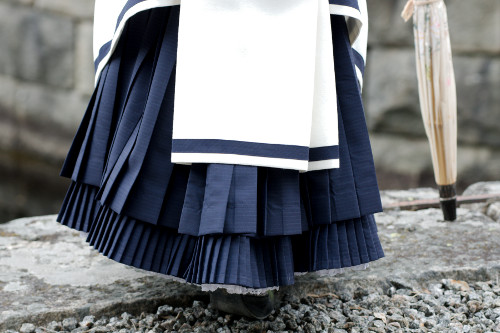
These pleated skirts show a row of smaller pleats peeking from under the tall, wider pleating. This might be a fashion fad, but it also seemed practical to me for various reasons: The wider, tall pleats open up more when moving and sitting down and are more likely to hit the ground, while a shorter and narrower pleating at the very edge is more likely to keep its shape. It's also less costly and fairly easy to replace when it begins to show wear, as hemline does. This is guessing on my part, of course, but makes sense. The smaller pleating may also give some volume and boost to the top layer.
So, on my skirt I decided to make a 12cm wide pleating at the bottom with 1cm pleats, with a 38cm wide pleating of 3cm pleats at the top. The narrower pleating shows beneath the wider one for about 5cm at the hem.
For ironing the pleats I made two brand new pleaters. I had earlier made a 5mm pleater for the Tissot-inspired dress, which had been a bit tricky to say the least. Compared to that the 1cm and especially the 3cm pleaters were child's play. The latter was finished in a few hours, I think. They are also much more even and neat, so with this added practice behind me I think I may have to try to make a new 5mm pleater in the future too.
I wanted the skirt to be quite narrow, so I based it on my dinner dress skirt pattern adding just a bit of width at the hem. The total hem width was roughly 200cm.
As the predominantly white overdress would be mostly suited to spring and summer season I tried to keep the layers to the minimum on the skirt. I made the skirt foundation from a sole layer of lightweight cotton / poly blend. I wanted this to be something of a relatively fast, relaxing project, so I actually finished the skirt seams with overlock - no one would see them anyway.
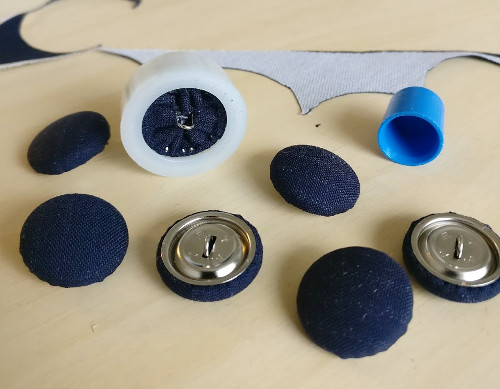
At one side I made an opening with hidden buttoning placket. Now, you mainly hear about hook closures being recommended, but from my experience the small hooks I had used for the Tissot dress are next to useless as they refuse to stay closed, while the heavier waistband hooks ones I used for the dinner dress skirt might show through the lighter material here. Buttons are also a inexpensive option as in a hidden placket they don't have to match so you can use whatever roughly same sized leftover buttons you have. In the end I think buttoned closure works just fine.
I added a wide bias cut strip of the material on the hem for extra support, and turned the hem with a heavy tape. The back width got a casing for gathering tapes and two elastic bands with buttonholes for fastening it at the back.
I added a wide bias cut strip of the material on the hem for extra support, and turned the hem with a heavy tape. The back width got a casing for gathering tapes and two elastic bands with buttonholes for fastening it at the back.
While making the skirt foundation I had also worked on the pleated strips. I had cut them along the fabric edge, but as my material was in two pieces I still had to make a few joins. I decided to join the pieces for the smaller pleating before pleating it, but the wider one I pleated in three different pieces which I then joined together, hiding the joins under the pleats.
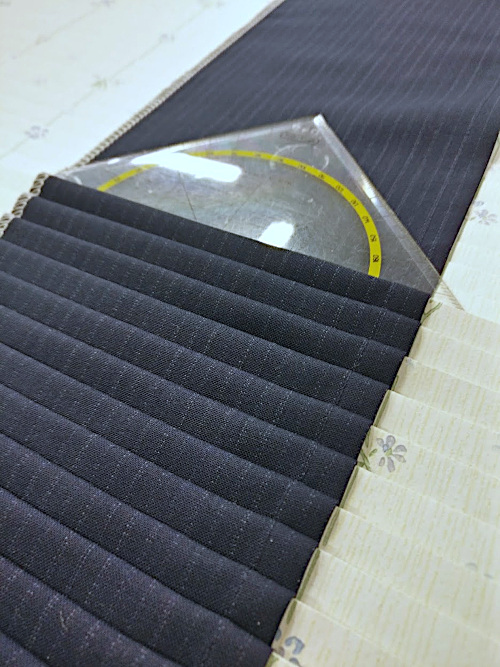
I hemmed the edges following the stripe, which masked the machine stitch quite neatly. The stripe, while almost invisible from a distance, was really handy as a cutting and hemming guideline.
I folded the hemmed pieces in the pleaters, first ironing them over to set them in place, then pressed them with a clothing press through a moist muslin rag first and then several times through a dry one. Then I let them set overnight. The lightweight wool blend settled well into sharp pleats which seem to last well.
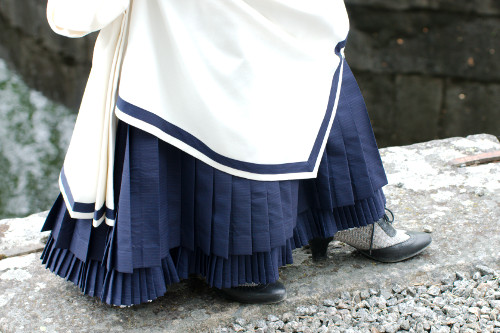
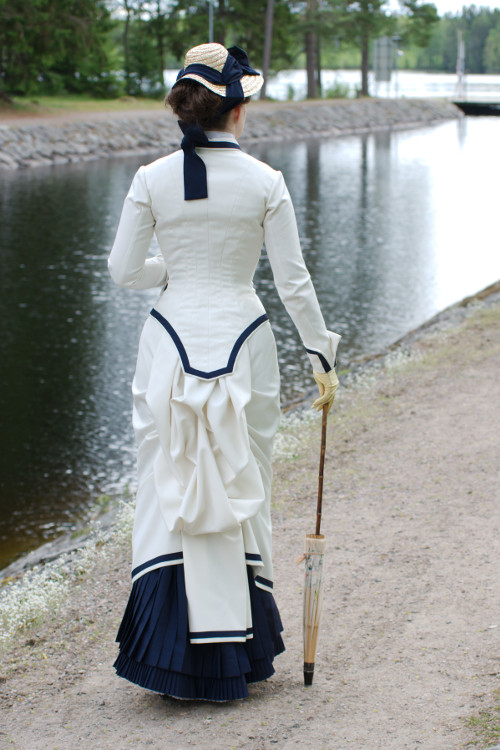
I sewed the pleated pieces on the skirt and finished their top edges with a band of the material. The rather quickly assembled skirt turned out very cute, and for once my old petticoat with the gathered back hem supported it perfectly. It's short enough to show the shoes, so it will be care-free to wear.
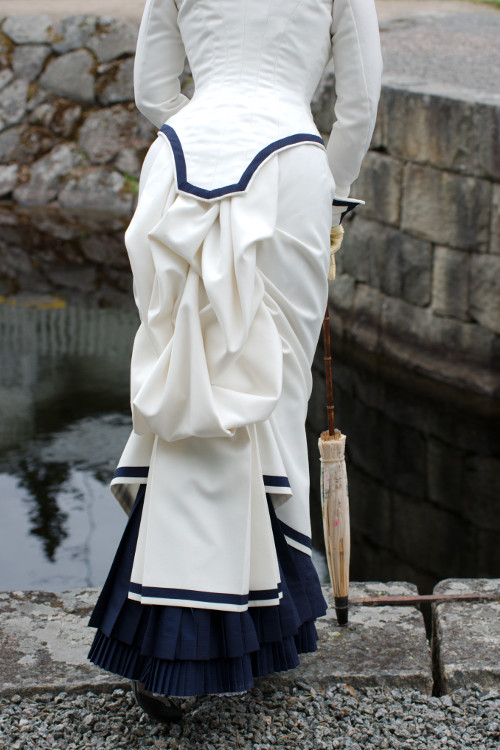
The overskirt
Next on the agenda was the overskirt. I wanted it to be rather simple and narrow in keeping with the narrow silhouette of the early 1880s, and happily the trusted "Fashions of the Gilded Age" provided a pattern for it too. "Overskirt for Traveling Dress" (pages 281-282) has a plain front and modestly sized back drapery ending in a pleated tail which I thought would fit in well with the tailored aesthetic I was after.
I tried the pattern on mock up muslin and ended up altering it slightly after all. The back length was oddly long, and I shortened it at both ends - at the bottom I wanted the edge a bit farther away from the potentially muddy ground, and to my eye the puffy part could also be a higher up. The original model was illustrated worn with a rather long jacket, so I thought that with a shorter one this would look more balanced. Back drapery can be set quite low on this period of course, but I guess my eye has trouble adjusting to that.
Fashion
illustration, Le Follet
Meanwhile, the front of overskirt was totally plain in the pattern, while most in the period seem to be at least slightly gathered to the back width. I tried to add a bit extra length and pleat it at the seam, which gave the front a bit more interesting look. Another thing I tried was a short slit at the center front, which I immediately loved. I had planned to trim the overskirt edge with a navy stripe imitating the jacket trimming, and this would really make the triangular shape stick out, especially against the dark skirt.
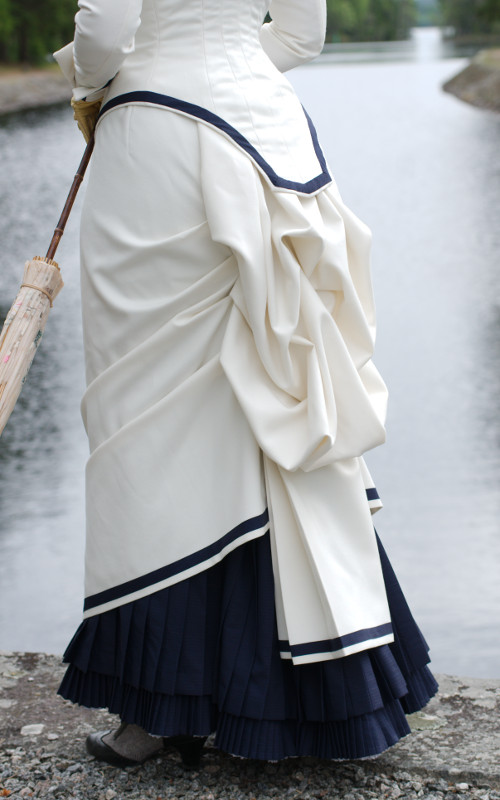
I made up the front and back separately quite far before joining them. I lined both with off-white cotton satin. It was lightweight but very densely woven, so it gave a bit of body to the back drapery and also helped to make the overskirt less transparent over the dark skirt. The least bit of darker fabric showing through would be highlighted against the jacket lined with white.
I had played around with the bias-cut trimming tape a little, and ended up using 1,5cm wide tape - much narrower than I had originally thought. The dark edging all too easily created a too heavy look. I had also originally planned to have several rows of stripe at the overskirt hem, but after pinning them on I at last decided that one was enough. Despite the dark navy accents I wanted to keep the light, summery look of the cream white overall look.
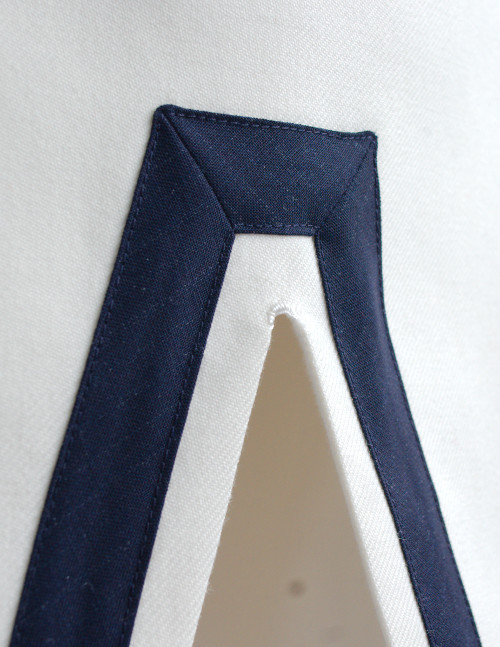
On the front piece I first stitched the bias tape on the hem by machine, and joined the gabardine and lining at the hem and front slit and turned them over. This blatant bag lining may not be the correct way of finishing overskirt edges in the period, but it worked for me and looked decently neat. I reinforced the end of the front slit with some blanket stitch, however, as it would take a lot of strain when walking.
I had cut the lining generously, and after basting the layers together at top and sides I trimmed the extra off and then sewed the waist darts through both layers.
On the back piece I began again by sewing the trimming tape on the hem, then sewed the lining on the hem, the lower part of the side seams and back opening at the top from the wrong side. I turned them over and sewed the layers together at side seams and top edge.
Both the gabardine and the cotton satin are machine washable, so I had washed both before cutting. I had also washed a piece of the navy wool blend with the gabardine to be sure that the stripe would not bleed color. Thus the overskirt would be at least in theory washable if needed, which would be desirable with a light color. With this in mind I wanted to make the drapery as easy to take apart as possible, except for the pleats in the seam of course.
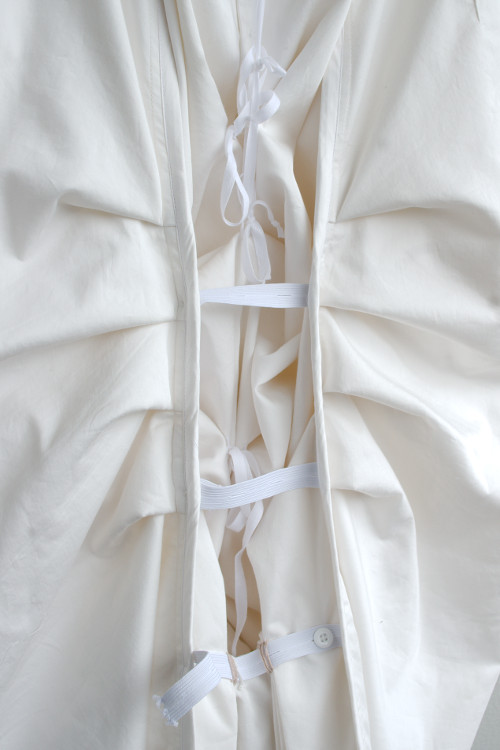
Most of the back draping was easy to create with tapes and loops, but the strictly pleated tail was more of a challenge. The easiest thing would be to sew the pleats together, but after a while I came up with an idea for a buttoning trick and decided to try it out.
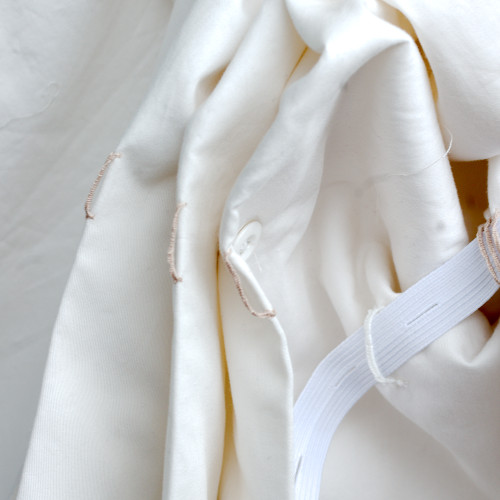
For the first thing I basted the guidelines for forming the pleats and the horizontal line where they would be fastened together. Then I ironed and pressed the pleats and checked that my basted lines matched, and made buttonholes through each layer except the top one. When the pleats are folded in place, the buttonholes are placed on the top of each other near the side seam, and can be buttoned together with a large button sewn on the bottom layer. At the inside edge of the pleats I sewed a thread loop in each fold through which the elastic tape joining the side seams together can be threaded. Here once again I used elastic tape with buttonholes, so I can easily fasten it on the other side seam and fasten the double button holding the pleats together too.
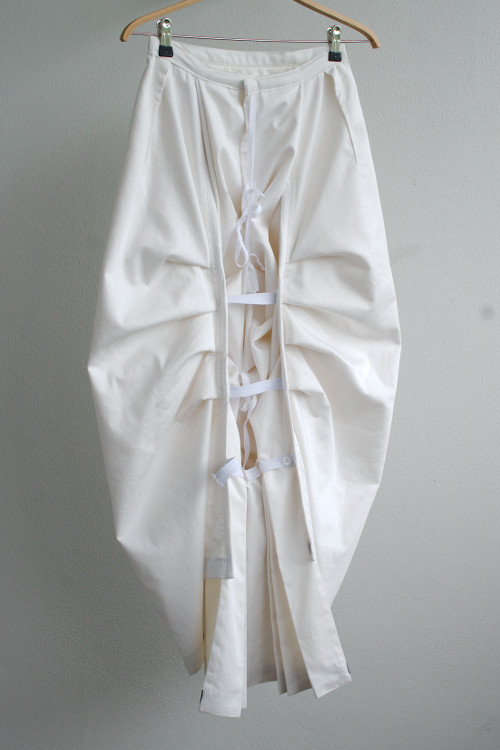
After getting the back draping settled I closed the side seams and finished them with bias tape. I gathered the waist a bit on the front piece, as the waistband should fit snugly while the rest of the overskirt should not look tight over the foundation skirt. I pleated the top of the back piece roughly according to the FOTGA pattern and then sewed on a narrow waistband, fastened by hook closing. The back slit kept gaping though, and while it should mostly be covered by the jacket I still wanted to fix it, and using the said jacket as an excuse for covering my sins I sewed on a few not-period-correct-quite-yet snap fasteners.
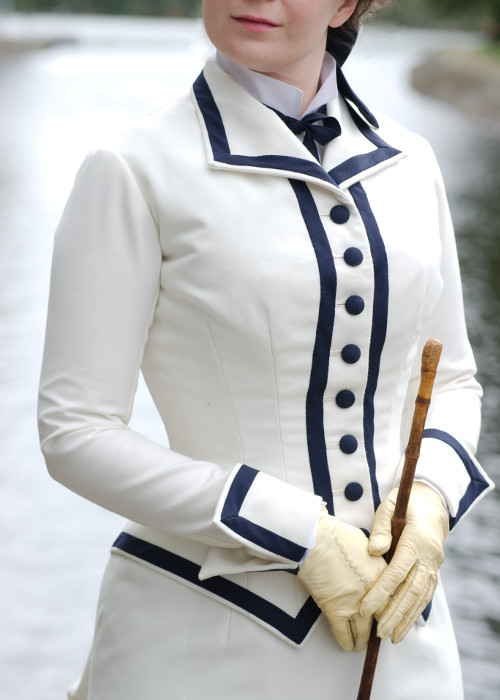
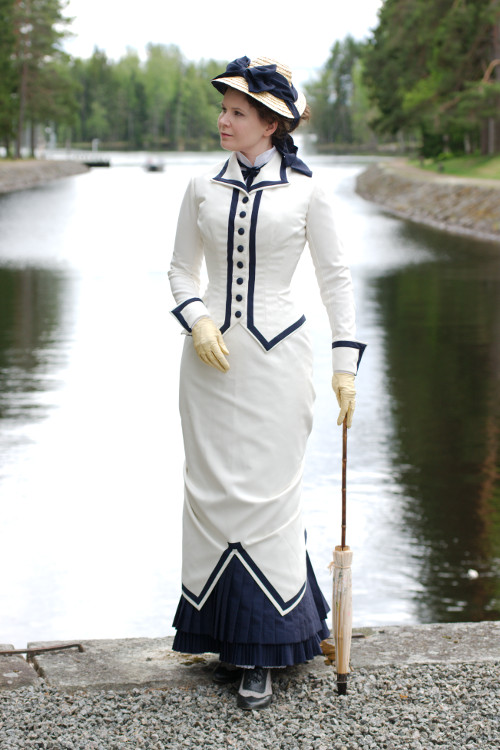
The jacket
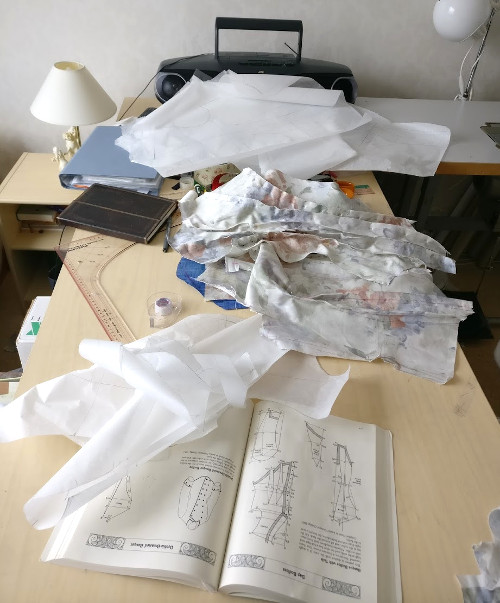
I had imagined the jacket to be an easy job, after all I had a bodice pattern that would just need a bit of fine tuning. When I made my first mock up I was quickly proved wrong. Pretty much everything suddenly did not fit.
I began, however, in good faith by drafting a mashup of my dinner dress bodice (which had fit well) and my old basic bodice pattern with high neck. In the dinner dress pattern I had turned the fold that tended to form at the front armhole to the waist darts, but now I began to wonder if this would cast the side seam too much off the grain line after all. I turned some of the width back to the armhole again to see if there would be some other way to deal with it. At least I was smart enough not to try to draft the pattern yet, but first try out the high necked pattern.
At the back things were more straightforward. Happily the jacket pattern had the second side piece reaching up to the shoulder seam similarly to the dinner dress pattern, so I could just copy the main seam lines. I did move them a bit of course to match the shape in the jacket pattern, and lengthened the back pieces.
The mock up was something of a minor disaster. In the dinner dress the deep square neckline had eliminated most of the overbust, armhole and neckline fit problems, which came back with a vengeance now. The sleeve pretty much copied from the dinner dress was mysteriously terrible too. So, I had no other option than to tackle the whole damn bodice pattern piece by piece. I ended up altering pretty much everything: The shoulders seams, angle of the front piece top part, waistline, darts, back pieces and sleeves until I finally got a semi-decent fit.
It's hardly surprising that the final pattern shape, most notably the front piece, looked much more like the period patterns than my previous one. Especially the oddly looking curved front shoulder seam makes a big difference. At last I got even the troublesome front armhole area to look smooth by the simple trick of adding some wadding under the bodice, just like they sometimes did on the period.
I did quite a lot of work to achieve good bodice fit, but after all it was time well spent as this new basic high necked pattern will hopefully be of much use in future projects.
Now I could finally move on to the details of the jacket in question. While working on the skirt and overskirt I had continued to look through fashion plates in case I wanted to make alterations on the FOTGA model - and I always do, for some reason.
When adding the front slit in the overskirt it of course followed that I wanted to incorporate the same element in the bodice by adding points in the front basque. I also altered the back basque shape by shortening the tails which looked a bit heavy to my eye after all. I also left out the back slit, as I thought the shorter back basque did not need it.
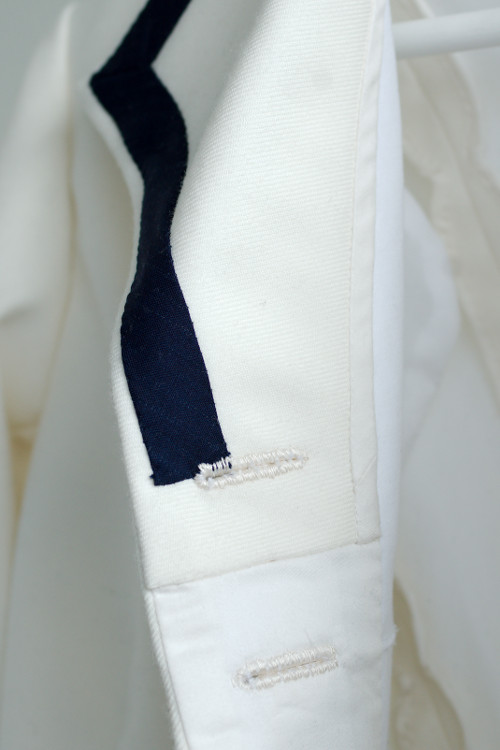
I had experimented with pinning navy bias tape on different widths on the mock up bodice to see which looked best, and ended up with 1,5cm, which I then used also in the overskirt. I had also noticed that the tape trimming looked nicer for some reason when it was sewn on about 5mm from the edge instead of as a border like in the FOTGA pattern.
I first tried the cuff pattern in the book, but did not like it after all - I think the shape would have worked better as a sleeve trimming rather than a real cuff, so I drafted wider cuffs instead.
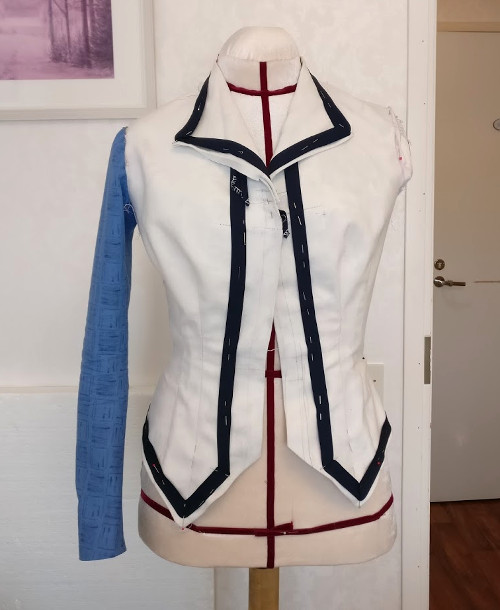
I did decide to keep the border trimming on both sides of the buttoning, but had a problem with the collar again. While it looks nice its so deep that it would require a high necked fake underbodice or vest underneath to work as a day dress, and that should really be in the contrasting color to match period aesthetic. I did try the jacket mock up with folded down front edges with a piece of the navy fabric underneath, but it looked just heavy and gloomy to me. I also felt the collar could well be wider to balance the hem points accentuated by the trim.
I began searching inspiration for a collar that would not open down to the bustline but would not be quite high either, and found some illustrations with a triangular collar. I thought it would look nice with the bodice points and trimmed overskirt slit.
Journal des Dames et des Demoiselles, 1880
Collars of the period are still bit of a mystery to me, though - some bodice patterns mention the collar being cut to the neckline shape or even as a removable piece, while coat patterns seem mostly to have a tailored collar that clearly rises at the neck. The latter appealed to my (perhaps modern) eye, so I tried to draft one with a separate lower back part and joining seam on the underside.
I used cotton twill for interlining the jacket bodice - it may be a bit stiff, but will hopefully keep the jacket in shape. I had at this point accepted the fact that with the chest padding, tailored collar and all this would not be ultra light summer wear or a washable thing.
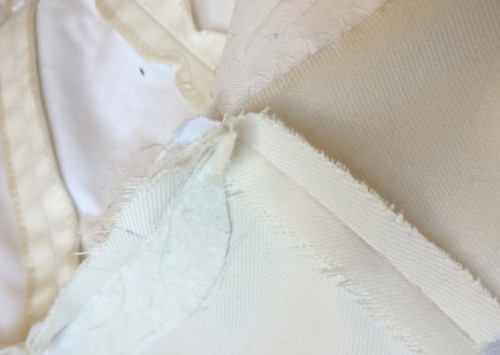
I cut the interlining first, marking seam lines, darts and balance marks etc with a faint pencil line. I cut all the pieces 5mm longer than the top material at the waistline. I sewed the small darts at the front edge on bust level, and sewed a few rows of gathering threads on the top material at the same area. After basting the layers together I pulled in the gathering threads and then ironed through a wet muslin to smooth the gabardine over the lining. It settled in better than I had expected, though I still fail to understand how they did this "dart only in interlining"-thing in silk taffeta.
I interlined the top layer of the collar with the cotton twill, though it made the edges a bit clumsy. The front piece interlining ends near the collar opening so that the underside of the collar made as an extension to the bodice front curves softly. At the neck I added a piece of felt interlining to keep the back of the collar firmly upright.
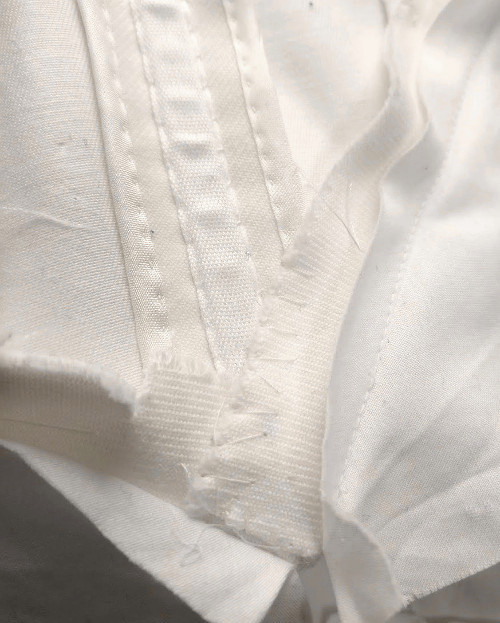
After all the basting I finally got to sew some actual seams - all the back seams and the front darts. Then followed the usual pressing the seams and finishing the seam allowances. As the gabardine frayed easily I decided that the best option would be to edge them with bias binding. It took a while, and was a bit tricky around the scalloped bits, so at some places the binding is not as neat as it could be. It's better than frantically fraying seam allowances, though. Then I sewed on the tape casings for boning.
For the first fitting I basted the side seams and shoulder seams. The bodice was a bit tight this time, but happily I had left ample seam allowance at the side seams. Other than that it looked rather promising.
I closed the shoulder seams for real and then joined the collar parts. I sewed the trimming tape on 0,5cm from the edge by hand. I had left generous allowance on the inside edge of the top collar piece, so I could smooth it to turn over the underside of the collar. Then I trimmed the excess fabric off and finished the raw edge with a bias binding. I also turned the front edges with an interfacing of the cotton satin I had used for lining the overskirt. Then I sewed down both edges on the bodice interlining.
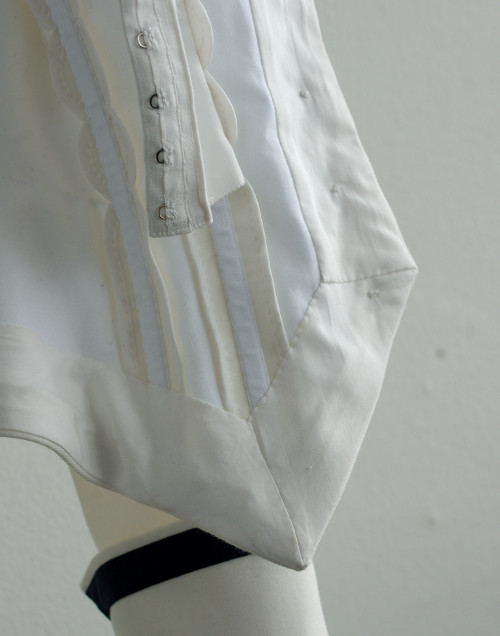
Next I made the buttonholes, except the bottom one, which would be done after finishing the hem. I had planned the buttonhole width and spacing quite carefully to get the buttons set precisely in the center between the trimming tapes bordering the buttoning. The second one from top in placed in the center of the bust dart in lining to minimize it showing through the top material. As there weren't that many buttonholes after all making them went quite fast, especially when compared to the total amount of work in the bodice finishing.
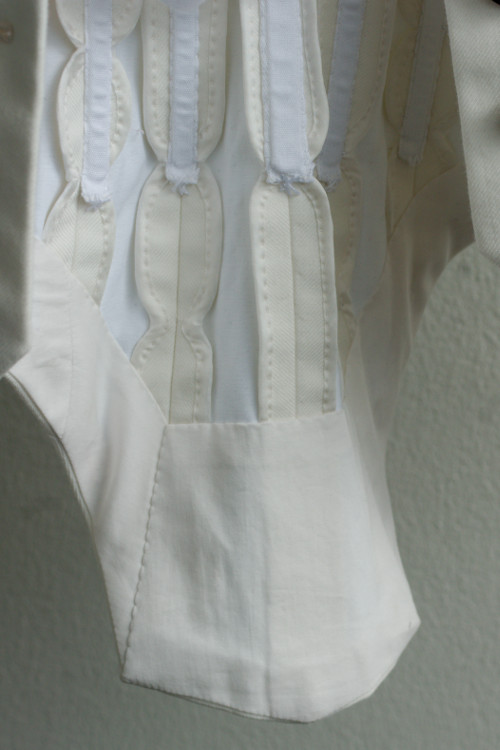
I added panels with hook and eye closure under the buttoning between waistline and bustline to take the strain away from buttons, as the jacket was very tight fitted at this area. They are whipstitched on the bone casings on front darts.
I found from my stash an odd leftover piece of hook tape recycled from somewhere, but no matching tape with loops. I improvised the loop side by sewing eye parts of hook and eye sets on a piece of curtain tape. This was actually a great way to use them, as I often make thread loops for individual hooks and thus end up with extra eye parts.
The panels ended up being a bit too wide and thus the closure was too loose to support the buttoning, but as I was too lazy to take them off I simply added a pleat on one side.

When I had the front closure finished (save the last buttonhole) I basted the side seams, this time a bit outside my originally marked seamline, and tried the jacket on with all the underthings and skirt layers. This time it buttoned effortlessly, thanks to the hidden hook and eye closure, but still fit snugly at the waist.
I finally sewed the side seams for real, finished the seam allowances and added bone casings. I still left the bottom end of them open, as the sleeves would be easier to set without bones in side seams. I also whip stitched the waistband on the center back seam bone casing.
The sleeves had caused me a lot of headache on the pattern drafting stage like everything else, but at last I got them looking passable. I kept ending up with way too much ease on the sleevehead, as the armhole should be quite small but I did not want the sleeves to be pinching tight at the arms. Of course with this material I could easily handle some extra ease, so at last I let it be and just added a strip of thin wadding between lining and gabardine to smooth any wrinkles that might appear in spite of my best efforts.
I lined the sleeves with cotton batiste, sewing through all the layers of both gabardine and lining at the sleeves and then turning the seam allowances towards the under piece. This technique was adviced on the sewing manual quoted in FOTGA, and I had my doubts about it beforehand, usually preferring to press all seams open when possible. I tried it nevertheless, and I had to admit that not only was it very fast and handy, the result was also very neat, at least with thin materials.
I confess I was a bit too hasty when it came to the cuffs. I interlined the whole top piece with the cotton twill and joined the top and bottom piece at the edges through all the layers, which resulted in thick edges and somewhat clunky corners. I was, however, too impatient to do them over with more care, which was probably kinda dumb considering how I obsessed over getting the inside of the jacket neat, but there you go.
So, despite the cuffs being less-than-perfect I basted them on the sleeve ends and turned all the edges under with a bias-cut facing. I had, by the way, made a small error of judgement when fitting the sleeve pattern on mock up: I had wanted the sleeves to be narrow at the wrist without any opening, and the finished sleeve with all the thick layers turned out to be so small at the wrist that I can just barely slip my rather large hand through. This is somewhat annoying, as I have to really pull at the cuffs when taking the jacket off.
After adding the cuffs and finishing the sleeve ends I set the sleeves on. They settled in rather smoothly in spite of my worrying over the extra ease, though I had to set them just a bit higher on the shoulder after all. I trimmed and finished the seam allowance with bias binding. Then I whip stitched the shaped wadding pads on the armhole seam. They really make a big difference on the bodice fit and give the jacket a beautiful silhouette.
The basted hemline shape still looked good and the edges of the bodice pieces had matched quite well. I turned the edges with pieced facing. First I sewed the facing strips almost to the end of the front and back edges ending in sharp corners. Then I pressed the seam allowances of the jacket to turn neatly to the right shape, cutting off most of the interlining at the corners to reduce bulk and finally whip stitched them to stay in shape. Then I turned the facing up, folding it on the corners and fastened it by hand on the interlining.
When the hemline was finished I finally made the last buttonhole. Then I pinned and sewed the trimming tape on the edges, hiding the ends under the collar.
The jacket ended up rather neat and pretty. Weirdly, I'm almost as happy about how it looks from the inside as from the outside, there is just something so fascinating in very structured garments. All that boning and padding of course gives also an illusion of a very nice figure and great posture. Furthermost I hope that battling with the pattern now will help me a lot in the future.
Accessorizing
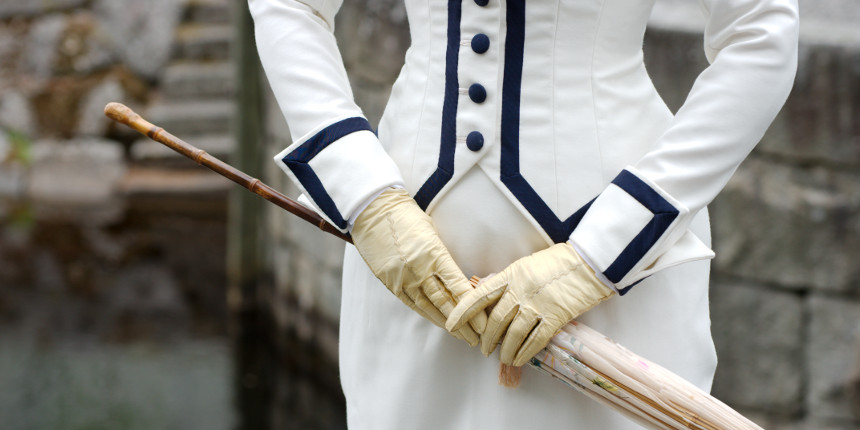
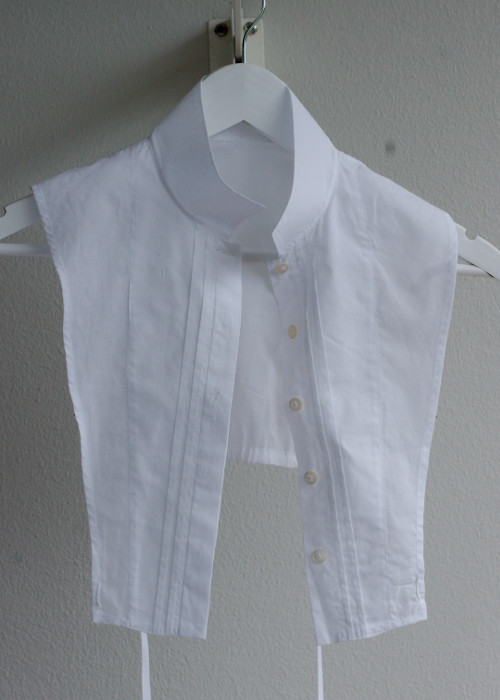
To complete the look I still needed some accessories: The ever-necessary balayeuse ruffle on the skirt, and for the jacket some sort of cuffs and something to fill in the half-high neck.
I could of course have made a complete high-necked corset cover, but felt lazy and decided to do with a chemisette. I made a quick one with a high, straight cut collar that seems to be most commonly worn with simple day dresses. The batiste chemisette reaches underbust on the front, and ribbon ties keep it firmly in place. Only a tiny glimpse of it actually shows from under the jacket, but I still wanted to add a few tucks next to the hidden buttoning, only to further hide them with a bow.
I also made very quick, simple cuffs which I starched with the collar and basted on the sleeves.
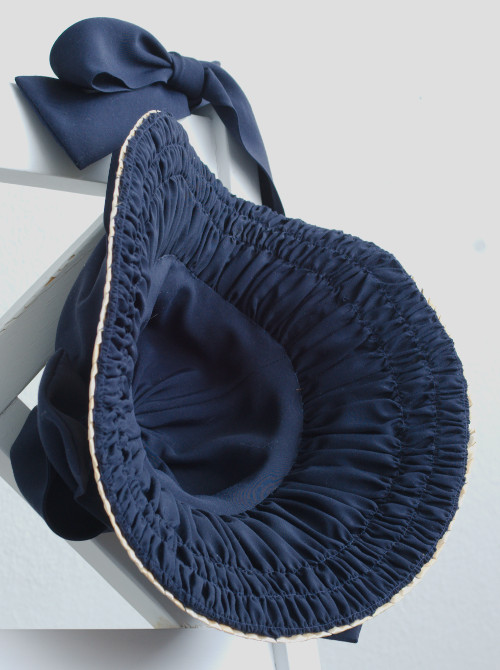
But above all, I needed a new hat! The outfit called for a rather simple straw hat. It could have been a small boater like in the Tissot painting, but in the end I rather preferred the more feminine shape of a typical straw hat of the period, with a mid high crown and a brim raised at the back. I trimmed it rather modestly in keeping with the clear cut style of the dress. More about the hat can be found here.
Final thoughts
The finished walking dress is very close to what I wanted it to be - neat and pretty with a tailored touch. It's also comfortable to wear, just right for cooler Finnish summer days. The short skirt is very carefree, though the narrow overskirt does not allow taking very long steps.
I had planned to wear this outfit for a lake cruise on a 112 year old steamship Tarjanne, but then covid19 messed up everything as we all know. I hope that the cruise will happen next summer, if not later this year, but meanwhile we drove to the picturesque little canal via which the ships passes on its route for a photshoot. The canal was built between the years 1850 to 1854, and it still retains some of its historical look.