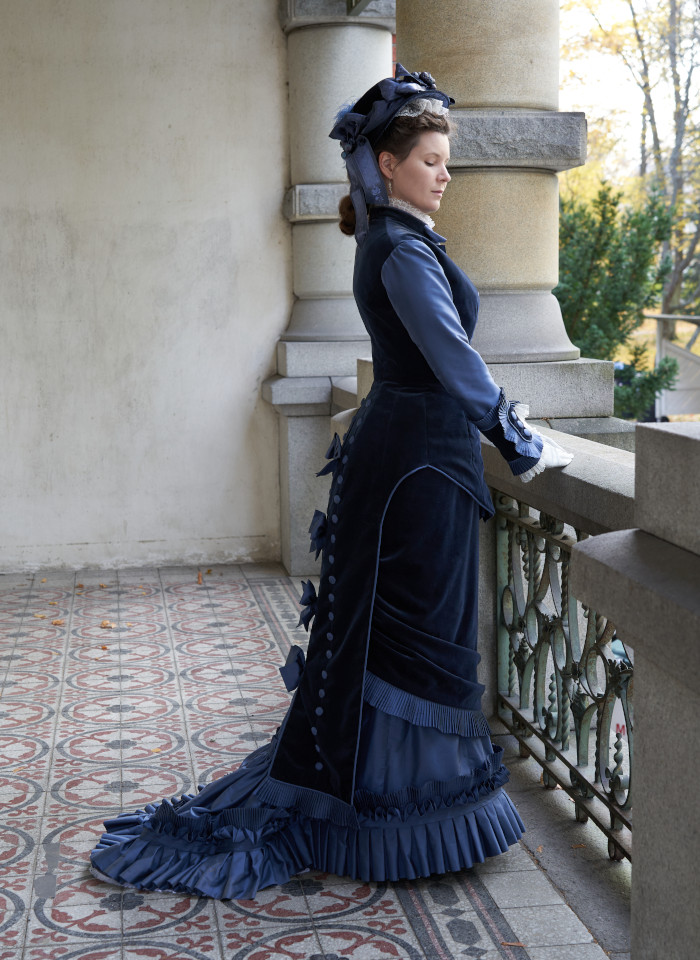
Directoire
habit bodice dress, 2020-2021
This time it really began with the materials. I had a lot of very dark navy blue velvet in stash, and then there were a lot of gorgeous museum pieces with velvet, often combined with silks. The dress idea was at the back of my mind for some time, and while I did not have any immediate use planned for it at the time I began it was one of those projects that I just had to make some time or other.
Materials
The cotton velvet had been on a crazy
sale many, many years ago. I had originally bought it for my 18th
century masquerade dress but there was a lot left, and it
would actually belong more to the Victorian era. Cotton velvet
(or velveteen as it was called in the period) was at the time
the much cheaper alternative for the traditional, luxurious silk
velvet, but it's quite a luxury material enough for my wardrobe
- and not inhumanely difficult to sew.I kept my eye on options for suitable silk for some time, and tried a few samples but none really matched. Then I ran across this silk on a trip to London. They had a few colors on sale and this shade of thundercloud blue was just so my color. The silk is again a poor man’s choice of machine woven dupioni, but it’s rather regular with only a few thicker threads now and there. Even using silk for a large portion of a dress is a bit scary for me, to be honest.
I knew at once that I would use that silk for something, then back home I remembered my old idea of silk and velvet dress, and when I excavated the velvet from the stash I was overjoyed to see that they fit together quite well. I had originally thought of a darker navy silk so that the dress would have a bit more subtle effect of two different textures in a similar shade, but then again different and even contrasting colors were used together a lot in the period.
Choosing the style
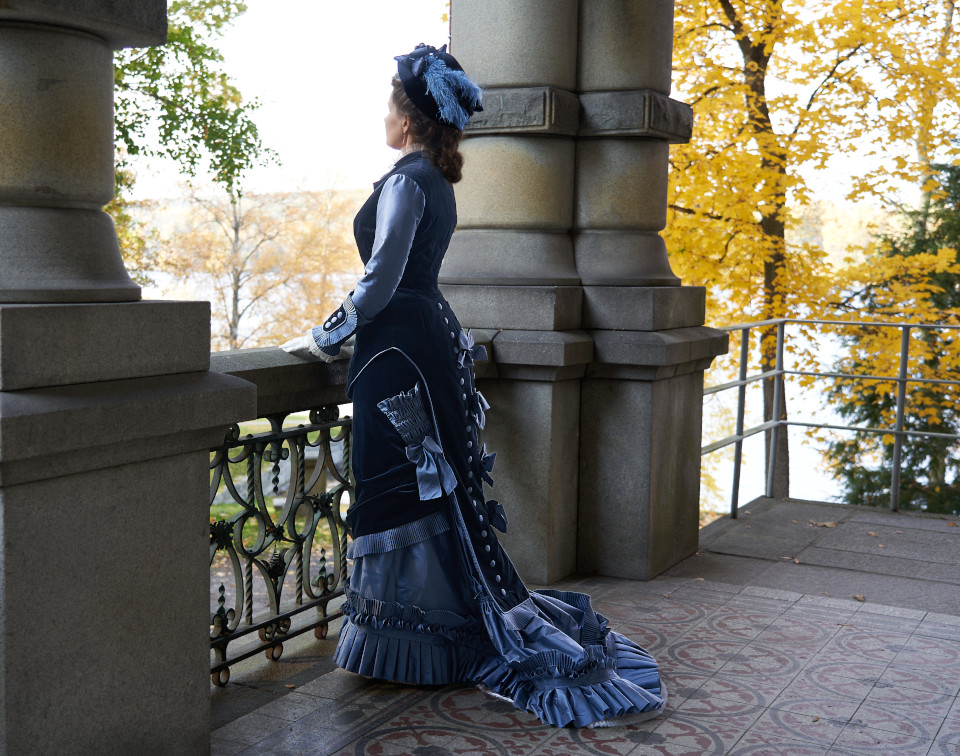
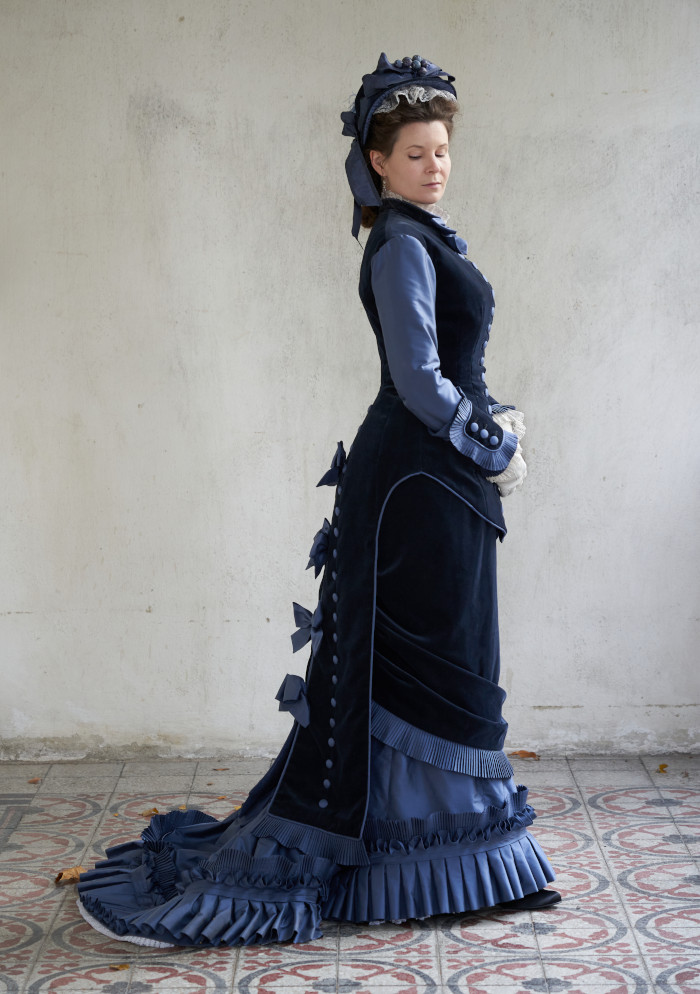
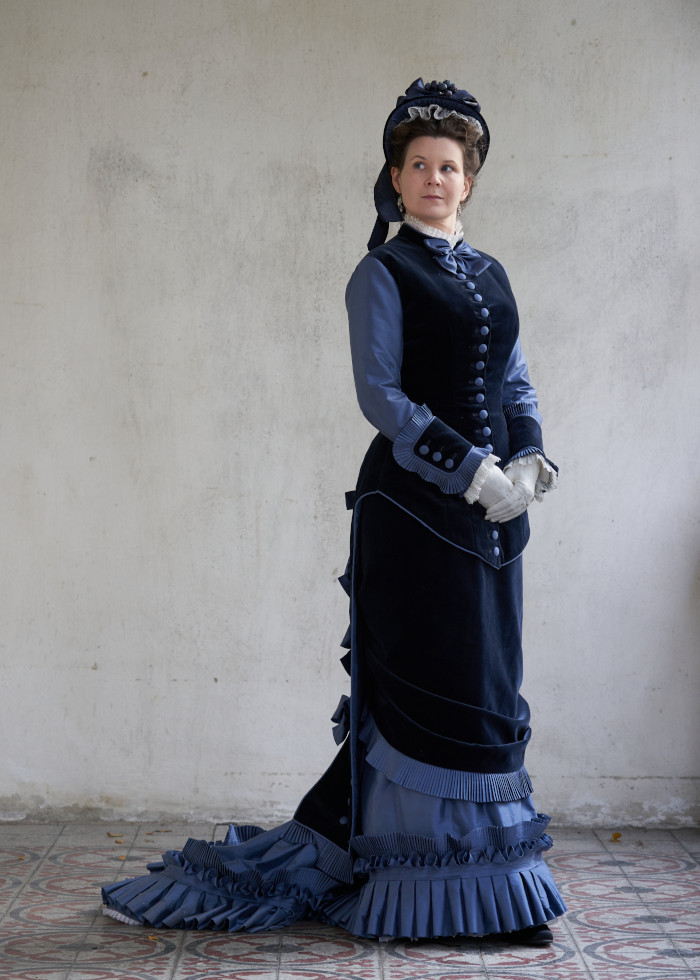
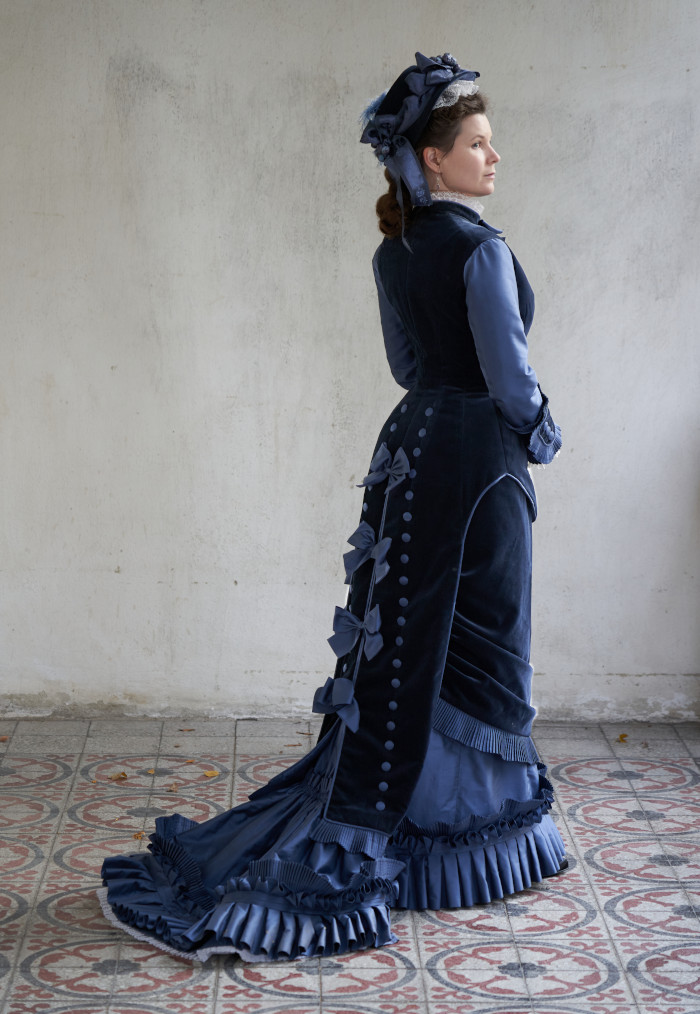
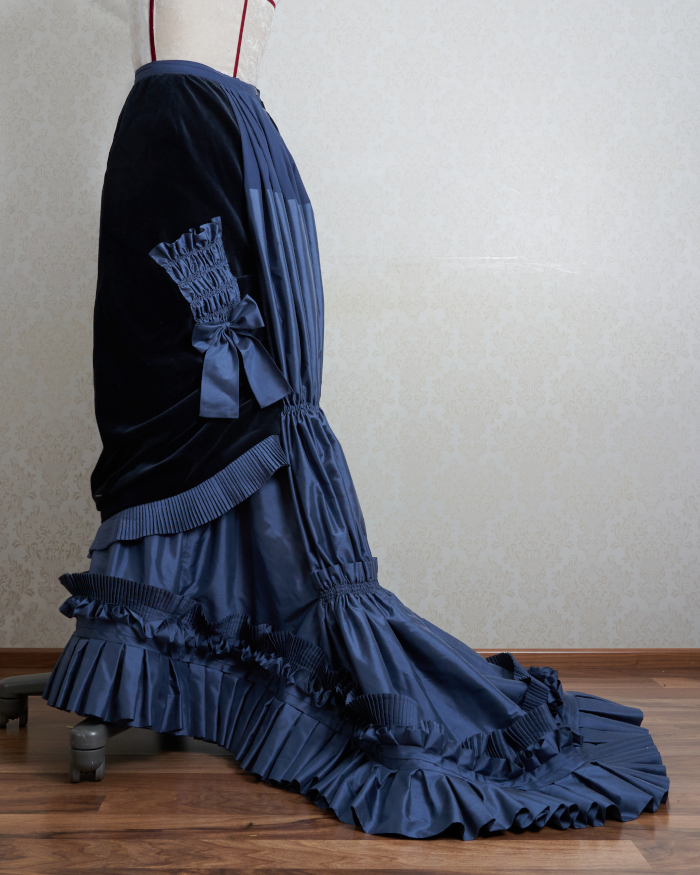
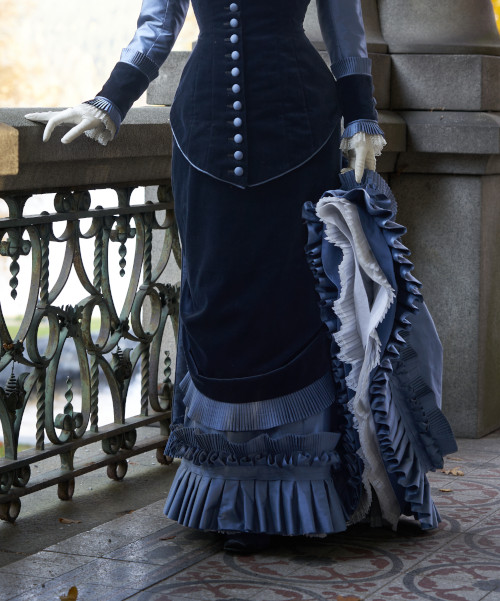
My first inspiration for this type of dress came from this fashion plate in “Tygonid Mód”, 1877. I read it as a combination of silk and velvet and the dark grayish navy color was beautiful. I also liked the bodice with tails, and knew it reminded me of something.

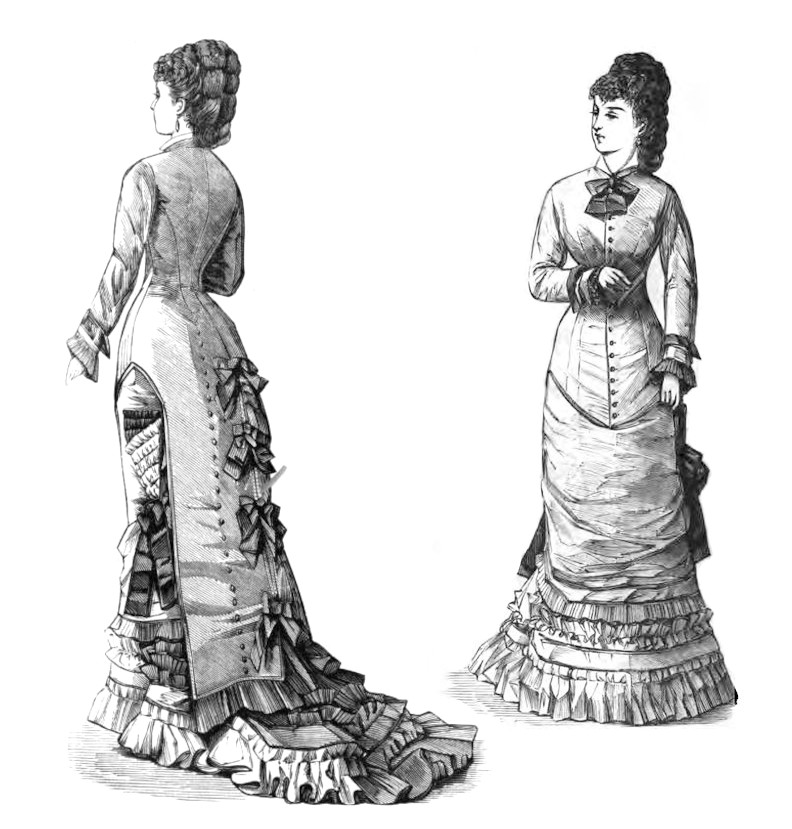
That something was a drawing with a pattern that had been on my hard drive forever, long before I even began actually sewing Natural Form. It’s from “Peterson’s Magazine”, 1877 again, and called “Directoire Habit Bodice” (“New style house dress”), which possibly refers to the almost ground length tails at the back. While it perfectly checks most boxes for late 1870s elegance - long, slim fitted bodice, ruffles, bows and a sweeping train, those tails give it the extra something. Very helpfully the illustration also provided both front- and back look of the dress.
I chose this model as my goal, but as usual, I ended up making a few changes. First of all I had hard time interpreting the picture as to what was going on in the skirt trimming, other than that there was clearly tons of it. I was already in great doubt whether my silk would be enough for half of it. I also basically liked the squared skirt that cleverly mirrored the tail ends in shape, but was afraid that it would be difficult to draft and get to sweep beautifully. My blue dinner dress had a square train but the construction there was totally different. And besides, I thought it wiser to settle for a slightly shorter train anyway.
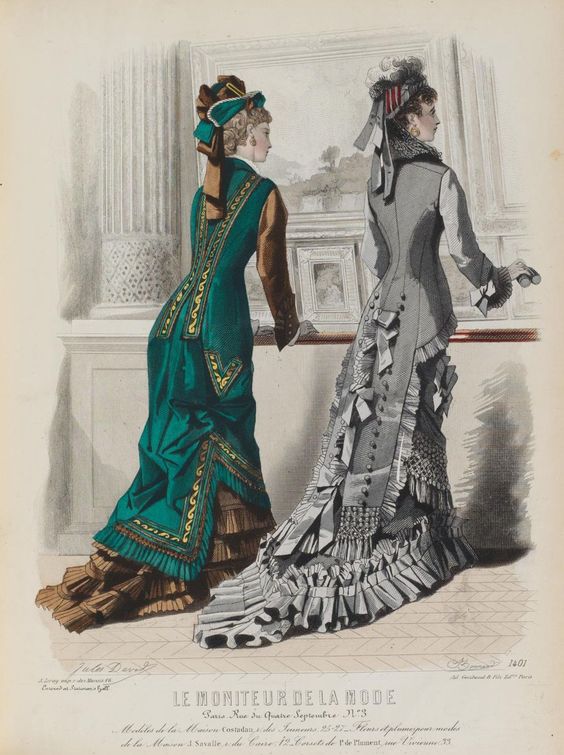
A fashion plate in “Le Moniteur de la Mode” from the same year had a dress with a very similar tailed jacket style down to the row of decorative buttons, but with a skirt that had a rounded train with more simple trimming. The trimming was also easier to decipher, at least to me it looked like big box pleats, possibly a bias tape covering the stitchline and a narrower strip in finer kilting (knife pleating) peeking from under the header. I thought that stylistically this skirt shape and trimming plan would fit with the Directoire jacket just as well.
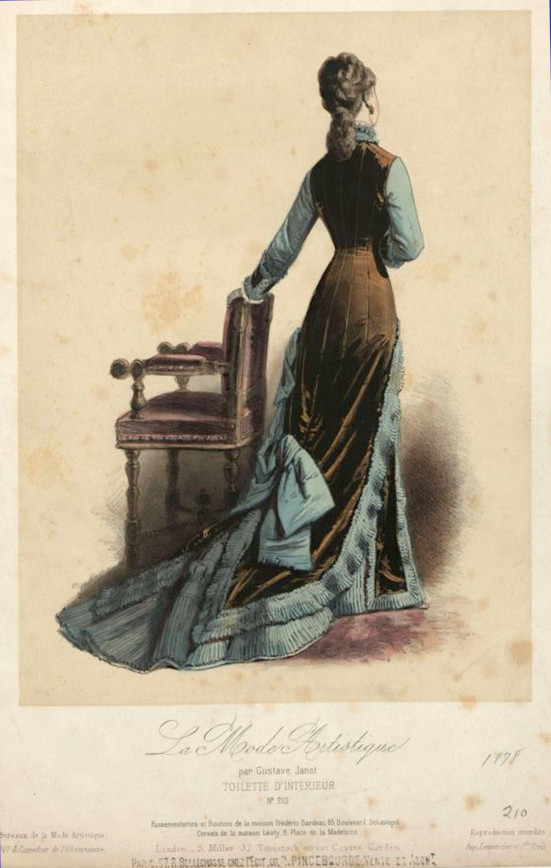
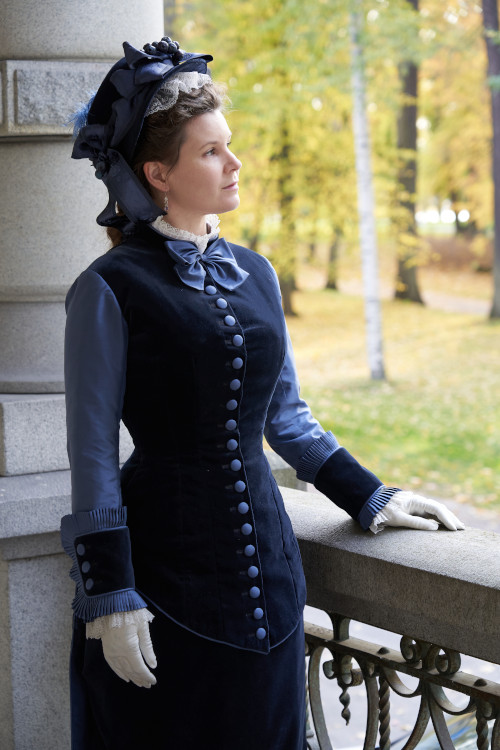
My final source of inspiration was this plate from “La Mode Artistique” from 1878. The dress itself is slightly different in style, but still combines two materials in a similar style, and it had the minor detail of sleeve cuffs I liked the best. Both the Directoire style and the Le Moniteur de la Mode dress had some kilted ruff and a band, but the Tygonid Mód dress had bigger cuffs with buttonholes. I’m a big fan of the huge richly trimmed cuffs of the earlier 1870s (maybe because I like 18th century menswear), and the ones in La Mode Artistique were a nice nod to earlier style.
So, I decided that it would not be a huge stylistic leap to combine these elements from other designs within a very short timeframe to my main inspiration style.
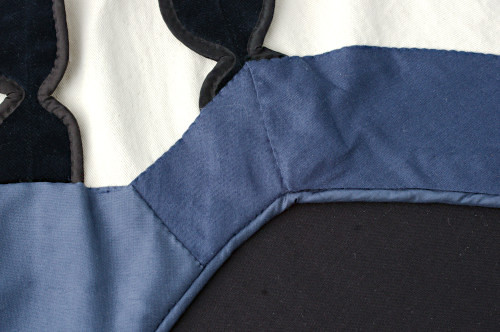
Combining different materials on the same dress in this period seems to follow certain patterns: In many pictures that I looked at, both fashion plates and museum pieces, a bodice in one material usually has sleeves in the contrasting one, while cuffs may be of the bodice material again. If there is a plastron front it’s of course in contrasting material from the rest of the bodice and in this case the sleeves may match the bodice. When velvet is used for bodice and overskirt the skirt seems to be often made in a lighter material that allows for all the ruffles. My research on this was of course very superficial, but it seemed to be a safe choice and also make a nice, well balanced combination.
Pattern
drafting: Bodice
I had once upon a time drafted a basic
bodice pattern for my Tissot
inspired polonaise dress, but there were a lot of problems
with it. The cream & navy walking dress jacket pattern was
already much better, so I set to work to draft a longer bodice
pattern based on it. It was short at the front, but longer at
the back which I thought would be a good starting point for
adding the tails.The cream jacket had a collar so I had to fit the tight neckline, something that I thread. For the life of me I can’t understand how I, with my very moderate bust size (maximized by correct underwear though) seem to have so much problems with fitting the front of a close-necked bodice. I always end up with a too curved front which then folds at the bust point. The trick of making a horizontal bust dart on the lining and smoothing the top fabric over it works in certain materials but not all. I had managed it even surprisingly neatly in the cream wool-poly mix, and the trimming disguised the inevitable wrinkles a bit, but I would never be able to squeeze a lot of ease into thick velvet.
“Few are perfect in form. Better to improve an imperfect form by padding, than to try and fit it by cutting”. (Fashions of the Gilded Age, Frances Grimble)
With the cream jacket I had learned the period trick of padding the hollow between bust and armhole - it may sound crazy to add even more bulk, but it actually is hugely helpful for getting a smooth line from shoulder to waist and also helps the front of the sleeve fit better. This time I went crazy with the padding, as the velvet surface smoothed any padding edge lines that might show through from a lighter material.
There had also been some extra length at the back of the jacket (very visible in the pictures), which I tried to get rid of now.
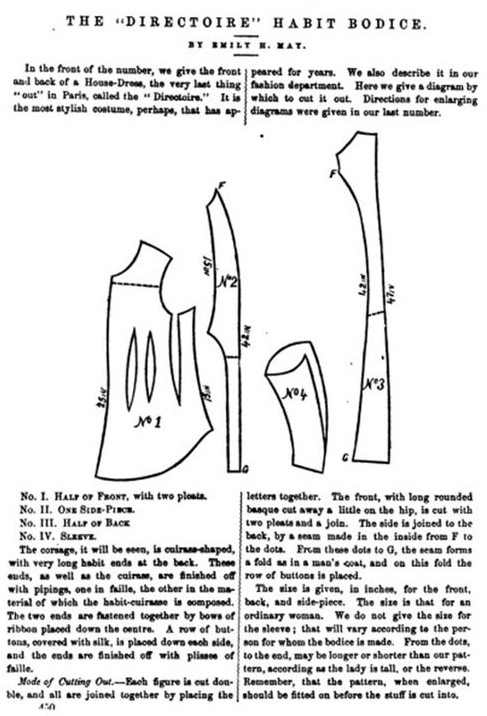
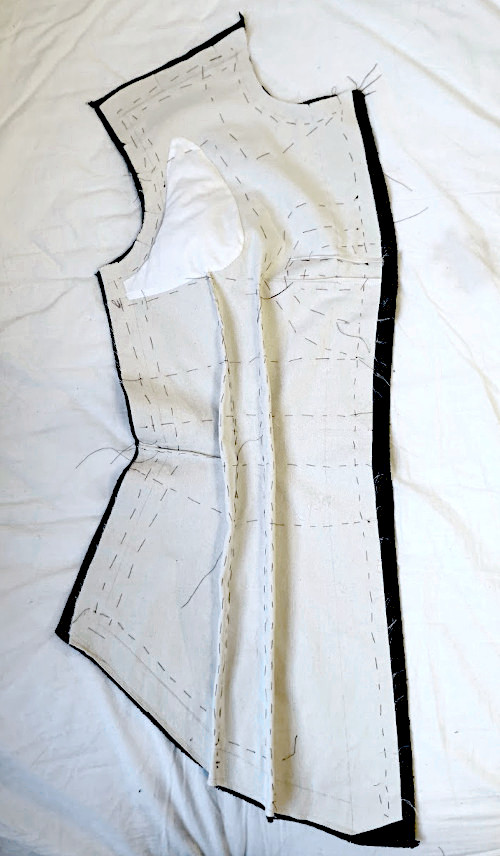
Then I could proceed on adapting the more or less fixed basic pattern for the Directoire Habit Bodice style. So, technically the original fashion illustration provided a pattern. On a closer look it turned out to be very sketchy and not even matching the drawing of the dress. The front piece shows shorter waist darts while in the drawing they reach the bodice hem, for example. The center back pieces look way too straight to match the curving seam on the drawing too. And the side-back seam where the bodice hem makes the sharp curve between back and front pieces is way too back for the curve to settle where it is in the picture.
I decided to ignore the pattern and just read the design from the picture, as the seam lines are quite clearly drawn there anyway. It seemed much more logical to just make a long underarm seam dividing the hem to front and back.
I measured roughly the right length for the side seam, center front and back tails, and drafted a sketchy hem shape that would get fine tuned in the mock up fitting. It turned out that the side seam was still too far back, partly caused by the fact that over my ass the single side-back piece I now had needed much more width at the hip level. And when I added width there was too much curve and the waist didn’t fit well anymore. I decided that the drawing was not infallible either, and no one would care if I added another seam at the side-back to take some of the shaping. I drafted the seam to end at the side of the back tails, and I think it looks much better both in terms of fit and design. The Le Moniteur de la Mode plate had a similar seam arrangement at the back too.
I still had to fuzz a bit with the waist fit and add the horizontal waist dart on the front pieces. On the cream jacket I had made a dart in the lining and almost managed to fit the wool blend over it, but velvet would just look bulky. Other than that, I lengthened the tails a bit more than I had thought necessary.
I also drafted the neckline, but chickened out with the collar. It was to be a simple standing collar, but I reasoned that I should maybe finish the bodice first, then check the neckline again and only then make the pattern for collar and cut it in case there would be alterations and because the velvet would be more bulky than my mock up material anyway.
And finally there was the sleeve. The cream jacket had had very tight sleeves, but in 1870s they tended to be still a bit looser and set lower. I widened them a bit, especially towards wrist. For the cuffs I pinned on a piece of fabric on the mock up sleeve and turned it in at the top edge until I was happy with the size.
Pattern
drafting: Skirt and overskirt
Before attacking the pattern drafting in earnest I had to decipher another mystery from the drawing: As the bodice tails cover the back of the skirt almost all the way down minus the train, I couldn’t really tell what was going on at the backside of the skirt. I assumed the skirt itself to be a basic model, but what about the overskirt? With a short bodice, overskirts are usually draped at the back somehow, but it seemed improbable that there would be much bulky draping under the bodice tails. I wondered if I could just sew the visible front part of the overskirt to the underskirt back piece seams. I consulted some more experienced people and even found one dress with a remotely similar arrangement, so I thought it would be the most likely solution.
I had problems with my first trained skirt for the Tissot-polonaise, and I had to shorten the train in the end to stop it from turning upwards at the hem. A bit shorter train did not ruin the dress in any way, but this dress needed a real train if not a huge one. The front and sides pieces of the Tissot skirt would be the right width for this, but I had to do something to the back piece.
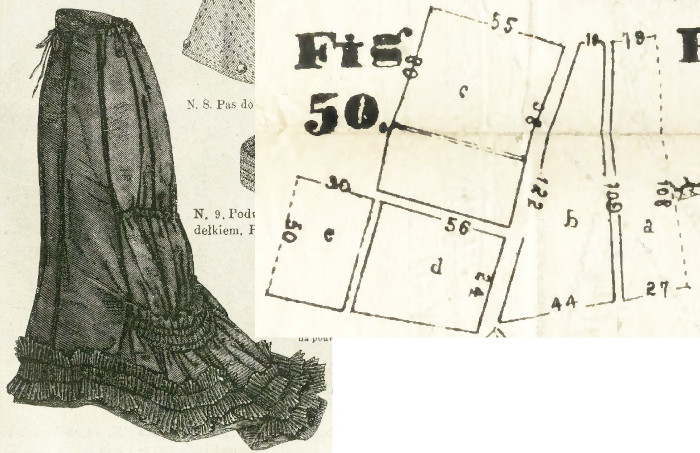
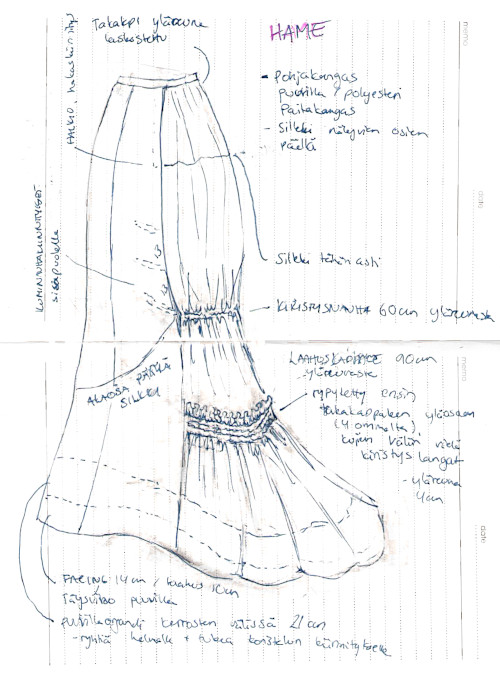
Luckily I had come across this skirt pattern from Tygonid Mód, conveniently from the same year as my dress. It had an extra wider piece gathered to the bottom edge of the back piece which would create the fan-tail effect without widening the front and side hem. I made a mock up, and found out that the train piece could actually be a bit narrower than in the pattern, so I narrowed and re-shaped it a bit. I also suspected that the wider the train piece would be the harder it would be to gather it into the upper back piece.
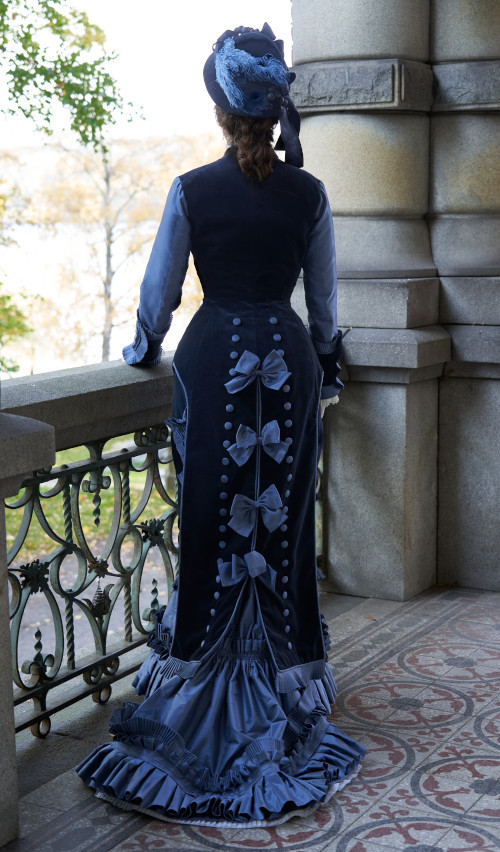
Another thing to decide had been at how high or low to set the train piece and the gathering line on the upper back piece. I have used roughly the same measurement (ca 60cm) from waist down in all my Natural Form skirts, trained of not (a bit below the knee), because it looks balanced to my eye, but this time the skirt silhouette in the drawing seemed very narrow very low down. True, there were fashion plates from the period that showed trains that began to fan out at very low, but I couldn’t help that they looked a bit unbalanced to my eye. In the end I followed the Tygonid Mód pattern with roughly similar proportions, the train part beginning at 90cm measured from the waistband downwards. The final total hem circumference is almost exactly 3 meters. It doesn’t sound that vast, but as it’s mostly at the back it gives a nice back flare.
It’s in my experience (or rather with the lack of it) hard to estimate from a limp mock up how a train will fall when it's properly interlined, trimmed and supported with a balayese. However I had to be content with this and just try what it would turn out like and learn from the result for the benefit of my future projects.
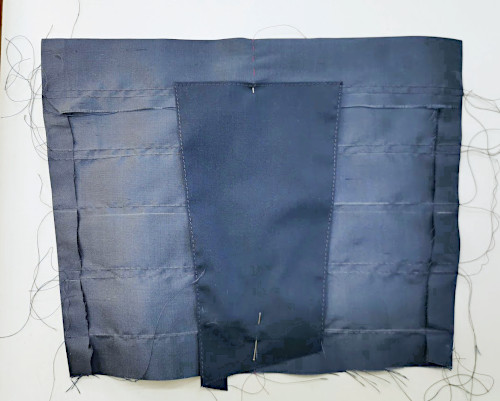
The overskirt was very easy: I simply took the pattern from my overskirt front piece for the cream and navy walking dress (I even had the mock up piece left, I only had to sew the front slit closed again) and readjusted the pleats a bit in the fitting. There would be four 3,5cm deep pleats spaced 7cm apart beginning 35cm down from the waistband. I also left some more ease at the hips to allow for the heavier material. Of course it was again hard to estimate how the much thicker velvet would drape, but I could leave some seam allowance and in emergency cut out a new piece - I had a lot of velvet and a large intact piece with only a few darts at the top part would no doubt be useful for something else.
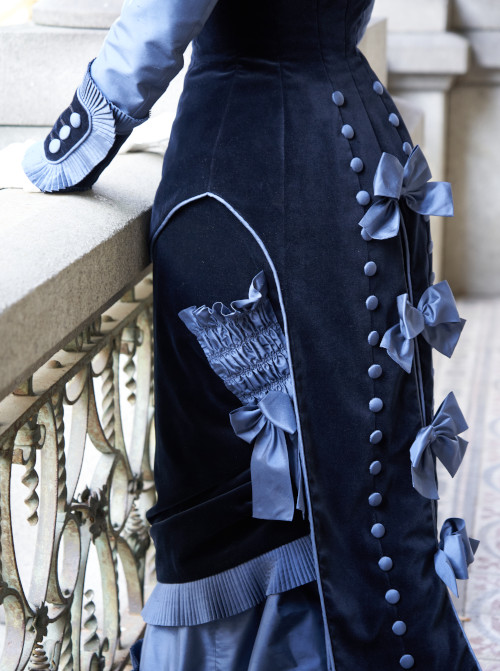
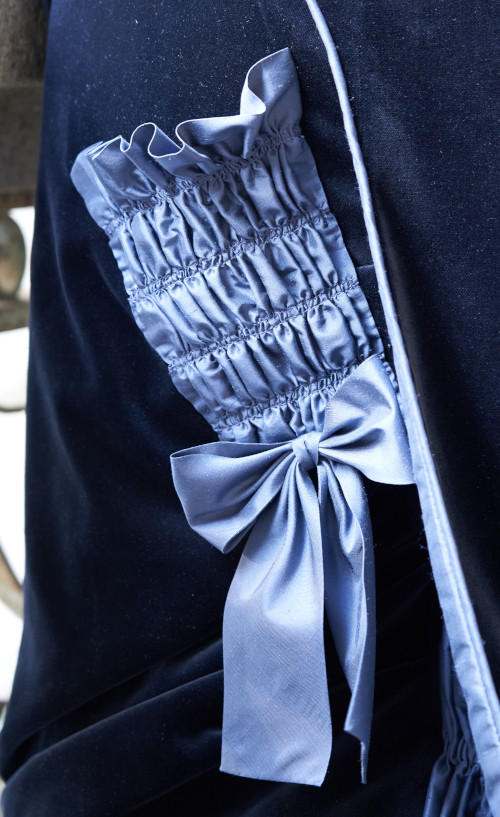
The original Directoire dress also had the delicious little detail of a decorative pocket, fashion fad of the period, or more exactly two of them one overlapping another. The combination looked lovely, but in the picture it looked like they were in two different shades and might look too massive in just one material over a contrasting one. I simply decided to ditch the smaller top one and go with the more usual one, further accentuated by the big bow.
I drafted a tentative shape for the pocket, but decided that it would be best to try the size and placing only on the finished skirt to see how it would fit the whole look and work with the overskirt folds.
About
calculating the material consumption
Before cutting anything I had to thoroughly calculate how far my silk would go. Obviously I still haven’t learned how much material can go to a ruffle trimmed trained dress, because I’m always surprised at the amount.
I first calculated the width and needed length of all the kilted strips, which always take three times the finished length. The wide box pleating in the hem could be done with double length
in a pinch but of course treble length would be desirable to get the voluminous effect.
The skirt back piece had to have a silk top fabric quite high at the back in case the bodice tails moved in wear to show the skirt underneath. In the front so much of it would be covered by the overskirt that I could cover only the lower part with silk.
The two-piece sleeves don’t take up that much material, especially now as the large cuffs covered the lower part. Lining for the tails required a large piece. Then I would also need to cut the bias bows, piping and some sort of bias tape for the skirt trimming. There were also dozens of buttons to cover, but they come out of any small cutting waste scraps. And of course the overskirt pocket, but that could be left out in an emergency.
So, I made a rough calculation of everything, checked that the silk should be just enough, and then decided to cut the large essential parts first and then figure out how to best use the rest.
Making
the skirt
I began the sewing with the skirt, as it would be better to fit the bodice over it, especially as the velvet overskirt would add bulk on the hip area and the back volume of the skirt would affect how the tails fell. Additionally most of the silk would go to the skirt, so it was best to cut it first.
Besides the silk and velvet some other materials went into the skirt as well. For the base I used the same trusted cotton and poly blend I had used in several of my previous skirts - it’s durable, lightweight and inexpensive and gives enough support for the trimmed hem without adding too much weight. Especially a thin dupioni needs a solid backing. For extra support I also added a layer of cotton organdy between the base fabric and silk as high as the trimming would reach. I sewed these pieces on the base material by machine. Another extra material I used was a thin bedsheet cotton satin, which I luckily found in a color that almost matched the silk. More on that later.
Like I mentioned above, I did my best to do as little silk as I could. The train piece got a silk top layer all around of course, but the top 20cm of the upper back piece is just in the base fabric. On the front and side pieces the silk top follows the upwards curving line of the overskirt, though there is a safe overlap of course in case the overskirt rises considerably when sitting etc. Especially the front piece hem which is mostly hidden under ruffles has some heavy piecing from the leftovers of the other pieces. I could of course technically also left the bottom of the hem under the wide trimming without the silk coved, as my base material wasn’t even hugely different in color, but since it would probably peek a bit under the box pleats I decided that I didn’t need to go to such lengths of economy.

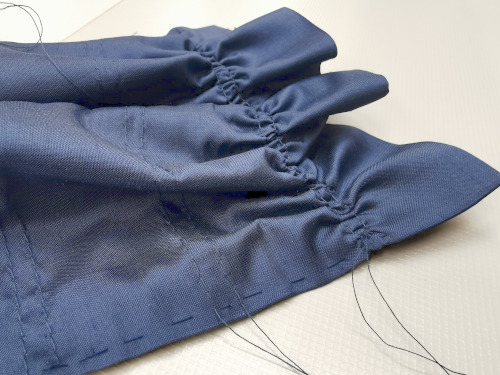
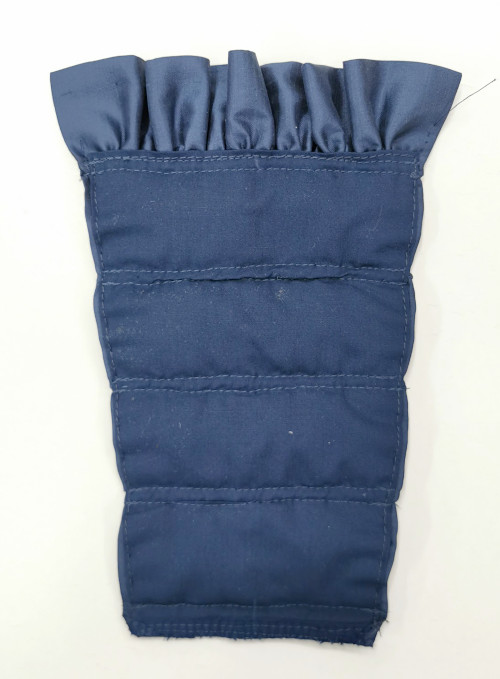
Putting the basic skirt together was fairly straightforward. After having joined all the layers in the pieces I finished the edges with overlock (it’s inside the skirt with a petticoat covering the wrong side so I don’t care if it's inaccurate). The main challenge was gathering the train piece neatly on the top part of the back piece. Happily it was still rather thin in spite of having several layers (the cotton-poly blend, silk on top and turned down over the edge of the base at the header). Or actually that itself was not the main challenge, but rather then get both gathered into the final shape.
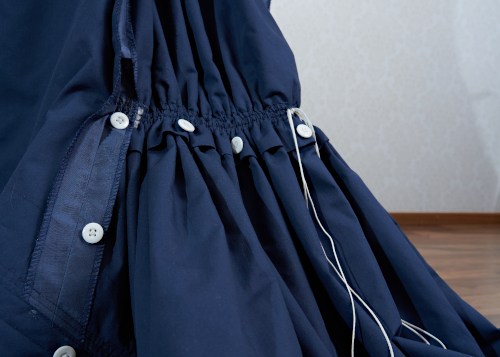
Imitating the Tygonid Mód illustration I left a 3cm header, then sewed four gathering lines 5mm apart, gathered the train piece on the right width and sewed it on the back piece over all the gathering lines. Then I (painstakingly) pulled narrow curtain strings through all the three casings thus formed, forced a small hole open at the center of the piece and pulled them out. This construction gave a similar look to the pattern illustration and allows the gathering to be partly opened for storage.
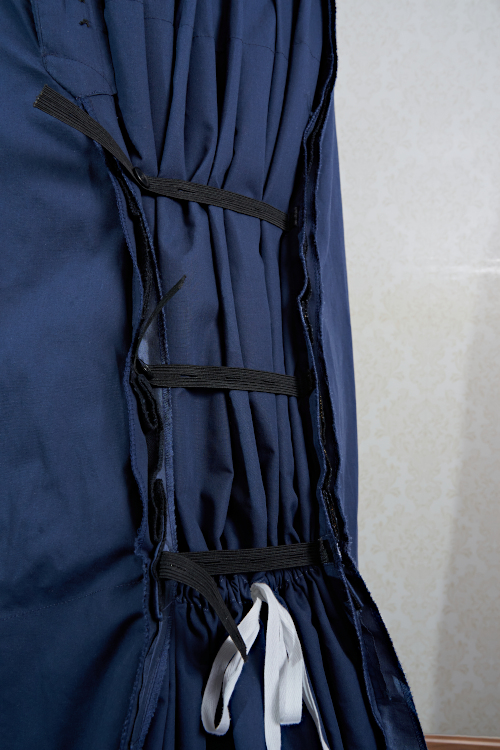
The top of the back piece got the usual gathering 60cm down from the waistband and three elastic bands and corresponding buttons to keep the fullness at the back, the lowest one at the level of the gathering and the other two spaced at 13cm distance.
After having joined the back pieces and the front- and side pieces I made up the overskirt.
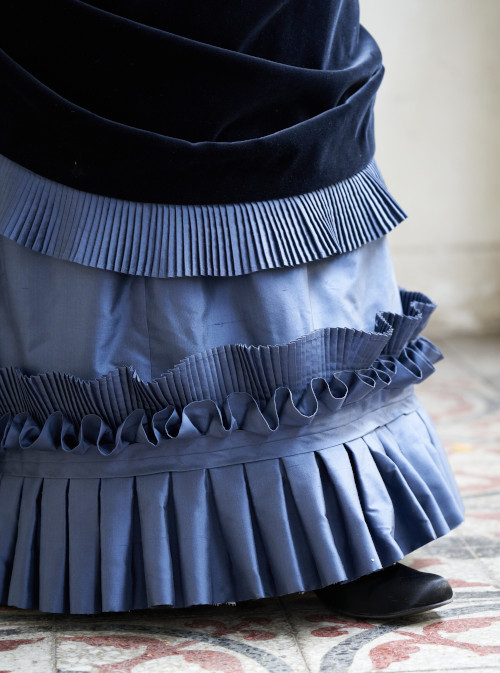
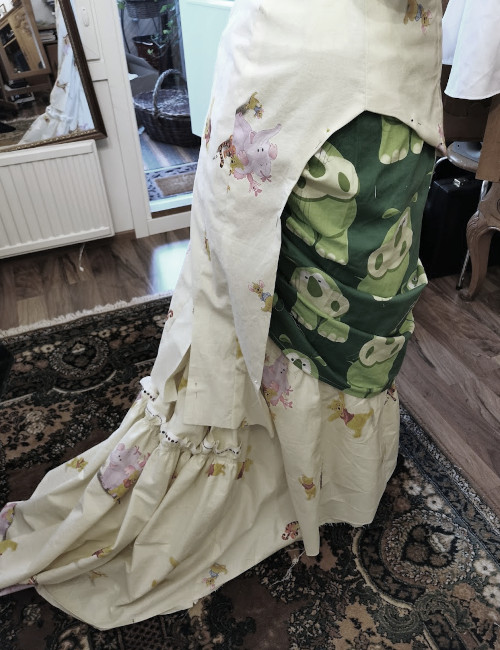
I had already made the first piece of 5mm kilting with my trusted pleating board, which would go to the overskirt hem with a finished width of 6cm. I sewed it on and finished with a bias facing of cotton satin. Then I sewed the waist darts, basted the side pleats and then basted the whole on the skirt front to test how it would drape.
I sewed the skirt back on the front and overskirt with a long stitch and tried it on. The velvet was heavier than the mock up muslin, so the overskirt fell more straight, but it did have some folds at the hem after all.
I could now close the side seams for real, finish the opening placket with hooks and put on the waistband. Then I checked the length. As usual I had been over-careful in cutting it and added that final allowance in the end just to be sure, and now had to trim off several centimeters of my precious silk. That done I finished the hem with a bias facing in the base material, 14cm wide at the front and sides and tapering to 10cm at the train.
The
Balayeuse
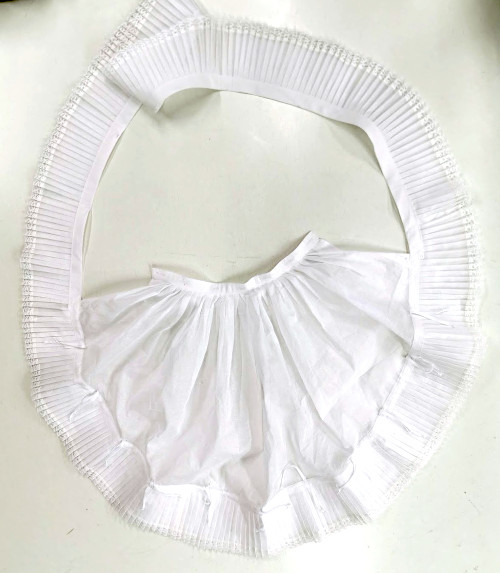
I decided that I might as well make the removable balayeuse at this point. It would be very similar to the one I had made for my lilac ballgown, protecting the train in the back and continuing as a simple ruffle for the front part of the skirt.
I had intended to use this dress mainly indoors, as the silk skirt is delicate and hard to clean, so the balayeuse wouldn’t have to be so heavy either. I used cotton organdy that I had in the stash, which might be a bit too lightweight but at least it does not make the skirt any heavier and looks fancy.
The back is cut with the same pattern as the train piece and gathered into a band that matches the gathered length of the join, and buttoned on at the band and sides. The hem is reinforced with a 3cm deep bias strip. The 10cm deep ruffle is edged with lace and pleated into 1cm deep knife pleats, then sewn on the top of the train piece. The edge is covered with self fabric bias tape, and the top of the rest of the peating is finished likewise with bias tape.
The ties for securing the balayeuse on the edge of the train are sewn under the ruffle heading. I worked corresponding loops on the train, and added the buttons at the gathering line and side seams.
The skirt seemed to work well and look good with the balayeuse on, which was a relief since with my Tissot-dress the balayeuse I had intended had totally ruined the skirt until I fixed it to become a petticoat extension instead. This meant that I could happily move on to add the skirt trimming.
Skirt
trimming
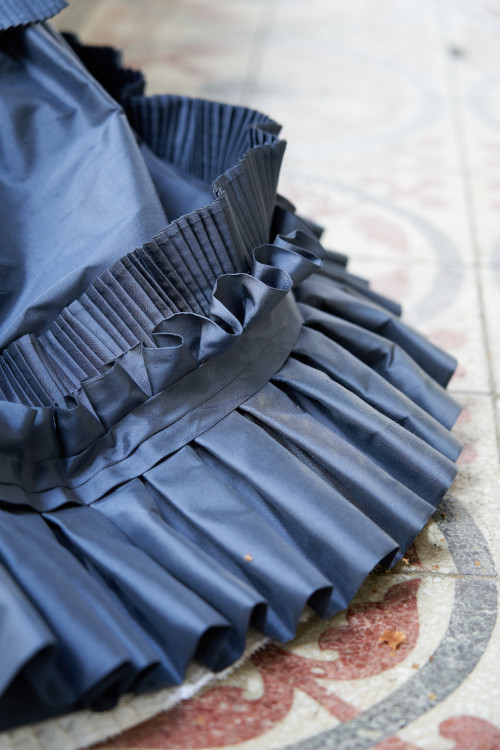
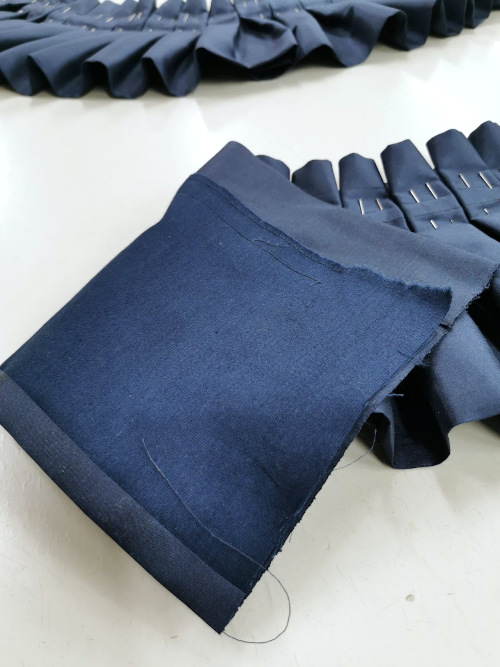
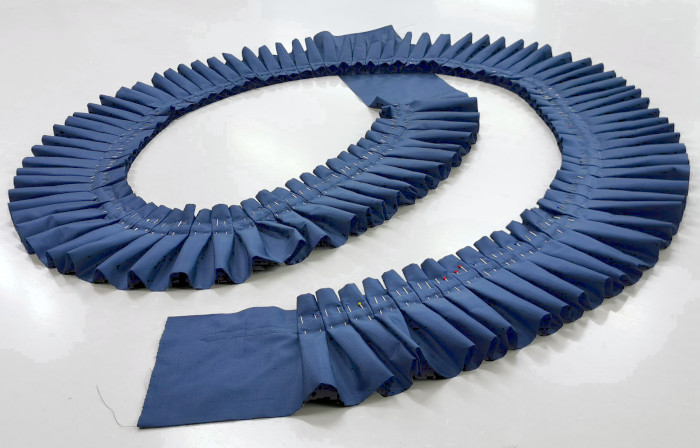
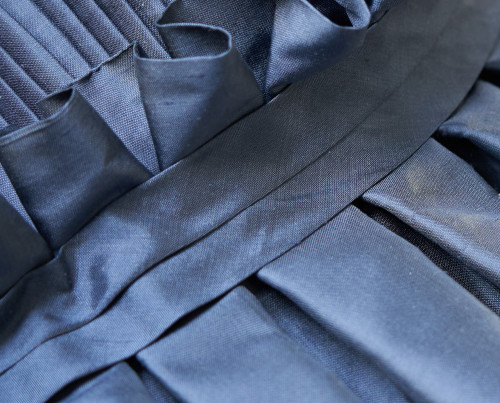
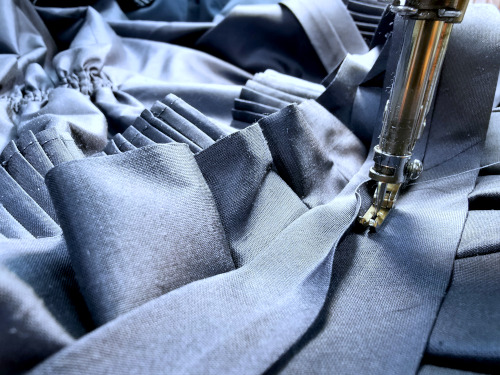
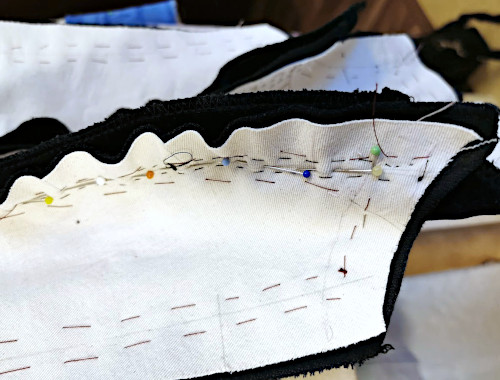
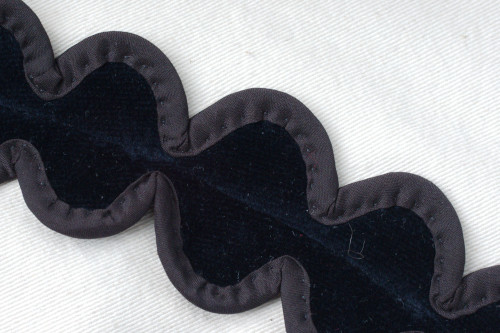
I made the 7,5cm deep kilting first, and sewed it on. The edge would get covered later with the larger box pleated ruffle.
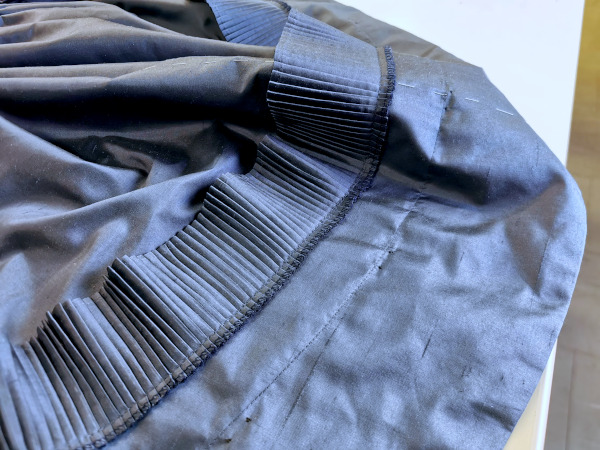
After careful calculation I had assured myself that I would have enough silk for the side-to-side placed box pleats that required three times the finished length of material. The 18cm deep ruffle would have a 3cm header. To save material I again used my old trick of lining the ruffle with cotton satin. The header has doubled silk but at the bottom edge the satin is joined to the silk about 1cm from the edge. This has worked very well for wider pleated pieces in the past and I really liked the result again this time: a thin cotton satin is about the same weight as the silk, but gives a bit of backing and keeps the silk from creasing so easily. Also the seam at the bottom edge with the seam allowance filling the fold stiffens the edge a bit and keeps it in shape.
I left the lining unfinished at the ends and then pinned the ruffle into 3cm box pleats. I stitched over them and then pinned the pleating in the skirt hem. I had prepared to do more or less adjusting at the join, but incredibly the pleats ended up perfectly even. All I had to do was to finish the join, pin the last pleats and sew them down.
I’m going to jump a little forward at this point (okay, a lot). As is my bad habit, I often procrastinate doing something I think is going to be difficult. In this case the only thing left to do in the skirt was to make some sort of bias tape, preferably folded to cover the stitching line of the ruffles. I even made a short test piece on another silk, but then put off making the real thing. My excuse, not entirely unfounded, was that I would calculate exactly the length and width of all the bias pieces I would need, piping and bows and all, and then cut them at the same time. And of course it would be safer to do it *later*.
But, anyway, when I finally had to make that bias thing, it turned out to be actually much easier and faster than I had thought.
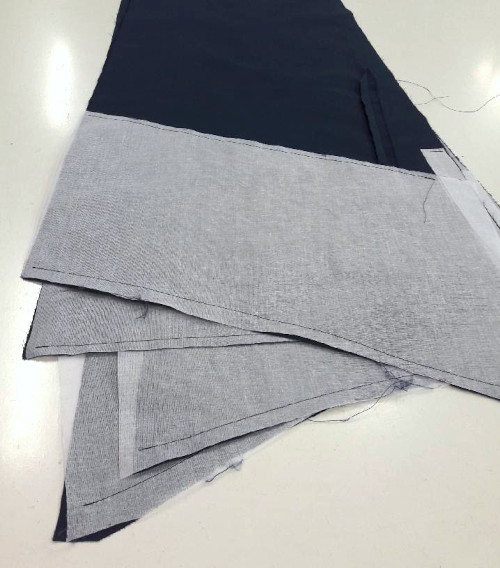
I had planned the bias tape to be 3cm wide, and had thought that I could use a single flat in an emergency, but of course it would look a little bleh. This museum piece had a nice wide double fold at the hem, and I thought I might try something similar but much narrower.
As the silk is so thin I decided to build the folding over an organdy strip in the finished width, cut in bias for flexibility. I made a few test versions using another silk and this is what I ended up with.
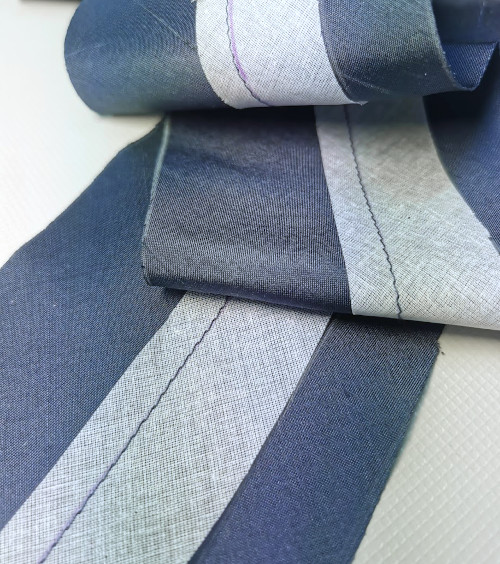
I cut an about 9,5cm wide bias piece of the silk. Then I sewed the organdy strip at 2,5cm distance from one edge of the silk, the stitch line at 9mm distance from the other edge of the strip.
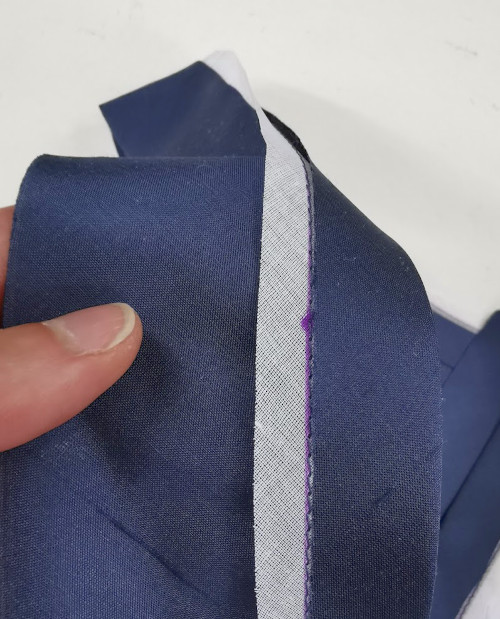
Then I folded and pressed the 2,5cm allowance to turn over the organdy strip edge. This now became the bottom edge.
On the right side I then folded and pressed the other edge to turn from the stitchline in the same direction (downwards), then back upwards again, then downwards to form a pleat 1,5cm from the edge. Then I folded and pressed the silk to turn over the lower edge on the wrong side. As the width of a bias strip never seems to be even no matter how carefully you cut it, I trimmed the turned under edges to 2cm at this point. I folded the edges so that the one facing towards the bottom edge became the top one, and less likely to peek out.
At this point I resorted to a modern hack: I slipped a 2 cm wide fusible tape under the edges and ironed over the wrong side to fix them to the organdy base. The allowances would technically be secured when sewing the folded bias tape in place, but this made life easier in the meanwhile. It was also a safe precaution as the overlap was not wide.
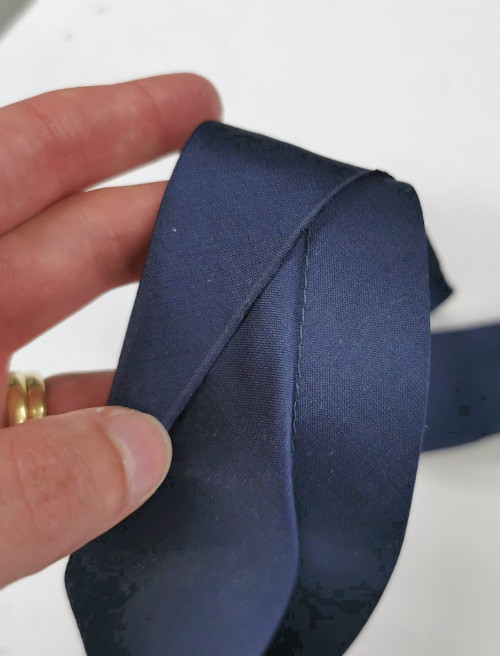
I pinned the finished tape in place and sewed it on, the stitchline very conveniently hidden under the pleat. The organdy base keeps it in shape and prevents the edges from folding over quite well, so I didn’t even have to whip stitch the edges down like I had been prepared to do. Sure, it’s not totally perfect and the silk pulls in some places, but it still looks pretty good. In the end making this piece of trimming was very easy and fast and I might definitely try the same technique again.
Making
the bodice
The bodice would, fully intentionally, be a lot more work.
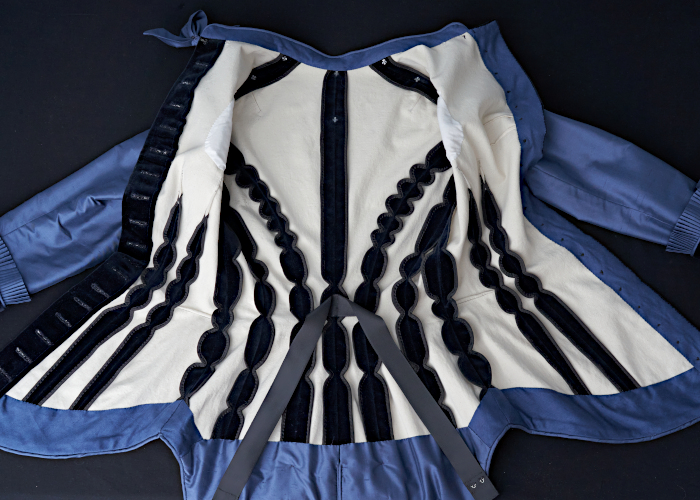
First I cut the cotton twill lining and marked pretty much everything I needed in it with pencil. At this point I also added the heavy padding to fill the hollow at the side of the bust and below the shoulder. I basted a generous amount of padding in several layers and then covered it with cotton batiste. It gave a nice, smooth line on the bodice, and also an impression of a bust I could only dream of in real life. I also sewed the horizontal bust darts.
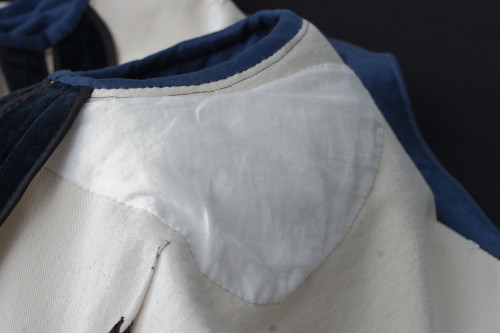
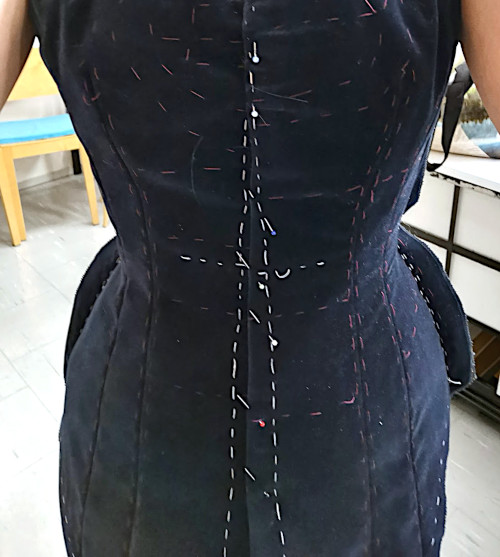
As the velvet tends to fray and cast a lot of mess around it I run all the edges in overlock immediately after cutting, even though I would trim and finish them differently later. Then I spend a lot of time basting the velvet on the twill lining. I also basted several marking lines and balance marks on a lighter thread so I wouldn’t get confused which was which. As the velvet is quite thick I made special care to bend the pieces as close to the finished shape as possible to make sure the lining would not end up too long or too short at the waist curve or shoulder.
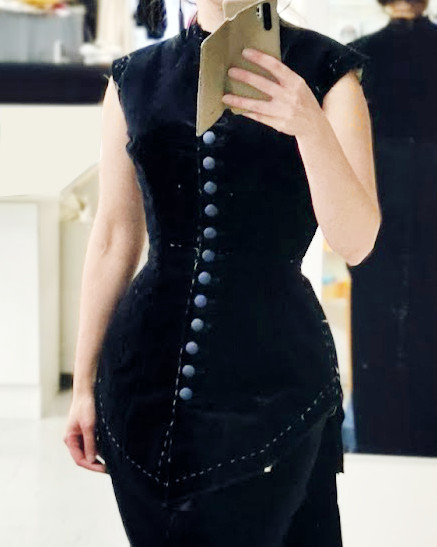
The fronts were the tricky part here: As I had mentioned earlier about the pattern drafting, the front edges were a challenge. I had daringly decided to make the horizontal bust dart in the lining (or two darts, actually, so as not to have a too sharp curve) and bravely try to ease the velvet over it. I basted many rows of gathering threads on short stitch, and somehow by gently pulling them little by little and carefully pressing the velvet over a velvet board I managed to get the velvet mounted down. There was of course some inevitable wrinkles but I had feared worse. I basted the bust are a lot to keep layers in shape while putting the bodice together.
As velvet can also be tricky to sew I basted all the bodice seams before sewing them. This made it go quite smoothly. Then I trimmed and scalloped the seam allowances. As mentioned before, velvet frays, so I whip stitched them before adding the bias binding. As usual, I finished only the back seams and front darts, and only basted the side- and shoulder seams for fitting.
Ah, that fitting… as you can see, the covid weight gain had finally got me, not to mention the Christmas time. In my defense, I had probably also underestimated the bulk the velvet overskirt would add. Happily at this point I still had a lot of extra allowance on the side seams, so it was easily fixed. I basted new seamlines and went forward.
I had originally planned the bodice with boning, but at this fitting I noticed that the fit was so smooth already that I might not need them after all. Velvet had a little stretch as well as the twill lining I used, so I could fit it rather tight without wrinkles at the waistline. At this point I still left the option open to be decided on the next proper fitting.
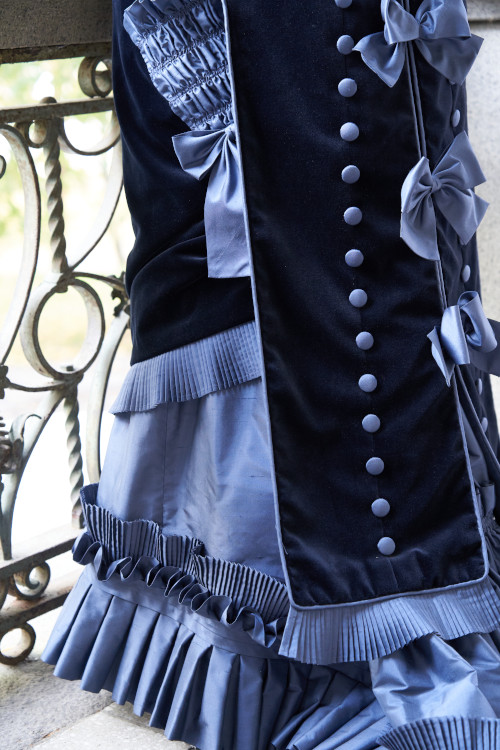
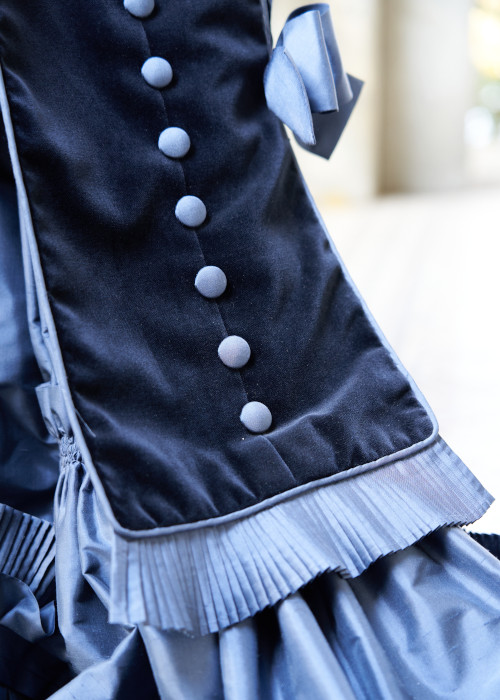
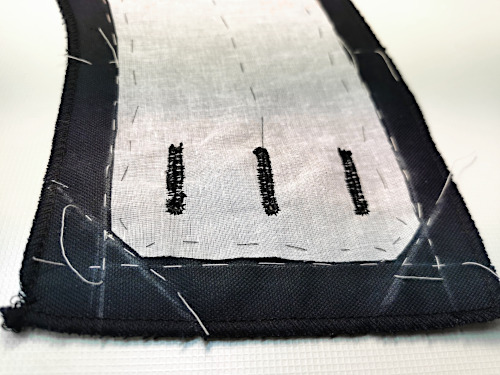
Then there were the buttonholes, a lot of them. Easiest to make at this point, so after fitting I usually take the basted side- and shoulder seams apart so I can work on just the separate right front. First I finished the front edge turned under with running overlock on the velvet edge and then turned it narrowly over the edge of the lining and secured with a machine stitch.
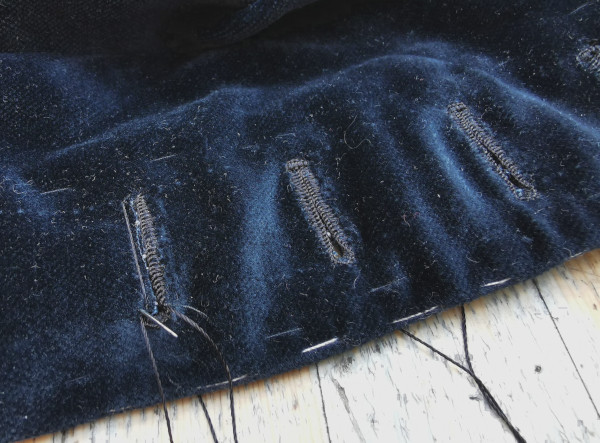
I marked the buttonhole places on the wrong side, then sewed a machine stitch along the lines to mark the places on the front side. Then I turned the front edge on the underside and stitched around the buttonholes with a short stitch to secure them before working them by hand. At this point I left the last few buttonholes at the bottom and top to be made only after finishing the hem and neckline, but it was useful to have the most in between done now for the later fittings.
Buttonholes on velvet - maddening at times, ditto dark top fabric and dark thread combined with light lining that tends to come out at places. By the way, I chose to use black thread because the dark blue I had in stash did not match and none of my local suppliers have buttonhole silk anymore, so it can be hard to find a matching one. Black is at least neutral with the dark navy.
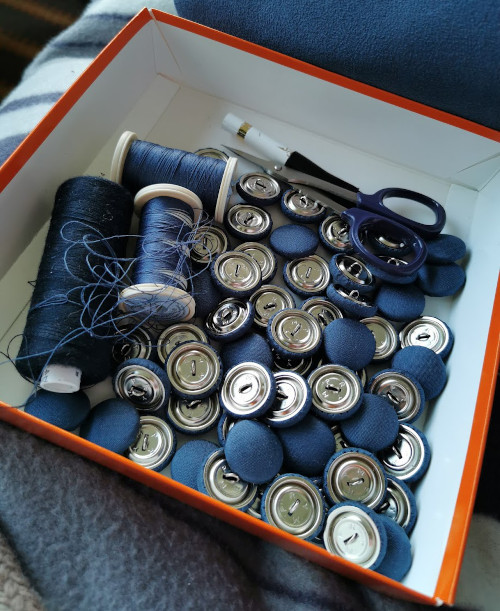
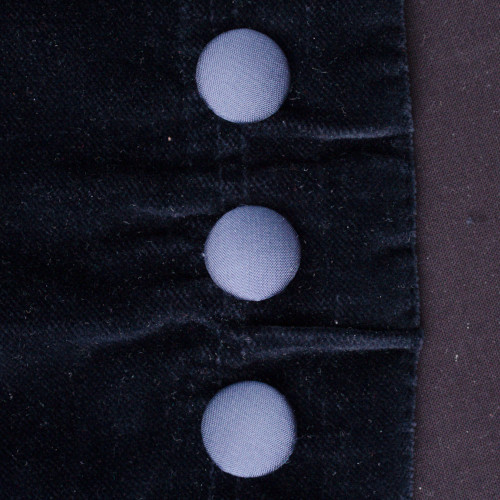
I also needed a ton of buttons (well, 65 to be exact). I used 19mm metal cover button parts and small silk scraps left from the cutting. I sewed a facing on the other front edge, leaving the top and bottom edges open again, and then sewed on the buttons for the finished buttonholes.
The next fitting with the best part of the buttoning finished looked promising. At this point a lot of time had passed with other projects in between, and I had managed to get rid of the few extra kilos, so I could alter the basted side seam lines just a bit smaller again (in optimistic expectation that my weight would stay the same). With tweaking the side seams to and fro I had also ended up with hemline not matching at the sides, and had to reshape it a bit otherways too and baste the new line.
I also decided to ditch the boning. I had already made the hook closure piece to support the buttoning, but there was not really need for it either - as I had already mentioned, the bodice materials had enough stretch to allow for a snug fit without putting too much strain on the buttons. After sewing the side seams for real and finishing the allowances I only needed to add a waistband. Then I could proceed on finishing the hem.
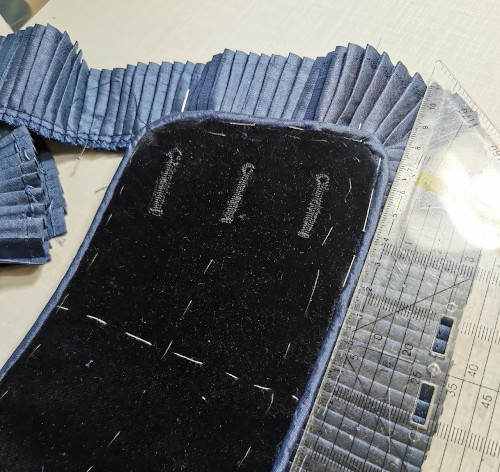
At this point I had to carefully calculate what to do with the rest of my silk. I had already cut the sleeves and reserved a piece for lining the bodice tails, but then there were the numerous bias pieces, some of which could have a lot of joins if needed and some that could not, namely the bows. I had cut the last of the other pieces from one edge so that I had a full width bias to utilize now, and with some planning managed to cut everything I needed and still have some left.
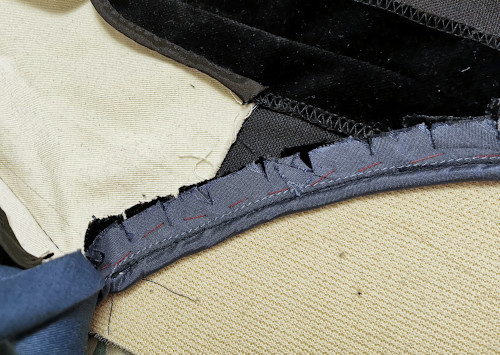
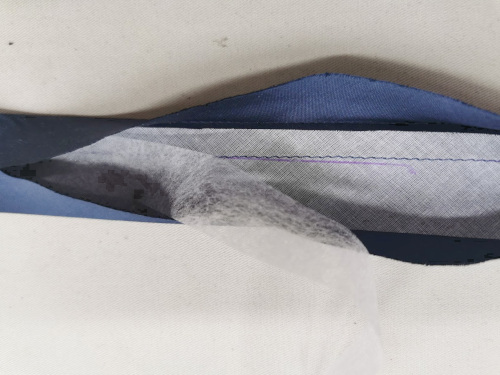
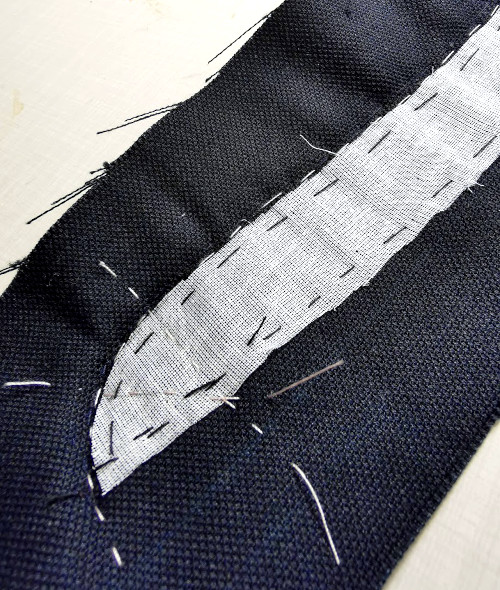
I had dabbled with piping in my dinner dress bodice, and it had went surprisingly smoothly, so I was unprepared for all the problems I encountered on this one. To begin with, it might be that no matter how precise I had tried to be, maybe my silk bias was not completely in true bias after all. Then the yarn I had used for piping before failed me: It was too thin to be used alone, but two layers didn’t settle neatly though they had inside the heavier top material of the dinner dress. I went panic shopping and found a thicker, soft cotton thread that I thought would work, but in the end I had problems with it too. And then there were the usual difficulties of the lovely combination of something with a nap and something thin and slippery.
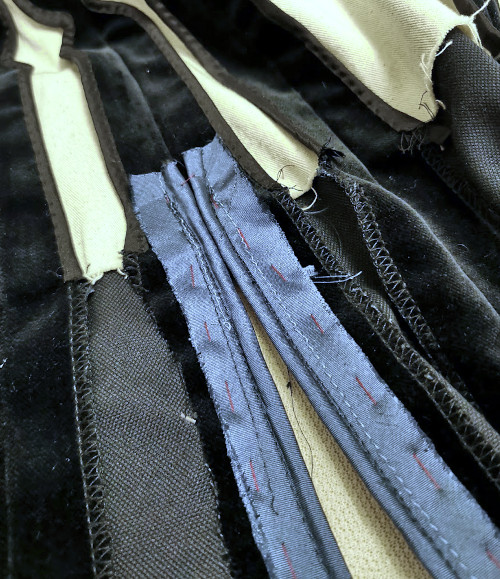
The front and sides backed with the cotton twill were not that bad with careful basting, but those tails were another matter. I had not interlined them, as I had thought the velvet backed with silk lining would have enough body to not look limp but not too stiff either. But now I found out that sewing a piping on velvet alone was a hopeless endeavor at least with my skill level. I pinned and basted the piping a billion times and still it was always either pulling the velvet shorter or curving out. At last I decided that it would have to do, sewed the piping on, added the kilted ruffle on the bottom edges, and then I was faced with the next difficulty: The velvet also simply refused to be lined with the silk.

I basted the lining on time and again, and it was always either too tight or too loose and together with the piping turned the tails wonky. At last I settled with just getting it done, basted a lot and then turned the edge under and slip stitched the silk on the piping edge. In fact, unpicked, pinned and basted again, and sewed again at places.
Yes, the finished thing looks bad. Happily at least the sides and front of the hem were much easier to finish with cotton satin facing. I also finished the bottom corners of front edges.
The bodice was now only missing a collar, which I had not even drafted, reasoning that it would be better to do when I had fitted the final shape of the neckline for real. And of course I had been lazy and left it for the last possible moment. Now I tried to be very careful in not fitting the neckline too tight, as the velvet collar with the ruffle added on the inside would be quite thick.
Many narrow standing collars in the period seem to be cut simply as a straight piece of material, but I persisted in wanting a bit of curve in the ends for a more snug fit. I cut the pattern shape in cotton organdy and basted it on a piece of velvet. Then I basted the piping on the edge, carefully cutting slits in the seam allowance to get a symmetrical curve at both ends. I sewed the piping on (with a few retakes), and then basted and sewed the collar on the neckline.
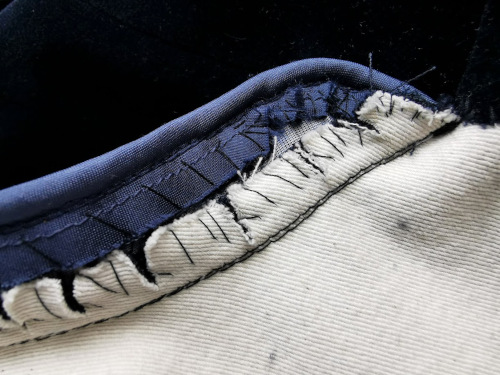
I finished the inside of the collar by first trimming and clipping the seam allowances and then whip stitching them down on the interlining. Then I added a lining of cotton satin and sewed it on with slip stitch. With the top- and bottom edge of the front edge now finished I could finally add the last buttonholes.
One more thing about that collar: I realized too late that I had been over-careful in not making it too tight, as it ended up being a bit loose instead. It definitely affects the look, which should be more snug, but on the other hand it’s at least comfortable to wear so I think I can live with it.
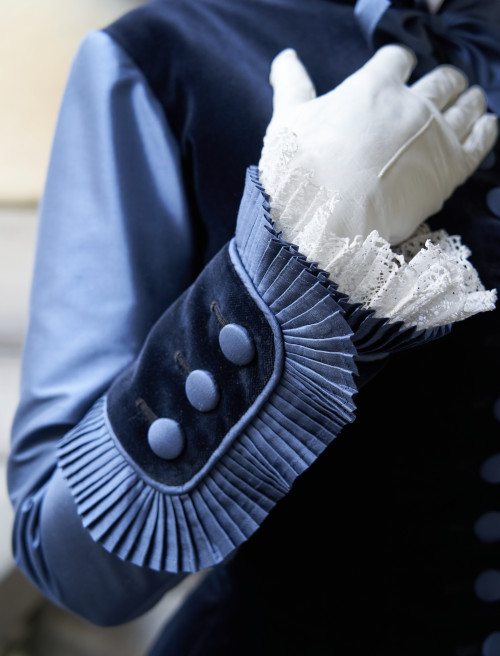
Sleeves
And of course there were the sleeves, which I had also been working on in the meanwhile. To save the precious silk I had cut the top fabric shorter at the sleeve ends because they would be lined with bedsheet cotton satin and covered with the heavy cuffs anyway. I joined the sleeve pieces, evened the top edge of the layers and basted the sleeve cap line and balance marks.
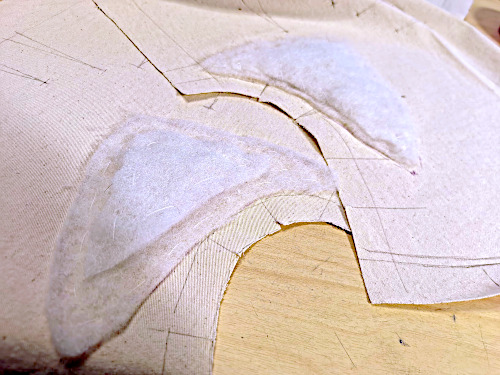
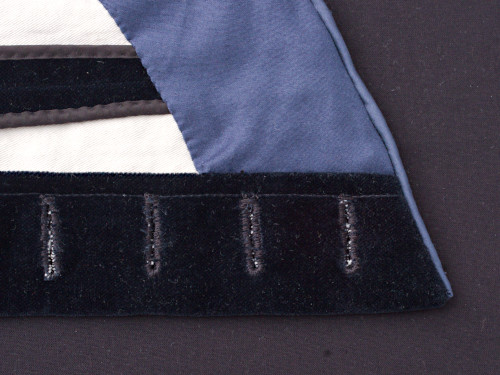
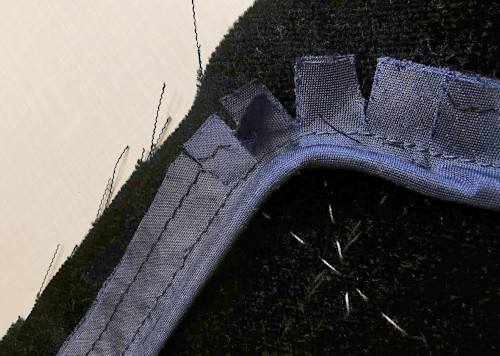
I had decided to interline the cuffs with cotton organdy (something that in retrospect I might have done with the bodice tails too). Besides giving some backing the interlining also neatly defined the edges. I basted it on the pieces and worked buttonholes on the top piece. Then I joined the seam and whip stitched the seam allowances on the interlining.
Getting the piping neat and symmetrical in the corners was a pain in the derriere, of course. Happily the cuffs would be edged with ruffles, so some unevenness in the width was not as glaringly obvious as it would have been against the velvet alone. Next I sewed the ruffles on, turned the seam allowances under and whip stitched them to the interlining. I had decided that the cuffs would not need a separate lining as the ruffles would disguise the underside possibly peeking out at top edge and the lower edge would be finished with the sleeve end edge turned under and slip stitched on the cuff.
Next I would sew the sleeves on the almost finished bodice. They had worked well in the mock up so I was optimistic, but once again my optimism crashed down with the realities of combining silk and velvet. To begin with, managing any extra fullness on densely woven material is tricky. I managed to get the sleeve head itself shaped pretty good on a dummy, but when I pinned it on the velvet bodice it looked fine for a second, then when I tried to even baste it in place it mysteriously always moved along with the nap. I battled with it (too) for what seemed like an eternity, then finally settled for good enough. Yes, to be honest I was pretty fed up at this point.
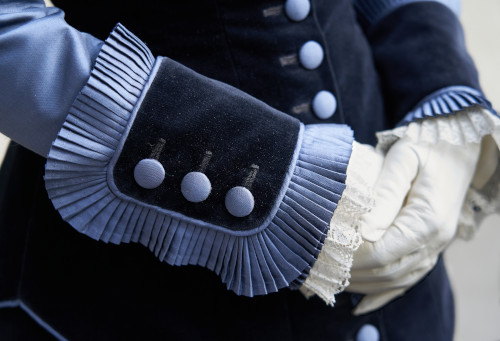
Normally I would have finished the sleeves as far as possible before sewing them on the bodice, but this time the cuffs were so heavy that I thought it would be easier to fit the sleeves without the cuffs weighing them down. Before attaching the cuffs I pinned them on and checked that the sleeve length was right. I also noticed that despite having drafted the cuff circumference longer than the sleeve they had ended up so thick that they were slightly short. Happily I had planned a wide overlap just in case, which came in useful now.
First I pinned the top of the cuff along the top seam of the sleeve, then followed around the sleeve. I also pinned the folded sleeve lining on the underside of the cuff. Then I sewed down the lower end, checked the placement for the buttons and sewed them on. Then I buttoned the cuffs and slip stitched the sleeve lining on. For further security I basted the top edge down with small stitches along the bias seam. Thus the buttoning is in theory real, but does not really work or have any practical function.
Finishing
touches
I had again left the fancy skirt pocket almost to the last. The good news was that I still had some silk left for it. I had planned roughly the shape and size I wanted, and now folded a mock up piece and pinned it on the overskirt. With the finished skirt and bodice I could see how it would fit over the overskirt pleats and get it exactly in the right place to be partly hidden by the bodice tails as in the fashion plate.
As for the construction I decided to make a doubled base of the cotton I had used for the skirt and then gather the silk over it. I cut the top edge folded and sewed the side seams and then stitched around it, leaving the bottom edge open. Then I cut a silk piece two times the width of the base, pressed 1cm seam allowances on the sides and 4,5cm wide heading (of which 1cm went to the seam allowance) on the top edge, and sewed sets of two gathering lines spaced 3,5cm apart.
Beginning from the top I pulled one gathering line at the time to the right length and sewed it on the base. On the bottom edge I left a 1cm allowance under the last gathering thread, sewed the layers together with overlock and turned them under.
I tried the dress on again, fiddled with the pocket placement until I was happy and pinned it on. I had to leave the topmost overskirt pleat under one size, but miraculously it sort of worked without pulling the overskirt out of shape. Then I sewed the side edges of the base on the overskirt by hand, and followed by tacking the silk to cover them, and lastly sewed the bottom edge. The pocket is then functional for small items like a handkerchief.
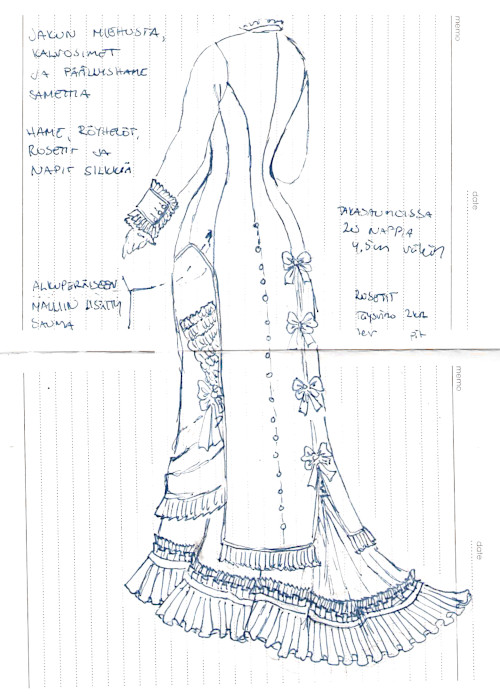
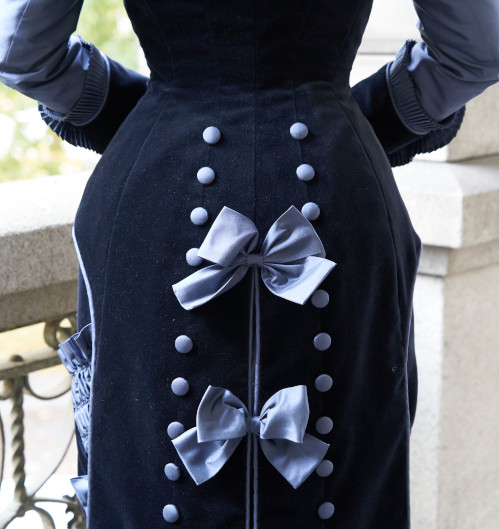
There were still a lot of buttons to sew on at the bodice tails. Already in the pattern drafting stage I had concluded that with the 19mm buttons I was using they would, to my eye, look best with 4,5cm spacing. Each side would then have a row of 20 buttons. It’s less than in the fashion plate, but as mentioned, my buttons are a bit larger and fashion plates of the era tend to favor a tall silhouette with body proportions that don’t always match those of the average person. Anyway, the good thing about the buttons was that they helped to secure the fiddly lining on the velvet.
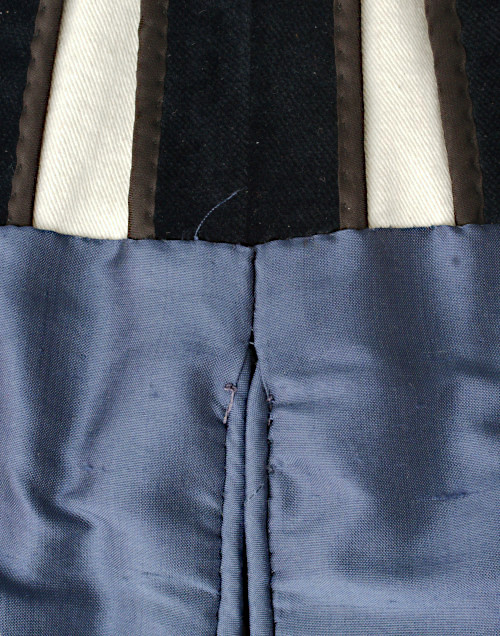
In the fittings I had also checked the placement for bows in the bodice tails. It had turned out that the skirt pulled the tails apart farther up than I had supposed, so I had to move the last join up and space the bows closer.
I sewed small thread bars to join the edges. I had made 6cm wide bow strips of doubled bias silk, and planned to make double looped bows as in the fashion plate, but when I had shaped the first few I realized that they looked way too oversized and heavy in this width. The quick fix was to make normal bows instead, which actually looked nice, but it meant that I had to shorten the bow strips. Hemming one edge again was not that bad but it was infuriating to think how much precious silk I might have saved by simply trying out one before cutting them all.
The reason I was so obsessed about saving silk, by the way, was that it might be a good idea to make another bodice for the really nice skirt. The only catch was that it would have to have tails too to cover the plain back of the skirt, unless of course I would manage to come up with some sort of detachable velvet piece to imitate the missing back overskirt. I still felt that velvet might be a be heavy for a ballgown, but might make a nice dinner dress - I even found some pictures of possible designs. But then the bodice would really have to include some details in silk to make a complete look. The bows in the back are just tacked it and can be easily borrowed, and some piping goes a long way, but we will see. My previous “I’ll make another bodice for this”-project, a ballgown bodice for the blue dinner dress is very much pushed to the bottom of the list too.
Neckline also got a bow (which I had planned to have a simple one from the start), and I finished the ruffled pocket with another bow with longer ends. And then the whole thing was finally finished.
I had been in a mad rush to finish it for the last few weeks, because we had already planned the photoshoot day and there was also the possibility of bad weather so we couldn’t leave it too late in the autumn. That maybe explains some of the angst, impatience and bad decisions I made towards the end. I actually sewed the last bows in place about 1:30 am on the photoshoot day.
Accessorizing
The original fashion plate was presented as a “House Dress”, but I reasoned that it could as well work as something of a visiting dress or a fancier day dress, in any case something to be worn outside a stately home where most costume events tend to take place. That meant that I also needed a pretty bonnet or hat for it, and making of it has its own post. It might have been smarter just to make a black one that would go with other outfits as well, but I couldn’t resist making a specific one for this dress. I also had a lot of navy blue trimming things in stash already, so I didn’t even have to purchase anything (save dye for the feathers).
I’m not very good with millinery, but I have to say that this one turned out very nice even to my own critical eye.
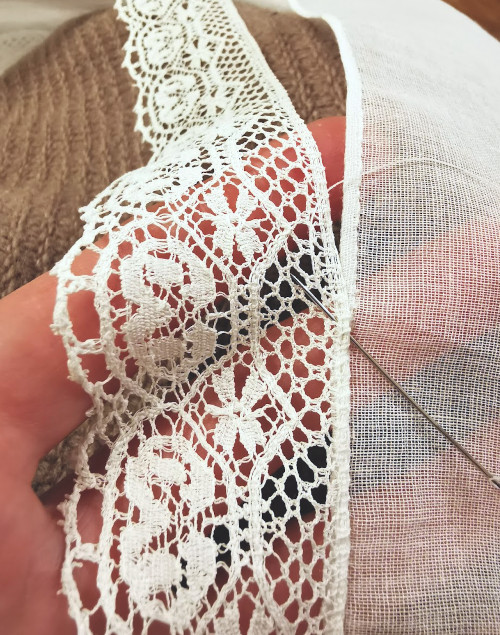
Then there were the necessary lace bits for the neck and sleeves. As this was a rather ambitious project I was mentally prepared to sacrifice some of my small and precious stash of antique lace. I did not have enough for a matching set, so I used a wider one for sleeves and a narrower one for neckline.
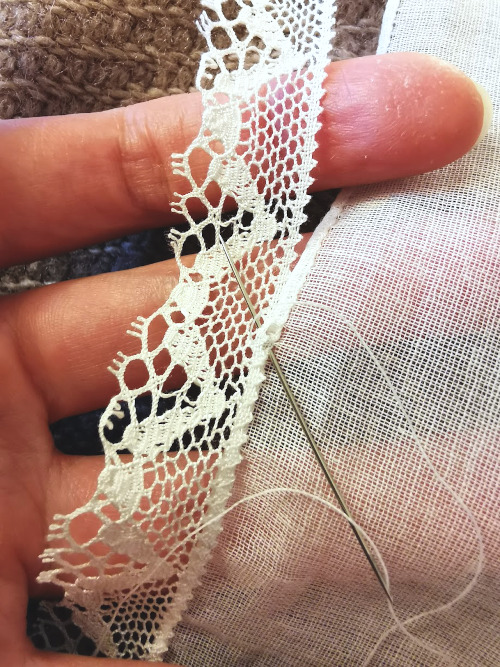
I used fine sheer cotton for both ruffles. I hemmed the material narrowly and then whip stitched the lace on it. The sleeve ruffles were then pleated and sewn into a band which was basted inside the sleeve.
I did not have a long enough piece of the lace I had planned for the neckline so the ruffle is only double the finished length (sleeve ruffles got three lengths). As the lace is narrow and doesn’t show that much it looks reasonably adequate.
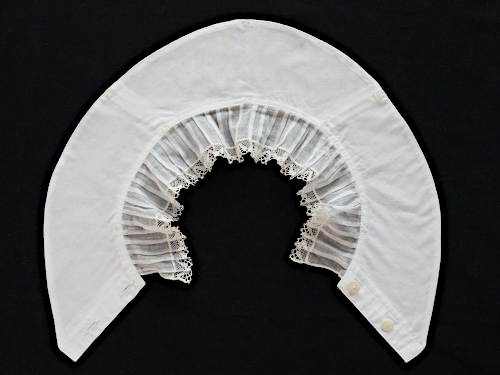
I thought it would be most practical to make a removable ruffle collar set in a short of tiny chemisette you can see in period illustrations. In those it looks like it has a single button on the front and that’s it, but I was a bit skeptical whether it would really stay securely in place like that. Well, it turned out that it didn’t, maybe my chosen material of doubled cotton batiste was too flimsy or whatever. I ended up sewing a lot of unseemly and not period accurate snap fasteners (because I didn’t trust hooks and eyes and did not have tiny flat buttons that might have worked at hand). I even used clear plastic ones instead of metal, because snap fasteners were incorrect in any case but at least those were less conspicuous.
I had of course planned the collar piece could be an addition to my wardrobe that could be used with other high necked dresses too, but as it had to be made to match the bit too large collar on this one it remains to be seen whether it will work with other garments. The sleeve ruffles also need roughly the same sleeve width and style that needs a wide and full ruffle. The thing with building a wardrobe (at least for a perfectionist like me) is that you need to be constantly making new accessories and even underwear to go with different styles of day and evening wear.
Conclusion
This dress was another big project for me, one that I had been planning for some time. The outcome is not 100% perfect, as things never are. Those unfortunate bodice tails (the *thing* of the design) have already been mentioned. Another thing that I realized from the pictures is that the irritating extra back length is there again, even though I tried to avoid it. I have to see further into this matter. Then again, now I can at least move my arms.
I also noticed that it looks like the bodice hem side curve has somehow ended up shorter on one side - I know I had to alter it at some point, but I have no idea anymore if I messed it up again either too short or too long, because I made it in such a hurry that I can’t even remember which side I fixed. Oh, well.
These reflections aside, I have to say that when I put the whole outfit on for the first time for the photoshoot I fell totally in love with it again despite the difficulties I had had towards the end. I feel really at home in it in almost an uncanny way, I love the colors, I even like the hat, and most of all I think it really has a period feeling to it. I’m really glad I used quality materials for once, though of course they are still far from the high end of what is available. For the 18th century the highlight of my wardrobe is naturally the light blue robe a lá francaise (even though the material there is totally inaccurate), and at the moment I feel this my best effort in Natural Form style so far.